
User Manual
Page 1
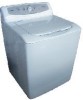
Haier Washing Machine USE & CARE GUIDE MODEL: HWMP95TL
Haier Washing Machine USE & CARE GUIDE MODEL: HWMP95TL
User Manual
Page 2
TABLE OF CONTENTS IMPORTANT SAFETY INSTRUCTIONS OPERATING INSTRUCTIONS Parts and Features Operating instructions PAGE 2, 3 4 4 5 CARE AND CLEANING GUIDE 7 Cleaning and Maintenance 7 Moving &Vacationing 8 TROUBLE SHOOTING INSTALLATION INSTRUCTIONS Tools and Materials Required UnpackingYourWasher LevellingYourWasher Steps for Installation ELECTRICAL REQUIREMENTS Power Interruptions SPECIFICATIONS 8 10 10 1 1 I I 12 14 14 Back Cover 1
TABLE OF CONTENTS IMPORTANT SAFETY INSTRUCTIONS OPERATING INSTRUCTIONS Parts and Features Operating instructions PAGE 2, 3 4 4 5 CARE AND CLEANING GUIDE 7 Cleaning and Maintenance 7 Moving &Vacationing 8 TROUBLE SHOOTING INSTALLATION INSTRUCTIONS Tools and Materials Required UnpackingYourWasher LevellingYourWasher Steps for Installation ELECTRICAL REQUIREMENTS Power Interruptions SPECIFICATIONS 8 10 10 1 1 I I 12 14 14 Back Cover 1

User Manual
Page 3
... user and care guide. 4. Children should only be properly installed in this appliance and keep them out of the reach of children. 5.This appliance must be done by pulling on the power cord. Repairs should be controlled, use in temperature.This refers to hot water entering the machine. Do not operate your appliance by authorised technician.. 9. Use only detergents or softeners recommended for their safety. IMPORTANT SAFETY INSTRUCTIONS...
... user and care guide. 4. Children should only be properly installed in this appliance and keep them out of the reach of children. 5.This appliance must be done by pulling on the power cord. Repairs should be controlled, use in temperature.This refers to hot water entering the machine. Do not operate your appliance by authorised technician.. 9. Use only detergents or softeners recommended for their safety. IMPORTANT SAFETY INSTRUCTIONS...
User Manual
Page 4
... not use this can only be used by an authorised technician. 22. Do not use this appliance unless all panels are stained, spotted or washed in gasoline, dry cleaning solvents or any flammable or explosive substances to electrical power source. 23. Do not try to remove clothes while the washer is kept free from obstacles. 24.Use the hoses provided. 3 Ensure washer is in operation. 17...
... not use this can only be used by an authorised technician. 22. Do not use this appliance unless all panels are stained, spotted or washed in gasoline, dry cleaning solvents or any flammable or explosive substances to electrical power source. 23. Do not try to remove clothes while the washer is kept free from obstacles. 24.Use the hoses provided. 3 Ensure washer is in operation. 17...
User Manual
Page 5
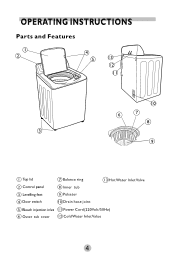
OPERATING INSTRUCTIONS Parts and Features i 4 5 3 i © I (DI Top lid ICD Control panel ©Balance ring (Dinner tub OHotWater InletValve ® Levelling feet ()Pulsator ® Door switch @Drain hose joint 0 Bleach injection inlet Power Cord(220Volt/50Hz) 0 Outer tub cover @ Cold Water InletValue 4
OPERATING INSTRUCTIONS Parts and Features i 4 5 3 i © I (DI Top lid ICD Control panel ©Balance ring (Dinner tub OHotWater InletValve ® Levelling feet ()Pulsator ® Door switch @Drain hose joint 0 Bleach injection inlet Power Cord(220Volt/50Hz) 0 Outer tub cover @ Cold Water InletValue 4
User Manual
Page 6
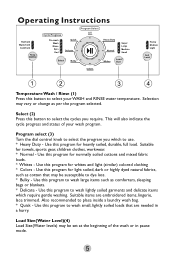
... normally soiled cottons and mixed fabric loads. * Whites - Suitable items are needed in pause mode. Load Size(Water Level)(4) Load Size(Water levels) may be set at the beginning of your WASH and RINSE water temperature. Selection may vary or change as cotton that are embroidered items, lingerie, lace trimmed. Use this program to wash large items such as comforters, sleeping bags or blankets. * Delicate - Use this program for light soiled, dark or highly...
... normally soiled cottons and mixed fabric loads. * Whites - Suitable items are needed in pause mode. Load Size(Water Level)(4) Load Size(Water levels) may be set at the beginning of your WASH and RINSE water temperature. Selection may vary or change as cotton that are embroidered items, lingerie, lace trimmed. Use this program to wash large items such as comforters, sleeping bags or blankets. * Delicate - Use this program for light soiled, dark or highly...

User Manual
Page 7
... items in the water. * Close the lid after loading the laundry. Loading the Washer: When loading the clothes into your laundry. Soil Level (5) Press this button to select the soil level of your washing machine, there are 3 levels to stop. Everyday soiled clothes * Light - Function automatically is inactive when water reaches the overflow protection level. During Pre-wash,Wash or Rinse, press this option to manually replenish water. Lightly soiled clothes Each dirtier wash level will not start. 6 There are...
... items in the water. * Close the lid after loading the laundry. Loading the Washer: When loading the clothes into your laundry. Soil Level (5) Press this button to select the soil level of your washing machine, there are 3 levels to stop. Everyday soiled clothes * Light - Function automatically is inactive when water reaches the overflow protection level. During Pre-wash,Wash or Rinse, press this option to manually replenish water. Lightly soiled clothes Each dirtier wash level will not start. 6 There are...
User Manual
Page 8
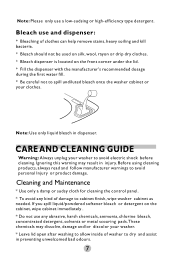
... liquid/powdered softener bleach or detergent on the front corner under the lid. * Fill the dispenser with the manufacturer's recommended dosage during the first water fill. * Be careful not to spill undiluted bleach onto the washer cabinet or your clothes. ) Note: Use only liquid bleach in dispenser. CARE AND CLEANING GUIDE Warning: Always unplug your washer. * Leave lid open after washing to allow inside of damage to cabinet finish, wipe washer cabinet as needed. Cleaning and Maintenance * Use...
... liquid/powdered softener bleach or detergent on the front corner under the lid. * Fill the dispenser with the manufacturer's recommended dosage during the first water fill. * Be careful not to spill undiluted bleach onto the washer cabinet or your clothes. ) Note: Use only liquid bleach in dispenser. CARE AND CLEANING GUIDE Warning: Always unplug your washer. * Leave lid open after washing to allow inside of damage to cabinet finish, wipe washer cabinet as needed. Cleaning and Maintenance * Use...
User Manual
Page 9
.... 8 TROUBLE SHOOTING If washer does not operate: * Check the unit is plugged in.The plug may have come loose. * Check if the electrical wall receptacle is of time.You will start automatically. Straighten out hoses. Moving &Vacationing *Turn off water supply at the faucet and disconnect hoses. Problems with water: * Not enough water coming out:Water faucet may be completely turned on. Drain water from all hoses. * Disconnect electrical plug. * Dry inner wash tub.If moving washer disconnect drain hose. *Turn the leveling legs...
.... 8 TROUBLE SHOOTING If washer does not operate: * Check the unit is plugged in.The plug may have come loose. * Check if the electrical wall receptacle is of time.You will start automatically. Straighten out hoses. Moving &Vacationing *Turn off water supply at the faucet and disconnect hoses. Problems with water: * Not enough water coming out:Water faucet may be completely turned on. Drain water from all hoses. * Disconnect electrical plug. * Dry inner wash tub.If moving washer disconnect drain hose. *Turn the leveling legs...
User Manual
Page 10
... change, buttons or other heavy objects could create noise related sounds. * Squealing sound: Due to overloaded wash tub. *Vibration Noise: may be due to not installing your water heater temperature.Hot water needs to make sure that top of drain outlet is less than 5 ft. (I .5 m) above the floor. *Water temperature is incorrect: Check your drain hose correctly. Normal Operating Sounds * The following sounds are continuously being lossed around. * Air rushing noise:This happens when the washer tub spins at...
... change, buttons or other heavy objects could create noise related sounds. * Squealing sound: Due to overloaded wash tub. *Vibration Noise: may be due to not installing your water heater temperature.Hot water needs to make sure that top of drain outlet is less than 5 ft. (I .5 m) above the floor. *Water temperature is incorrect: Check your drain hose correctly. Normal Operating Sounds * The following sounds are continuously being lossed around. * Air rushing noise:This happens when the washer tub spins at...
User Manual
Page 11
... using undiluted bleach. Check if you with the installation of fabric softener. Call service. Refer to manufacturers instructions on your load.Wash in cooler water. * Soap residue: detergent may be dissolved in water. * Check water temperature, add detergent as wash tub is out of draining is too slow. Please open the lid and rebalance the load. The water level sensor fault - Avoid overloading and resort your clothes:this is due to wash. LED Display Notes: Trouble Codes Rinse and spin indicators flash All process indicators flash All water level indicators flash...
... using undiluted bleach. Check if you with the installation of fabric softener. Call service. Refer to manufacturers instructions on your load.Wash in cooler water. * Soap residue: detergent may be dissolved in water. * Check water temperature, add detergent as wash tub is out of draining is too slow. Please open the lid and rebalance the load. The water level sensor fault - Avoid overloading and resort your clothes:this is due to wash. LED Display Notes: Trouble Codes Rinse and spin indicators flash All process indicators flash All water level indicators flash...
User Manual
Page 12
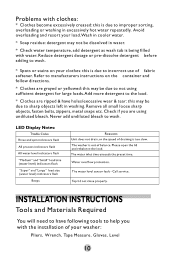
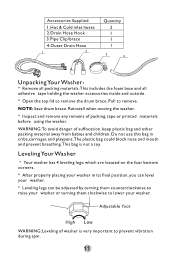
Accessories Supplied I .Hot & Cold inlet hoses 2.Drain Hose Hook 3.Pipe Clip/brace 4.Outer Drain Hose Quantity 2 I I I UnpackingYourWasher: * Remove all packing materials.This includes the foam base and all adhesive tape holding the washer accessories inside and outside. * Open the top lid to remove. which are located on the four bottom corners. * After properly placing your washer. Reinstall when moving the washer. * Inspect and remove any remains of suffocation...
Accessories Supplied I .Hot & Cold inlet hoses 2.Drain Hose Hook 3.Pipe Clip/brace 4.Outer Drain Hose Quantity 2 I I I UnpackingYourWasher: * Remove all packing materials.This includes the foam base and all adhesive tape holding the washer accessories inside and outside. * Open the top lid to remove. which are located on the four bottom corners. * After properly placing your washer. Reinstall when moving the washer. * Inspect and remove any remains of suffocation...
User Manual
Page 13
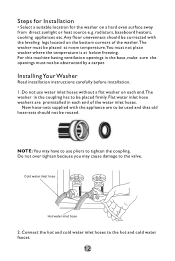
... leveling legs located on the bottom corners of the water inlet hoses. Connect the hot and cold water inlet hoses to the valve. Flat water inlet hose washers are to tighten the coupling. Cold water inlet hose 0 Hot water inlet hose 2. Steps for Installation • Select a suitable location for the washer on each end.The washer in each end of the washer.The washer must be placed at below freezing. Do not over tighten because you may have to use water inlet hoses...
... leveling legs located on the bottom corners of the water inlet hoses. Connect the hot and cold water inlet hoses to the valve. Flat water inlet hose washers are to tighten the coupling. Cold water inlet hose 0 Hot water inlet hose 2. Steps for Installation • Select a suitable location for the washer on each end.The washer in each end of the washer.The washer must be placed at below freezing. Do not over tighten because you may have to use water inlet hoses...

User Manual
Page 14
Water Inlet Goose Neck Water Supply Hose Hose Bend Drain Hose 13
Water Inlet Goose Neck Water Supply Hose Hose Bend Drain Hose 13

User Manual
Page 15
... extension cord. Wiring Requirements: The washer must be plugged into an outlet that is damaged, it again. 14 If the supply cord is properly installed and grounded. Remove the power cord from AC outlet when a power outage occurs.When power has been restored re-plug power cord to AC outlet.If outage is for a prolonged period, clean washer before using it must be replaced by the manufacturer, its service...
... extension cord. Wiring Requirements: The washer must be plugged into an outlet that is damaged, it again. 14 If the supply cord is properly installed and grounded. Remove the power cord from AC outlet when a power outage occurs.When power has been restored re-plug power cord to AC outlet.If outage is for a prolonged period, clean washer before using it must be replaced by the manufacturer, its service...
User Manual
Page 16
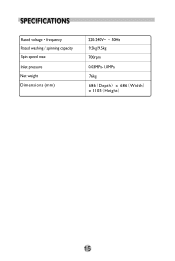
I .OMPa 76kg 686 (Depth) x 686 (Width) x 1 105 (Height) 15 SPECIFICATIONS Rated voltage • frequency Rated washing / spinning capacity Spin speed max Inlet pressure Net weight Dimensions (mm) 220-240V- • 50Hz 9.5kg/9.5kg 700rpm 0.03MPa-
I .OMPa 76kg 686 (Depth) x 686 (Width) x 1 105 (Height) 15 SPECIFICATIONS Rated voltage • frequency Rated washing / spinning capacity Spin speed max Inlet pressure Net weight Dimensions (mm) 220-240V- • 50Hz 9.5kg/9.5kg 700rpm 0.03MPa-


