
User Manual
Page 1
Retain it for HWM60-10 Please read this manual carefully before using. Fully Automatic Washing Machine User's manual User's manual This manual is for future reference.
Retain it for HWM60-10 Please read this manual carefully before using. Fully Automatic Washing Machine User's manual User's manual This manual is for future reference.

User Manual
Page 2
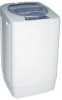
Contents Specifications the 2nd cover Names of the parts 1 Safety precautions 2 Installation and adjustment 4 Preparation before washing 8 Put in the laundries 9 Usage of the detergent 9 Use the operation buttons 10 Close the top lid 13 Finish washing ...13 Disposal after washing 14 Trouble shooting Answer to question 15 Packing list ...16 Specification Water level/Water quantity (about) High/About 48 L Medium/About 37L Low/About 30L Very low/About 20L Water inlet pressure 0.03MPa-1MPa Rated washing / spinning capacity 6.0kg/6.0kg
Contents Specifications the 2nd cover Names of the parts 1 Safety precautions 2 Installation and adjustment 4 Preparation before washing 8 Put in the laundries 9 Usage of the detergent 9 Use the operation buttons 10 Close the top lid 13 Finish washing ...13 Disposal after washing 14 Trouble shooting Answer to question 15 Packing list ...16 Specification Water level/Water quantity (about) High/About 48 L Medium/About 37L Low/About 30L Very low/About 20L Water inlet pressure 0.03MPa-1MPa Rated washing / spinning capacity 6.0kg/6.0kg
User Manual
Page 3
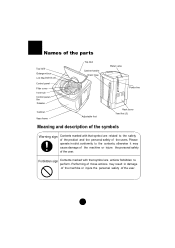
... the par ts Top lid B Detergent box Lint filter(Installed by user) Control panel Filter cover Inner tub Control panel film Pulsator Cabinet ase frame Top lid A Cabinet handle Drain hose Water valve Power line Adjustable foot ack cover fixed foot (3) Meaning and description of the symbols Warning sign Contents marked with that symbol are actions forbidden to perform. Please operate in damage of the machine or injure the personal safety...
... the par ts Top lid B Detergent box Lint filter(Installed by user) Control panel Filter cover Inner tub Control panel film Pulsator Cabinet ase frame Top lid A Cabinet handle Drain hose Water valve Power line Adjustable foot ack cover fixed foot (3) Meaning and description of the symbols Warning sign Contents marked with that symbol are actions forbidden to perform. Please operate in damage of the machine or injure the personal safety...
User Manual
Page 4
... the washing machine runs normally. The power cord plug should be pluged in spinning. the bathroom. Be sure to be convenient to pull the plug out and close the water tap when the machine is installed on ground with carpet, do not use water hotter above 50 C . Do not press or nip it with rated voltage. If the power cord or the power plug is bad, or the power plug becomes...
... the washing machine runs normally. The power cord plug should be pluged in spinning. the bathroom. Be sure to be convenient to pull the plug out and close the water tap when the machine is installed on ground with carpet, do not use water hotter above 50 C . Do not press or nip it with rated voltage. If the power cord or the power plug is bad, or the power plug becomes...
User Manual
Page 5
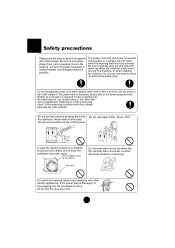
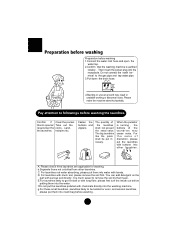
... use foamless washing powder. 3 Please check if the water faucet is open, and if the connection of our company. Do not decompose, repair or alter the machine by yourself. Keep the machine away from direct sunlight and heat source like the heater. If the lint filter is suggested to proper position. Safety precautions Do not stretch hands into the working machine. Do not wash laundries...
... use foamless washing powder. 3 Please check if the water faucet is open, and if the connection of our company. Do not decompose, repair or alter the machine by yourself. Keep the machine away from direct sunlight and heat source like the heater. If the lint filter is suggested to proper position. Safety precautions Do not stretch hands into the working machine. Do not wash laundries...
User Manual
Page 6
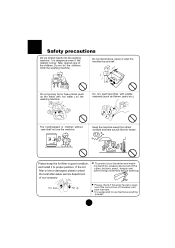
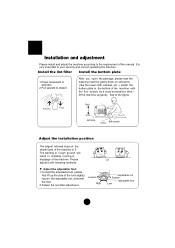
... washing machine gently down Put up Back Front Soft items Screw Bottom plate Adjust the installation position The largest allowed slope of the shank base of the machine is very important to your security and correct operating the machine. Please adjust it with the five screws by a cross screwdriver, then l ift the machine up gently. Install the lint filter Install...
... washing machine gently down Put up Back Front Soft items Screw Bottom plate Adjust the installation position The largest allowed slope of the shank base of the machine is very important to your security and correct operating the machine. Please adjust it with the five screws by a cross screwdriver, then l ift the machine up gently. Install the lint filter Install...

User Manual
Page 7
... Figure 4). How to change the direction of the drain hose 1.Loosen the fastening screw of the back cover to take off the drain hose hook Lower bread Figure 4 Usage of the drain hose The drain hose shall drain smoothly 1.The height of the drain hose shall be smooth, and cost such long time that the machine may stop at mid If the extra hose is needed, please make smooth drainage...
... Figure 4). How to change the direction of the drain hose 1.Loosen the fastening screw of the back cover to take off the drain hose hook Lower bread Figure 4 Usage of the drain hose The drain hose shall drain smoothly 1.The height of the drain hose shall be smooth, and cost such long time that the machine may stop at mid If the extra hose is needed, please make smooth drainage...

User Manual
Page 8
...twisting Figure 4 Nut Figure 5 Figure 6 6 See to the water faucet. Connection between the water inlet hose jointer and the water tap 1.Use the new water inlet hose provided with the machine to connect to Figure 5. Put the jointer of the lock lever and push down the slider. The outlet end surface of the...figure. See to Figure 6. See to Figure 1. 3.Loosen the screw till the water tap can not be set on the tap. Install the water inlet hose Confirm the water tap Water tap,suitable Outlet end surface Water tap,not suitable >10mm It is too large and the jointer can be accessed....
...twisting Figure 4 Nut Figure 5 Figure 6 6 See to the water faucet. Connection between the water inlet hose jointer and the water tap 1.Use the new water inlet hose provided with the machine to connect to Figure 5. Put the jointer of the lock lever and push down the slider. The outlet end surface of the...figure. See to Figure 6. See to Figure 1. 3.Loosen the screw till the water tap can not be set on the tap. Install the water inlet hose Confirm the water tap Water tap,suitable Outlet end surface Water tap,not suitable >10mm It is too large and the jointer can be accessed....

User Manual
Page 9
... is heard. Jointer of the water inlet valve Connection between the water inlet hose and the washing machine 1.Do not take off the water inlet hose. Push down the water inlet hose 1.Close the water tap. 2.Press the locking lever. Insert the water inlet hose into the jointer. 2.Hang the lock lever to check if it is used more than once every week, the jointer of the water inlet hose can be kept on the...
... is heard. Jointer of the water inlet valve Connection between the water inlet hose and the washing machine 1.Do not take off the water inlet hose. Push down the water inlet hose 1.Close the water tap. 2.Press the locking lever. Insert the water inlet hose into the jointer. 2.Hang the lock lever to check if it is used more than once every week, the jointer of the water inlet hose can be kept on the...
User Manual
Page 10
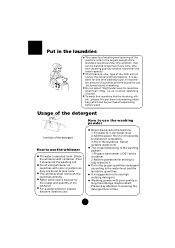
... add detergent on the part with chemicals directly into the washing machine. The big laundries like the jeans shall be twisted or worn, and woolen laundries, please put them into the receptacle. C. For laundries with long fiber, please first turn the inside out before putting them into water with buttons into mesh bag before washing the laundries Confirm if Clear the pocket. Then insert the power plug...
... add detergent on the part with chemicals directly into the washing machine. The big laundries like the jeans shall be twisted or worn, and woolen laundries, please put them into the receptacle. C. For laundries with long fiber, please first turn the inside out before putting them into water with buttons into mesh bag before washing the laundries Confirm if Clear the pocket. Then insert the power plug...
User Manual
Page 11
... water. Run for the usage and quantity of the cloth will influence the actual washing capacity. Pour it completely. 3.Put in the machine 1.Fill water to use . It is suitable for one time washing to the user's manual for 30 seconds to fully dissolve it before wash. Washing powder with container. Put in time 9 Please pay attention to cleaning the detergent box in the proper quantities detergent according to decided level. Usage...
... water. Run for the usage and quantity of the cloth will influence the actual washing capacity. Pour it completely. 3.Put in the machine 1.Fill water to use . It is suitable for one time washing to the user's manual for 30 seconds to fully dissolve it before wash. Washing powder with container. Put in time 9 Please pay attention to cleaning the detergent box in the proper quantities detergent according to decided level. Usage...
User Manual
Page 12
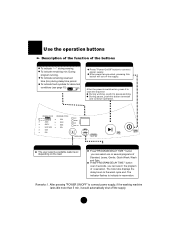
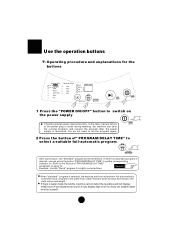
... power is switched on the load. PROGRAM STATUS STANDARD JEANS GENTLE QUICK WASH WASH SPIN PROCEDURE STATUS SOAK WASH RINSE SPIN WATER LEVEL PROGRAM DELAY TIME START PAUSE POWER ON/OFF " WATER LEVEL"button The user selects a suitable water level depending on , press it to restart and continue operation. During program running. Press"PROGRAM/DELAY TIME " button over 2 seconds, you can select the program of reservation. The nixie tube displays the delay hours to pause working. "START/PAUSE"button...
... power is switched on the load. PROGRAM STATUS STANDARD JEANS GENTLE QUICK WASH WASH SPIN PROCEDURE STATUS SOAK WASH RINSE SPIN WATER LEVEL PROGRAM DELAY TIME START PAUSE POWER ON/OFF " WATER LEVEL"button The user selects a suitable water level depending on , press it to restart and continue operation. During program running. Press"PROGRAM/DELAY TIME " button over 2 seconds, you can select the program of reservation. The nixie tube displays the delay hours to pause working. "START/PAUSE"button...
User Manual
Page 13
... wet laundries are put in,it may display high level.You must set the program again. 2 Press the button of" PROGRAM/DELAY TIME" to select a suitable full-automatic program PROGRAM DELAY TIME After switching on . Operating procedure and explanations for slightly soiled articles. Page 10 Example: Use the "Quick" program for the buttons PROGRAM STATUS STANDARD JEANS GENTLE QUICK WASH WASH SPIN PROCEDURE STATUS SOAK WASH RINSE SPIN WATER LEVEL PROGRAM DELAY TIME START PAUSE POWER...
... wet laundries are put in,it may display high level.You must set the program again. 2 Press the button of" PROGRAM/DELAY TIME" to select a suitable full-automatic program PROGRAM DELAY TIME After switching on . Operating procedure and explanations for slightly soiled articles. Page 10 Example: Use the "Quick" program for the buttons PROGRAM STATUS STANDARD JEANS GENTLE QUICK WASH WASH SPIN PROCEDURE STATUS SOAK WASH RINSE SPIN WATER LEVEL PROGRAM DELAY TIME START PAUSE POWER...
User Manual
Page 14
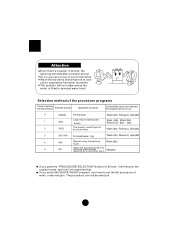
... load below 1 kg Wash (bb) Rinse(cc) Spin(dd) 4 WASH Repeat using the washing liquid Wash (bb) When the laundries need only 5 SPIN spinning after a certain period. The procedure can not be selected. 12 If you select the"QUICK WASH" program, you push the "PROCEDURE SELECTION" button for woolen laundries. Do not use soak process for 6 times, it will resume the original mode, and it will not rotate unless the water...
... load below 1 kg Wash (bb) Rinse(cc) Spin(dd) 4 WASH Repeat using the washing liquid Wash (bb) When the laundries need only 5 SPIN spinning after a certain period. The procedure can not be selected. 12 If you select the"QUICK WASH" program, you push the "PROCEDURE SELECTION" button for woolen laundries. Do not use soak process for 6 times, it will resume the original mode, and it will not rotate unless the water...
User Manual
Page 15
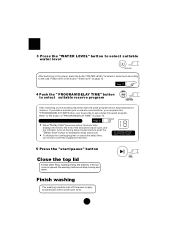
... the load. the washing will finish about 18 hours later 5 Press the "start/pause" button Close the top lid Except water filling ,washing,rinsing and draining, if the top cover is opened, the washing machine will be automatically set a delay time wash program. Finish washing The washing machine cuts off the supply and reselect. If you desire a wash cycle to select suitable reserve program PROGRAM DELAY TIME After switching on page 10. START PAUSE START...
... the load. the washing will finish about 18 hours later 5 Press the "start/pause" button Close the top lid Except water filling ,washing,rinsing and draining, if the top cover is opened, the washing machine will be automatically set a delay time wash program. Finish washing The washing machine cuts off the supply and reselect. If you desire a wash cycle to select suitable reserve program PROGRAM DELAY TIME After switching on page 10. START PAUSE START...

User Manual
Page 16
... in the washing machine for a long period. in time. Do not wipe it may influence your using , please clean the lint and foreign materials of the water inlet valve is still wet. (See to pull off the power plug from the receptacle before maintenance. 4.Hang up Figure 2 The filter screen of the lint filter etc. Disposal after each using , please clean it directly with neutral detergent. Lint filter: 1.Pull...
... in the washing machine for a long period. in time. Do not wipe it may influence your using , please clean the lint and foreign materials of the water inlet valve is still wet. (See to pull off the power plug from the receptacle before maintenance. 4.Hang up Figure 2 The filter screen of the lint filter etc. Disposal after each using , please clean it directly with neutral detergent. Lint filter: 1.Pull...
User Manual
Page 17
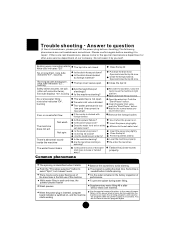
... the machine. Open the water tap. Close the top lid Put the laundries orderly. While water filling in wash and rinse, the pulsator pauses rotation Wash pauses When the power plug is inserted, computer board indicator is recovered. It is setting the drain time. Is the machine slanting? How to set water level? Close the top lid.Level the machine in spinning? Push the "Start/Pause" button. Remove the foreign bodies Use it when the power is...
... the machine. Open the water tap. Close the top lid Put the laundries orderly. While water filling in wash and rinse, the pulsator pauses rotation Wash pauses When the power plug is inserted, computer board indicator is recovered. It is setting the drain time. Is the machine slanting? How to set water level? Close the top lid.Level the machine in spinning? Push the "Start/Pause" button. Remove the foreign bodies Use it when the power is...
User Manual
Page 18
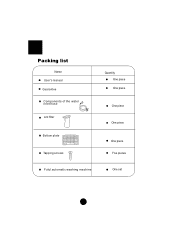
Packing list Name User's manual Guarantee Components of the water inlet hose Lint filter Bottom plate Tapping screws Quantity One piece One piece One piece One piece One piece Five pieces Fulyl automatic washing machine One set 16
Packing list Name User's manual Guarantee Components of the water inlet hose Lint filter Bottom plate Tapping screws Quantity One piece One piece One piece One piece One piece Five pieces Fulyl automatic washing machine One set 16


