User Manual
Page 1
TOP LOAD FULLY AUTOMATIC WASHING MACHINE USER MANUAL MODEL HWM120-1678ES5 Please read this manual carefully before operating your washing machine and retain it for future reference. 0030517750
TOP LOAD FULLY AUTOMATIC WASHING MACHINE USER MANUAL MODEL HWM120-1678ES5 Please read this manual carefully before operating your washing machine and retain it for future reference. 0030517750
User Manual
Page 2
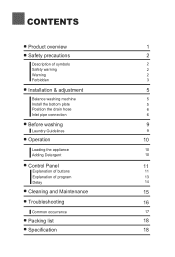
CONTENTS Product overview 1 Safety precautions 2 Description of symbols 2 Safety warning 2 Warning 2 Forbidden 3 Installation & adjustment 5 Balance washing machine 5 Install the bottom plate 5 Position the drain hose 6 Inlet pipe connection 6 Before washing 9 Laundry Guidelines 9 Operation 10 Loading the appliance 10 Adding Detergent 10 Control Panel 11 Explanation of buttons 11 Explanation of program 13 Delay 14 Cleaning and Maintenance 15 Troubleshooting 16 Common occurrence 17 Packing list 18 Specification 18
CONTENTS Product overview 1 Safety precautions 2 Description of symbols 2 Safety warning 2 Warning 2 Forbidden 3 Installation & adjustment 5 Balance washing machine 5 Install the bottom plate 5 Position the drain hose 6 Inlet pipe connection 6 Before washing 9 Laundry Guidelines 9 Operation 10 Loading the appliance 10 Adding Detergent 10 Control Panel 11 Explanation of buttons 11 Explanation of program 13 Delay 14 Cleaning and Maintenance 15 Troubleshooting 16 Common occurrence 17 Packing list 18 Specification 18
User Manual
Page 3
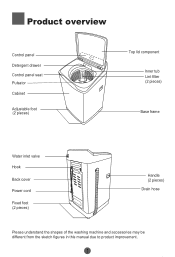
Product overview Control panel Detergent drawer Control panel seat Pulsator Cabinet Adjustable foot (2 pieces) Top lid component Inner tub Lint filter (2 pieces) Base frame Water inlet valve Hook Back cover Power cord Fixed foot (2 pieces) Handle (2 pieces) Drain hose Please understand the shapes of the washing machine and accessories may be different from the sketch figures in this manual due to product improvement.
Product overview Control panel Detergent drawer Control panel seat Pulsator Cabinet Adjustable foot (2 pieces) Top lid component Inner tub Lint filter (2 pieces) Base frame Water inlet valve Hook Back cover Power cord Fixed foot (2 pieces) Handle (2 pieces) Drain hose Please understand the shapes of the washing machine and accessories may be different from the sketch figures in this manual due to product improvement.
User Manual
Page 4
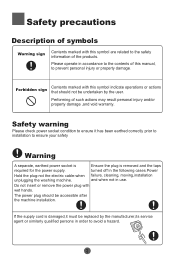
... products. turned off in use. and when not in the following cases.Power Hold the plug-not the electric cable-when failure, cleaning, moving,installation unplugging the washing machine. Do not insert or remove the power plug with this symbol indicate operations or actions that should be replaced by the user. Safety precautions Description of symbols Warning sign Contents marked with wet hands. If the supply cord...
... products. turned off in use. and when not in the following cases.Power Hold the plug-not the electric cable-when failure, cleaning, moving,installation unplugging the washing machine. Do not insert or remove the power plug with this symbol indicate operations or actions that should be replaced by the user. Safety precautions Description of symbols Warning sign Contents marked with wet hands. If the supply cord...
User Manual
Page 5
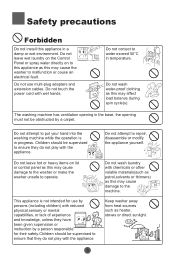
... washer to repair, disassemble or modify the appliance yourself. Do not wash laundry with the appliance. 3 Do not attempt to malfunction or cause an electrical fault. Do not leave wet laundry on the Control Panel or spray water directly on lid or control panel as this appliance in temperature. Do not wash water-proof clothing as this may affect load balance during spin cycle(s). Children should be obstructed by a person responsible for use multi-plug...
... washer to repair, disassemble or modify the appliance yourself. Do not wash laundry with the appliance. 3 Do not attempt to malfunction or cause an electrical fault. Do not leave wet laundry on the Control Panel or spray water directly on lid or control panel as this appliance in temperature. Do not wash water-proof clothing as this may affect load balance during spin cycle(s). Children should be obstructed by a person responsible for use multi-plug...
User Manual
Page 6
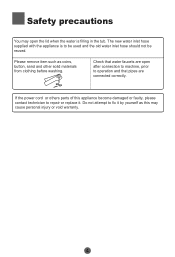
... are connected correctly. Check that water faucets are open the lid when the water is to be used and the old water inlet hose should not be reused. If the power cord or others parts of this may open after connection to machine, prior to repair or replace it by yourself as coins, button, sand and other solid materials from clothing before washing. The new water inlet hose supplied with the appliance...
... are connected correctly. Check that water faucets are open the lid when the water is to be used and the old water inlet hose should not be reused. If the power cord or others parts of this may open after connection to machine, prior to repair or replace it by yourself as coins, button, sand and other solid materials from clothing before washing. The new water inlet hose supplied with the appliance...
User Manual
Page 7
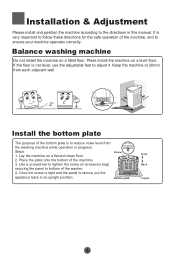
... the panel is not level, use the adjustable feet to ensure your machine operates correctly. Balance washing machine Do not install the machine on a level floor. Screw Bottom plate Front Back Carpet 5 Use a screwdriver to tighten the screw (in this manual. Lay the machine on a flat and clean floor. 2. Installation & Adjustment Please install and position the machine according to follow these directions for the safe operation of the washer. 4. Keep the machine at...
... the panel is not level, use the adjustable feet to ensure your machine operates correctly. Balance washing machine Do not install the machine on a level floor. Screw Bottom plate Front Back Carpet 5 Use a screwdriver to tighten the screw (in this manual. Lay the machine on a flat and clean floor. 2. Installation & Adjustment Please install and position the machine according to follow these directions for the safe operation of the washer. 4. Keep the machine at...
User Manual
Page 8
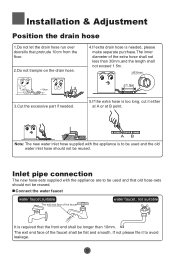
... at A or at B point. Installation & Adjustment Position the drain hose 1.Do not let the drain hose run over doorsills that protrude 10cm from the floor. 2.Do not trample on the drain hose. 4.If extra drain hose is needed . 5.If the extra hose is too long, cut it to be used and the old water inlet hose should not be reused. Connect the water faucet water faucet,suitable The exit...
... at A or at B point. Installation & Adjustment Position the drain hose 1.Do not let the drain hose run over doorsills that protrude 10cm from the floor. 2.Do not trample on the drain hose. 4.If extra drain hose is needed . 5.If the extra hose is too long, cut it to be used and the old water inlet hose should not be reused. Connect the water faucet water faucet,suitable The exit...
User Manual
Page 9
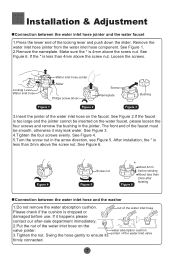
... 4mm before use. Locking Lever Water inlet hose Water inlet hose jointer Slider Philips screw driver Screw Nameplate Bushing Figure 1 Figure 2 Figure 3 3.Insert the jointer of the faucet must be inserted on the valve jointer. water absorption cushion 3.Tighten the nut. Swing the hose gently to ensure its jointer of the water inlet hose on the water faucet, please loosen the four screws and remove the bushing...
... 4mm before use. Locking Lever Water inlet hose Water inlet hose jointer Slider Philips screw driver Screw Nameplate Bushing Figure 1 Figure 2 Figure 3 3.Insert the jointer of the faucet must be inserted on the valve jointer. water absorption cushion 3.Tighten the nut. Swing the hose gently to ensure its jointer of the water inlet hose on the water faucet, please loosen the four screws and remove the bushing...
User Manual
Page 10
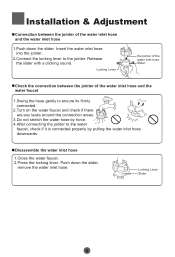
.... 2.Turn on the water faucet and check if there are any leaks around the connection areas. 3.Do not stretch the water hose by pulling the water inlet hose downwards. Installation & Adjustment Connection between the jointer of the water inlet hose and the water inlet hose 1.Push down the slider, remove the water inlet hose. Disassemble the water inlet hose 1.Close the water faucet. 2.Press the locking lever. Push down the slider. Locking Lever Slider 8 Insert the water inlet hose into...
.... 2.Turn on the water faucet and check if there are any leaks around the connection areas. 3.Do not stretch the water hose by pulling the water inlet hose downwards. Installation & Adjustment Connection between the jointer of the water inlet hose and the water inlet hose 1.Push down the slider, remove the water inlet hose. Disassemble the water inlet hose 1.Close the water faucet. 2.Press the locking lever. Push down the slider. Locking Lever Slider 8 Insert the water inlet hose into...

User Manual
Page 11
... machine. f.Do not put fabrics that are insoluble in the tub. Turn the clothing inside out or put inside out before washing 1.Connect the jointer of your machine, spread out the laundry before start the wash. d.Prewash the soiled clothes and apply detergent directly on the appliance while operation in the power cord to a gas pipe, water pipe or telephone line. 3.Put down the drain hose. Do not ground the washing machine...
... machine. f.Do not put fabrics that are insoluble in the tub. Turn the clothing inside out or put inside out before washing 1.Connect the jointer of your machine, spread out the laundry before start the wash. d.Prewash the soiled clothes and apply detergent directly on the appliance while operation in the power cord to a gas pipe, water pipe or telephone line. 3.Put down the drain hose. Do not ground the washing machine...

User Manual
Page 12
... the detergent drawer with water before the next wash cycle to avoid residue and optimize the washing performance. 10 Dissolve directly inside the washing machine:(not applicable for reserve program) 1.Add some water (select "1" water level). 2.Add washing powder.Run for automatic washing machine. How to fully dissolve the Powder.Then push the "Start/Pause" button. 3.Put in the figure above . Adding Detergent Detergent(liquid/ washing powder) compartment Softener compartment How to use low suds/ high efficiency washing powder which is recommended to add washing powder...
... the detergent drawer with water before the next wash cycle to avoid residue and optimize the washing performance. 10 Dissolve directly inside the washing machine:(not applicable for reserve program) 1.Add some water (select "1" water level). 2.Add washing powder.Run for automatic washing machine. How to fully dissolve the Powder.Then push the "Start/Pause" button. 3.Put in the figure above . Adding Detergent Detergent(liquid/ washing powder) compartment Softener compartment How to use low suds/ high efficiency washing powder which is recommended to add washing powder...

User Manual
Page 13
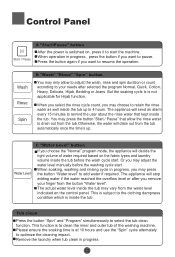
... "Start/Pause" button. If the "Start/Pause" button is deactivated. In case it shows the estimated time remaining (minute). Next press the button "Wash" and "Rinse" for 3 seconds simultaneously again and after 10 minutes. 11 Press the button "Wash" and "Rinse" for 3 seconds simultaneously to switch off and child lock function is not pressed, the machine will switch off the power automatically after 3 beeps, the child lock light turn...
... "Start/Pause" button. If the "Start/Pause" button is deactivated. In case it shows the estimated time remaining (minute). Next press the button "Wash" and "Rinse" for 3 seconds simultaneously again and after 10 minutes. 11 Press the button "Wash" and "Rinse" for 3 seconds simultaneously to switch off and child lock function is not pressed, the machine will switch off the power automatically after 3 beeps, the child lock light turn...
User Manual
Page 14
... fabric types and laundry volume inside the tub may only allow to adjust the wash, rinse and spin duration or count according to remind the user about the rinse water that allow the rinse water to select the tub clean function. The actual water level inside the tub before the washing cycle start the machine. When operation in progress. 12 The appliance will drain out from the tub.Otherwise, the water will stop adding water if the water...
... fabric types and laundry volume inside the tub may only allow to adjust the wash, rinse and spin duration or count according to remind the user about the rinse water that allow the rinse water to select the tub clean function. The actual water level inside the tub before the washing cycle start the machine. When operation in progress. 12 The appliance will drain out from the tub.Otherwise, the water will stop adding water if the water...

User Manual
Page 15
... wash lightly soiled, dark or highly dyed natural fabrics, such as comforters, sleeping bags and blankets. Use this cycle to wash durable fabric materials like towels, workwear, children clothes and etc. Use this cycle to wash large items such as cotton that may be easily discolored. Use this cycle to wash lightly soiled garments and delicate clothes that are needed in a hurry. Use this cycle to wash hijab. Control Panel Explanation of program Normal Quick...
... wash lightly soiled, dark or highly dyed natural fabrics, such as comforters, sleeping bags and blankets. Use this cycle to wash durable fabric materials like towels, workwear, children clothes and etc. Use this cycle to wash large items such as cotton that may be easily discolored. Use this cycle to wash lightly soiled garments and delicate clothes that are needed in a hurry. Use this cycle to wash hijab. Control Panel Explanation of program Normal Quick...

User Manual
Page 16
For example, you required and choose a delay of the washing cycle. 14 Delay mode is not applicable for 3 seconds, the display will shows "00" and the rest of the indicator lights will be the reminder to the user about the end of between 1 to 24hours (in 1 hour increments) to finish the wash at 18 hours later. An acoustic signal sounds will off. Select the program that you may choose to complete the wash . Control Panel Delay How to activate Delay function: How to activate Delay function: Press the button "Water level" for Tub clean function.
For example, you required and choose a delay of the washing cycle. 14 Delay mode is not applicable for 3 seconds, the display will shows "00" and the rest of the indicator lights will be the reminder to the user about the end of between 1 to 24hours (in 1 hour increments) to finish the wash at 18 hours later. An acoustic signal sounds will off. Select the program that you may choose to complete the wash . Control Panel Delay How to activate Delay function: How to activate Delay function: Press the button "Water level" for Tub clean function.
User Manual
Page 17
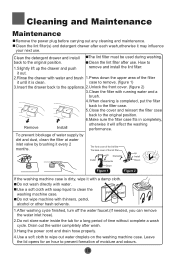
... detergent drawer and install The lint filter must be used during washing. Clean the lint filter after wash. 3.Hang the power cord and drain hose properly. 4.Use a soft cloth to 1.Slightly lift up the drawer and push remove and install the lint filter: it out. 2.Rinse the drawer with a damp cloth. Leave the lid opens for a long period of moisture and odours. 15 Clean the lint filter(s) and detergent drawer after each wash,otherwise it every 2 months. Do not wash directly with running water...
... detergent drawer and install The lint filter must be used during washing. Clean the lint filter after wash. 3.Hang the power cord and drain hose properly. 4.Use a soft cloth to 1.Slightly lift up the drawer and push remove and install the lint filter: it out. 2.Rinse the drawer with a damp cloth. Leave the lid opens for a long period of moisture and odours. 15 Clean the lint filter(s) and detergent drawer after each wash,otherwise it every 2 months. Do not wash directly with running water...
User Manual
Page 18
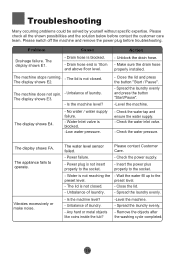
... - Check the water pressure. Water is not insert properly to operate. Any hard or metal objects - Close the lid and press the button "Start / Pause". - The appliance fails to the socket. - The display shows E2. The display shows E1. - Unbalance of laundry. Close the lid. - The machine stops running. - Make sure the drain hose properly installed. - the washing cycle completed. 16 Please contact Customer Care. - Power plug is not reaching the preset level. - Spread...
... - Check the water pressure. Water is not insert properly to operate. Any hard or metal objects - Close the lid and press the button "Start / Pause". - The appliance fails to the socket. - The display shows E2. The display shows E1. - Unbalance of laundry. Close the lid. - The machine stops running. - Make sure the drain hose properly installed. - the washing cycle completed. 16 Please contact Customer Care. - Power plug is not reaching the preset level. - Spread...
User Manual
Page 19
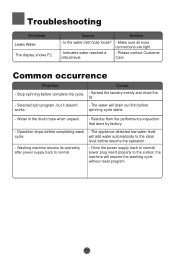
... spinning cycle starts. - Operation stops before complete the cycle. - Spread the laundry evenly and close the lid. - Selected spin program, but it doesn't works. - Indicates water reached a critical level. - Make sure all hose connections are tight. - Please contact Customer Care. The water will resume the washing cycle without reset program. 17 Troubleshooting Problem Leaks Water The display shows F2. Is the water inlet hose loose? - Once the power supply back to normal/ power plug insert properly to the socket, the machine will drain...
... spinning cycle starts. - Operation stops before complete the cycle. - Spread the laundry evenly and close the lid. - Selected spin program, but it doesn't works. - Indicates water reached a critical level. - Make sure all hose connections are tight. - Please contact Customer Care. The water will resume the washing cycle without reset program. 17 Troubleshooting Problem Leaks Water The display shows F2. Is the water inlet hose loose? - Once the power supply back to normal/ power plug insert properly to the socket, the machine will drain...
User Manual
Page 20
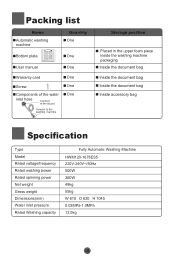
... plate One User manual One Warranty card One Screw One Components of the water One inlet hose faucet Storage position Placed in the upper foam piece inside the washing machine packaging Inside the document bag Inside the document bag Inside the document bag Inside accessory bag Specification Type Model Rated voltage/frequency Rated washing power Rated spinning power Net weight Gross weight Dimensions(mm) Water inlet pressure Rated Washing capacity Fully Automatic Washing Machine HWM120-1678ES5 220V-240V...
... plate One User manual One Warranty card One Screw One Components of the water One inlet hose faucet Storage position Placed in the upper foam piece inside the washing machine packaging Inside the document bag Inside the document bag Inside the document bag Inside accessory bag Specification Type Model Rated voltage/frequency Rated washing power Rated spinning power Net weight Gross weight Dimensions(mm) Water inlet pressure Rated Washing capacity Fully Automatic Washing Machine HWM120-1678ES5 220V-240V...


