

User Manual
Page 1
Retain it for HWM-6.5/S Please read this manual carefully before using. Fuzzy Computerized Automatic Washing Machine User's manual This manual is for future reference.
Retain it for HWM-6.5/S Please read this manual carefully before using. Fuzzy Computerized Automatic Washing Machine User's manual This manual is for future reference.

User Manual
Page 2
for water levels above "6", the cycle is: after water reaching level "2", it begins to heat, meanwhile water supply continues until level "6", water supply stops and it continues heating to the set level 3. This washing machine provides 3 temperature selections of 20 , 30 and 40 . For high water levels, only the water amount below level "6" can be in the laundries 9 Usage of the detergent 9 Use the operation buttons 10 Close the top lid 14 Finish washing ...14 Disposal after water reaches...
for water levels above "6", the cycle is: after water reaching level "2", it begins to heat, meanwhile water supply continues until level "6", water supply stops and it continues heating to the set level 3. This washing machine provides 3 temperature selections of 20 , 30 and 40 . For high water levels, only the water amount below level "6" can be in the laundries 9 Usage of the detergent 9 Use the operation buttons 10 Close the top lid 14 Finish washing ...14 Disposal after water reaches...

User Manual
Page 3
..., otherwise it may cause damage of the machine or injure the personal safety of the user. Names of the parts Top lid B Detergent box Lint filter(Installed by user) Lint filterA(Installed by user) Control panel Filter cover Inner tub Pulsator Control panel film Cabinet base frame Top lid A Water absorption cushion Cabinet handle Drain hose Adjustable foot Water valve Power line back cover fixed foot (3) Meaning and description of the symbols Warning sign Contents...
..., otherwise it may cause damage of the machine or injure the personal safety of the user. Names of the parts Top lid B Detergent box Lint filter(Installed by user) Lint filterA(Installed by user) Control panel Filter cover Inner tub Pulsator Control panel film Cabinet base frame Top lid A Water absorption cushion Cabinet handle Drain hose Adjustable foot Water valve Power line back cover fixed foot (3) Meaning and description of the symbols Warning sign Contents...

User Manual
Page 4
... soft items Do not wash water-proof laundries like Do not use the plug any more. 2 The ventilation holes at damp place like the raincoat, bike covers etc. Be sure to be convenient to pull the plug out and close the water tap when the machine is installed on the control panel. The power cord plug should be pluged in spinning. Never wash it is polluted...
... soft items Do not wash water-proof laundries like Do not use the plug any more. 2 The ventilation holes at damp place like the raincoat, bike covers etc. Be sure to be convenient to pull the plug out and close the water tap when the machine is installed on the control panel. The power cord plug should be pluged in spinning. Never wash it is polluted...
User Manual
Page 5
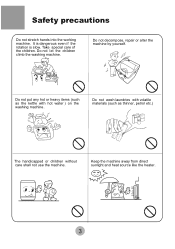
... handicapped or children without care shall not use the machine. Keep the machine away from direct sunlight and heat source like the heater. 3 Do not decompose, repair or alter the machine by yourself. Do not let the children climb the washing machine. Do not wash laundries with hot water ) on the washing machine. Safety precautions Do not stretch hands into the working machine. It is dangerous even...
... handicapped or children without care shall not use the machine. Keep the machine away from direct sunlight and heat source like the heater. 3 Do not decompose, repair or alter the machine by yourself. Do not let the children climb the washing machine. Do not wash laundries with hot water ) on the washing machine. Safety precautions Do not stretch hands into the working machine. It is dangerous even...
User Manual
Page 6
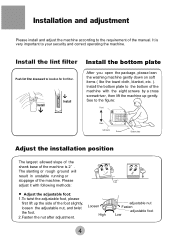
Install Install Install the bottom plate After you open the package, please lean the washing machine gently down on soft items ( like the towel cloth, blanket, etc. ). It is 2 . Install the lint filter Push lint filter downward to the requirement of the manual. The slanting or rough ground will result in unstable running... adjustment. Install the bottom plate to your security and correct operating the machine. See to the figure: Front Back Soft items Screw Bottom plate Adjust the installation position The largest allowed slope of the shank base of the machine is very...
Install Install Install the bottom plate After you open the package, please lean the washing machine gently down on soft items ( like the towel cloth, blanket, etc. ). It is 2 . Install the lint filter Push lint filter downward to the requirement of the manual. The slanting or rough ground will result in unstable running... adjustment. Install the bottom plate to your security and correct operating the machine. See to the figure: Front Back Soft items Screw Bottom plate Adjust the installation position The largest allowed slope of the shank base of the machine is very...

User Manual
Page 7
...the drain hose frame. The highest point 0.7m Do not put the drain hose up to suitable position. Figure 2 Usage of the drain hose The drainage shall be smooth with the rack and screws. Put down the drain hose. Figure 3 4 install ...water level of washing tub for avoiding to siphon phenomenon during drain. 2.Do not step on the cabinet to hang the drain hose (as figure 2). Set the bracket on the drain hose .There is a hole on or press the drain hose. How to change the direction of the drain hose 1 Dismount the back cover of the washing machine. 3 protrude the drain hose...
...the drain hose frame. The highest point 0.7m Do not put the drain hose up to suitable position. Figure 2 Usage of the drain hose The drainage shall be smooth with the rack and screws. Put down the drain hose. Figure 3 4 install ...water level of washing tub for avoiding to siphon phenomenon during drain. 2.Do not step on the cabinet to hang the drain hose (as figure 2). Set the bracket on the drain hose .There is a hole on or press the drain hose. How to change the direction of the drain hose 1 Dismount the back cover of the washing machine. 3 protrude the drain hose...

User Manual
Page 8
Damage to the water faucet. Attach the water inlet hoses to the valves can result. 2. Using pliers, tighten the coupling. ( As figure 1) NOTE: Do not over tighten. Install the water inlet hose 1. Connect the other ends to the water inlet valve . ( As figure 2) Figure 1 Jointer of the water inlet hose Jointer of the water inlet valve Water absorption cushion Figure 2 6
Damage to the water faucet. Attach the water inlet hoses to the valves can result. 2. Using pliers, tighten the coupling. ( As figure 1) NOTE: Do not over tighten. Install the water inlet hose 1. Connect the other ends to the water inlet valve . ( As figure 2) Figure 1 Jointer of the water inlet hose Jointer of the water inlet valve Water absorption cushion Figure 2 6

User Manual
Page 9
Check the connection between the water inlet hose and the water tap 1.Swaying the hose gently to confirm if it is fastened stable. 2.After installation, open the tap to check if it leaks. 3.Do not bend the hose with overstrain. 4.Before each usage please check if the connection between the water inlet hose and the water tap is firm, so as to prevent dropping from the water tap and washer Pull off the water inlet hose from improve Installation position. Take down the water inlet hose 1.After using,Close the water tap. 2.
Check the connection between the water inlet hose and the water tap 1.Swaying the hose gently to confirm if it is fastened stable. 2.After installation, open the tap to check if it leaks. 3.Do not bend the hose with overstrain. 4.Before each usage please check if the connection between the water inlet hose and the water tap is firm, so as to prevent dropping from the water tap and washer Pull off the water inlet hose from improve Installation position. Take down the water inlet hose 1.After using,Close the water tap. 2.

User Manual
Page 10
... the washing machine is much soil, please remove the soil first. b. For laundries not water absorbing, please put the laundries polluted with chemicals directly into water with serious soil directly. there's special Take out the requirement for washing. The quantity of discretion, please put in unstable working or abnormal noise. f. Then insert the power plug into other laundries. Connect the water inlet hose. 2. c. You can add detergent on the part with...
... the washing machine is much soil, please remove the soil first. b. For laundries not water absorbing, please put the laundries polluted with chemicals directly into water with serious soil directly. there's special Take out the requirement for washing. The quantity of discretion, please put in unstable working or abnormal noise. f. Then insert the power plug into other laundries. Connect the water inlet hose. 2. c. You can add detergent on the part with...

User Manual
Page 11
... the laundries directly. Put in the machine 1.Fill water to dissolve it before wash. Avoid using whitener on laundries with color or pattern as to the user's manual for 30 seconds to "Low" water level. 2.Add the power. Direct dissolved in the prorer quantities detergent according to lose color. Run for the usage and quantity of the cloth will influence the actual washing capacity. Please pay attention to use the washing powder Inlet box...
... the laundries directly. Put in the machine 1.Fill water to dissolve it before wash. Avoid using whitener on laundries with color or pattern as to the user's manual for 30 seconds to "Low" water level. 2.Add the power. Direct dissolved in the prorer quantities detergent according to lose color. Run for the usage and quantity of the cloth will influence the actual washing capacity. Please pay attention to use the washing powder Inlet box...
User Manual
Page 12
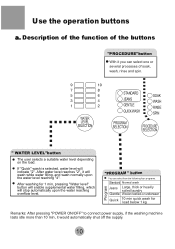
... following four programs. Standard Normal wash Jeans Large, thick or heavily soiled laundry Gentle Woolen textiles or underwear Quick 10 min quick wash for 1 min, pressing "Water level" button will enable supplemental water filling, which will indicate "2". WATER LEVEL SELECTION STANDARD JEANS GENTLE QUICK WASH SOAK WASH RINSE SPIN PROGRAM SELECTION PROCEDURE SELECTION " WATER LEVEL"button The user selects a suitable water level depending on the load. Description of the function of soak, wash, rinse and spin. Use the operation buttons a.
... following four programs. Standard Normal wash Jeans Large, thick or heavily soiled laundry Gentle Woolen textiles or underwear Quick 10 min quick wash for 1 min, pressing "Water level" button will enable supplemental water filling, which will indicate "2". WATER LEVEL SELECTION STANDARD JEANS GENTLE QUICK WASH SOAK WASH RINSE SPIN PROGRAM SELECTION PROCEDURE SELECTION " WATER LEVEL"button The user selects a suitable water level depending on the load. Description of the function of soak, wash, rinse and spin. Use the operation buttons a.

User Manual
Page 13
... indicate remaining reserved time (hrs) during sensing. "POWER ON/OFF"button Press "Power On/Off" button to set scheduling or heating Function. During machine running, the display indicates the cycle remaining time in a switching sequence 30 40 20 . During program running , if selection or cancellation of heating function is selected. After power is connected, pressing this button to start the machine During working, push it means heating function is...
... indicate remaining reserved time (hrs) during sensing. "POWER ON/OFF"button Press "Power On/Off" button to set scheduling or heating Function. During machine running, the display indicates the cycle remaining time in a switching sequence 30 40 20 . During program running , if selection or cancellation of heating function is selected. After power is connected, pressing this button to start the machine During working, push it means heating function is...

User Manual
Page 14
... heating indicator is lighted, which means the heating function is selected. b.Operating procedure and explanations for the buttons WATER LEVEL SELECTION STANDARD JEANS GENTLE QUICK WASH SOAK WASH RINSE SPIN RESERVE HOURS LATER SURPLUS MIN PROGRAM SELECTION PROCEDURE SELECTION RESERVATION CALEFACTION POWER START ON/OFF PAUSE 1 Press the "POWER ON/OFF" button to the "Button of power failure or the power plug is loose during washing, the machine can save the...
... heating indicator is lighted, which means the heating function is selected. b.Operating procedure and explanations for the buttons WATER LEVEL SELECTION STANDARD JEANS GENTLE QUICK WASH SOAK WASH RINSE SPIN RESERVE HOURS LATER SURPLUS MIN PROGRAM SELECTION PROCEDURE SELECTION RESERVATION CALEFACTION POWER START ON/OFF PAUSE 1 Press the "POWER ON/OFF" button to the "Button of power failure or the power plug is loose during washing, the machine can save the...
User Manual
Page 15
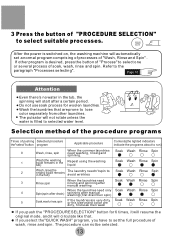
PROCEDURE SELECTION After the power is switched on, the washing machine will not rotate unless the water is desired, press the button of "Process" to selected water level. Do not use soak process for 6 times, it will resume the original mode, and it will start after manual washing (first drain then spin) 5 Soak,wash,rinse,spin If the laundries are very dirty, Soak Wash Rinse Spin or the sleeve and collar are prone to...
PROCEDURE SELECTION After the power is switched on, the washing machine will not rotate unless the water is desired, press the button of "Process" to selected water level. Do not use soak process for 6 times, it will resume the original mode, and it will start after manual washing (first drain then spin) 5 Soak,wash,rinse,spin If the laundries are very dirty, Soak Wash Rinse Spin or the sleeve and collar are prone to...

User Manual
Page 16
... After switching on the power, press the button "WATER LEVEL" to select a water level according to the load. Keep pressing the "RESERVATION/CALEFACTION"button for more than 2 s, the heating indicator turns on page 11. 4 Press the "WATER LEVEL" button to select suitable water level WATER LEVEL SELECTION After switching on , the washing machine reserved wash program will be automatically set a reserved wash program. If you desire a wash cycle to end at a reserved time, you should switch off...
... After switching on the power, press the button "WATER LEVEL" to select a water level according to the load. Keep pressing the "RESERVATION/CALEFACTION"button for more than 2 s, the heating indicator turns on page 11. 4 Press the "WATER LEVEL" button to select suitable water level WATER LEVEL SELECTION After switching on , the washing machine reserved wash program will be automatically set a reserved wash program. If you desire a wash cycle to end at a reserved time, you should switch off...
User Manual
Page 17
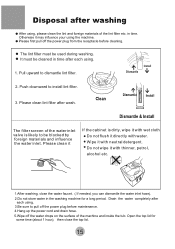
... machine and inside the tub. Push downward to pull off the power plug before maintenance. 4.Hang up the power cord and drain hose. 5.Wipe off the power plug from the receptacle before cleaning. Please clean it If the cabinet is likely to dismantle lint filter. Drain the water completely after each using . 1. Open the top lid for a long period. The lint filter must be used during washing. It must be cleaned in time after each using...
... machine and inside the tub. Push downward to pull off the power plug before maintenance. 4.Hang up the power cord and drain hose. 5.Wipe off the power plug from the receptacle before cleaning. Please clean it If the cabinet is likely to dismantle lint filter. Drain the water completely after each using . 1. Open the top lid for a long period. The lint filter must be used during washing. It must be cleaned in time after each using...

User Manual
Page 18
... Pulsator turns mildly. The digital tube displays "E1" and it to set the program again. The spinning cannot work Close the top lid Re-order the laundries. Is the machine slanting? Are the laundries slanting in gear. Common phenomena Close the top lid Clean the foreign material. After long running except water filling and draining. It does not do not need to repair. Is the power plug loose? Open and...
... Pulsator turns mildly. The digital tube displays "E1" and it to set the program again. The spinning cannot work Close the top lid Re-order the laundries. Is the machine slanting? Are the laundries slanting in gear. Common phenomena Close the top lid Clean the foreign material. After long running except water filling and draining. It does not do not need to repair. Is the power plug loose? Open and...

User Manual
Page 19
... list Name User's manual Warranty card Water inlet hose The side of connection between the water inlet hose and the washing machine The side of connection between the jointer of the water inlet hose and the water faucet Lint filter Quantity One piece One piece One piece Two pieces Lint filter A Bottom plate Two pieces One piece Tapping screws Eigh piecest Fuzzy computerized automatic washing machine One set Specification Water level/Water quantity (about) Water inlet pressure Rated washing / spinning capacity...
... list Name User's manual Warranty card Water inlet hose The side of connection between the water inlet hose and the washing machine The side of connection between the jointer of the water inlet hose and the water faucet Lint filter Quantity One piece One piece One piece Two pieces Lint filter A Bottom plate Two pieces One piece Tapping screws Eigh piecest Fuzzy computerized automatic washing machine One set Specification Water level/Water quantity (about) Water inlet pressure Rated washing / spinning capacity...


