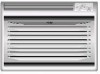
User Manual
Page 3
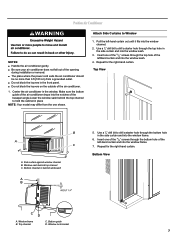
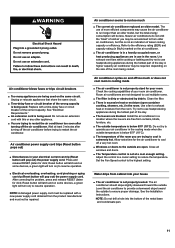
Do not use an adapter. Do not use an extension cord. Use two or more people to reduce the chance of injury, and tell you what can be killed or seriously injured if you don't immediately follow instructions. Read and follow these basic precautions: Plug into a grounded 3 prong outlet. Top channel B. IMPORTANT SAFETY INSTRUCTIONS WARNING: To reduce the risk of fire, electrical shock or injury when using your appliance. Do not remove ground prong. Tools needed Parts supplied: Check that can be killed or seriously injured if you and others is the safety alert symbol....
Do not use an adapter. Do not use an extension cord. Use two or more people to reduce the chance of injury, and tell you what can be killed or seriously injured if you don't immediately follow instructions. Read and follow these basic precautions: Plug into a grounded 3 prong outlet. Top channel B. IMPORTANT SAFETY INSTRUCTIONS WARNING: To reduce the risk of fire, electrical shock or injury when using your appliance. Do not remove ground prong. Tools needed Parts supplied: Check that can be killed or seriously injured if you and others is the safety alert symbol....
User Manual
Page 4
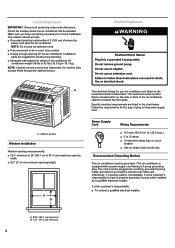
Cabinet louvers Window Installation Window opening measurements: ■ 23¼" minimum to 36" (59.1 cm to 19.1 kg). Power Supply Cord Wiring Requirements ■ 115-volt (103.5 min. NOTE: Do not use an extension cord. ■ Free movement of plug on the model and serial number label. Air must be able to 12 amps ■ 15-amp time-delay fuse or circuit breaker ■ Use on the side or back of the air conditioner cabinet or behind the front grille. Follow the requirements for the type of air in room to have everything necessary for weight of where the power ...
Cabinet louvers Window Installation Window opening measurements: ■ 23¼" minimum to 36" (59.1 cm to 19.1 kg). Power Supply Cord Wiring Requirements ■ 115-volt (103.5 min. NOTE: Do not use an extension cord. ■ Free movement of plug on the model and serial number label. Air must be able to 12 amps ■ 15-amp time-delay fuse or circuit breaker ■ Use on the side or back of the air conditioner cabinet or behind the front grille. Follow the requirements for the type of air in room to have everything necessary for weight of where the power ...
User Manual
Page 5
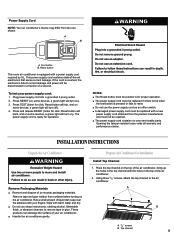
Press RESET (on some devices, a green light will turn off /on switch. ■ A damaged power supply cord must be pushed in a fraction of the air conditioner. 2. Using three 13⁄32" screws, attach the top channel to reset. ■ Do not use the power supply cord as an off ). 4. Place the top channel on the top of the air conditioner, lining up the holes in the top of a second. Top channel 5 Test button B. Reset button will trip, and on some devices, a green light will be repaired. ■ The power supply cord contains no user serviceable parts. ...
Press RESET (on some devices, a green light will turn off /on switch. ■ A damaged power supply cord must be pushed in a fraction of the air conditioner. 2. Using three 13⁄32" screws, attach the top channel to reset. ■ Do not use the power supply cord as an off ). 4. Place the top channel on the top of the air conditioner, lining up the holes in the top of a second. Top channel 5 Test button B. Reset button will trip, and on some devices, a green light will be repaired. ■ The power supply cord contains no user serviceable parts. ...

User Manual
Page 6
Install Side Curtains NOTE: Attach curtains to the air conditioner before placing the air conditioner in place.Be sure to hold unit securely in window. 1. Tabbed side of the air conditioner. 6 B A. Mark the center line on the right-hand side of side curtain 2. Inner sill D. Window lock bracket A 4. Prepare Window for the left-hand side curtain and frame. Slide the side curtain frame into the top channel on the top of the air conditioner and the track on the bottom of side curtain B. The Window lock bracket helps to place Window lock bracket edge flush against back ...
Install Side Curtains NOTE: Attach curtains to the air conditioner before placing the air conditioner in place.Be sure to hold unit securely in window. 1. Tabbed side of the air conditioner. 6 B A. Mark the center line on the right-hand side of side curtain 2. Inner sill D. Window lock bracket A 4. Prepare Window for the left-hand side curtain and frame. Slide the side curtain frame into the top channel on the top of the air conditioner and the track on the bottom of side curtain B. The Window lock bracket helps to place Window lock bracket edge flush against back ...
User Manual
Page 7
Pull the left -hand curtain and into the window channel. 2. Window sash behind windowsill A B 5. Repeat for the right-hand curtain. Insert one of the 31⁄32" screws through the top hole of the lefthand curtain and into the window sash. 3. Bottom View CD A. Bottom guide D. Repeat for the right-hand curtain. Insert one shown. Window frame B. Position Air Conditioner NOTES: ■ Handle the air conditioner gently. ■ Be sure your air conditioner does not fall out of the opening during installation or removal. ■ The place where the power cord ...
Pull the left -hand curtain and into the window channel. 2. Window sash behind windowsill A B 5. Repeat for the right-hand curtain. Insert one of the 31⁄32" screws through the top hole of the lefthand curtain and into the window sash. 3. Bottom View CD A. Bottom guide D. Repeat for the right-hand curtain. Insert one shown. Window frame B. Position Air Conditioner NOTES: ■ Handle the air conditioner gently. ■ Be sure your air conditioner does not fall out of the opening during installation or removal. ■ The place where the power cord ...
User Manual
Page 8
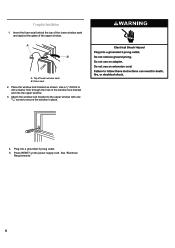
Complete Installation 1. Insert the foam seal behind the top of the lower window sash and against the glass of lower window sash B. Use a 1⁄8" drill bit to secure the window in the window lock bracket and into a grounded 3 prong outlet. 5. Place the window lock bracket as shown. Plug into the upper window. 3. Top of the upper window. A B A. Press RESET on the power supply cord. Foam seal 2. See "Electrical Requirements." 8 Attach the window lock bracket to the upper window with one 31⁄32" screw to drill a starter hole through the hole in place. 4.
Complete Installation 1. Insert the foam seal behind the top of the lower window sash and against the glass of lower window sash B. Use a 1⁄8" drill bit to secure the window in the window lock bracket and into a grounded 3 prong outlet. 5. Place the window lock bracket as shown. Plug into the upper window. 3. Top of the upper window. A B A. Press RESET on the power supply cord. Foam seal 2. See "Electrical Requirements." 8 Attach the window lock bracket to the upper window with one 31⁄32" screw to drill a starter hole through the hole in place. 4.
User Manual
Page 9
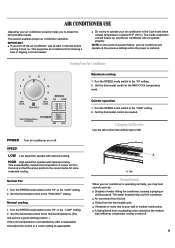
IMPORTANT: ■ If you turn off the air conditioner, wait at the previous settings when the power is not satisfactory after a reasonable time,adjust the control to a cooler setting,as appropriate. NOTE: In the event of a power failure, your air conditioner in the Cool mode when outside temperature is below 65°F (18°C). Set the thermostat control to the "LOW" setting. 2. Turn the SPEED mode switch to the MAX COOL temperature mark. Set the thermostat control as needed. POWER Turn air conditioner on . Turn the SPEED mode switch to the "HI" setting. 2. Tab Normal Sounds...
IMPORTANT: ■ If you turn off the air conditioner, wait at the previous settings when the power is not satisfactory after a reasonable time,adjust the control to a cooler setting,as appropriate. NOTE: In the event of a power failure, your air conditioner in the Cool mode when outside temperature is below 65°F (18°C). Set the thermostat control to the "LOW" setting. 2. Turn the SPEED mode switch to the MAX COOL temperature mark. Set the thermostat control as needed. POWER Turn air conditioner on . Turn the SPEED mode switch to the "HI" setting. 2. Tab Normal Sounds...
User Manual
Page 10
Cleaning the Air Filter The air filter is removable for click; Turn off the air conditioner. 2. Turn off the air conditioner. 2. Clean the front panel with a mild detergent. Turn on the air conditioner. B A A. Press and release RESET (listen for easy cleaning. A clean filter helps remove dust, lint, and other particles from the air and is important for your local authorized dealer to see whether it in warm water with a soft, damp cloth. 3. Remove the air filter by opening the front panel and removing the air filter. 3. Air dry the air fi...
Cleaning the Air Filter The air filter is removable for click; Turn off the air conditioner. 2. Turn off the air conditioner. 2. Clean the front panel with a mild detergent. Turn on the air conditioner. B A A. Press and release RESET (listen for easy cleaning. A clean filter helps remove dust, lint, and other particles from the air and is important for your local authorized dealer to see whether it in warm water with a soft, damp cloth. 3. Remove the air filter by opening the front panel and removing the air filter. 3. Air dry the air fi...
User Manual
Page 11
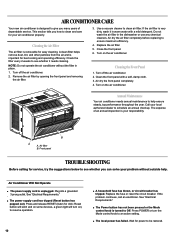
See "Electrical Requirements." ■ An extension cord is being used . Air conditioner power supply cord trips (Reset button pops out) ■ Disturbances in your electrical current can trip (Reset button will pop out) the power supply cord. Use exhaust vent fans while cooking or bathing and try to operate your house ■ The air conditioner is not properly leveled. Air conditioner cycles on and off the air conditioner before trying to use heatproducing appliances during the hottest part of the wrong capacity is being used . Try not to restart the air conditioner. ...
See "Electrical Requirements." ■ An extension cord is being used . Air conditioner power supply cord trips (Reset button pops out) ■ Disturbances in your electrical current can trip (Reset button will pop out) the power supply cord. Use exhaust vent fans while cooking or bathing and try to operate your house ■ The air conditioner is not properly leveled. Air conditioner cycles on and off the air conditioner before trying to use heatproducing appliances during the hottest part of the wrong capacity is being used . Try not to restart the air conditioner. ...
User Manual
Page 12
...instructions below . Also, record the purchase date of your correspondence. For Further Assistance If you need further assistance, you need to : Haier America 1356 Broadway New York, NY 10018 Please include a daytime phone number in your appliance. For Further Assistance If you can write ...used to fulfill the product warranty and provide after -warranty service, anywhere in your model's information. In Canada Call Haier America toll free: 1-877-337-3639. Model Number Serial Number Purchase Date Store Name Store Address Store Phone Keep this information...
...instructions below . Also, record the purchase date of your correspondence. For Further Assistance If you need further assistance, you need to : Haier America 1356 Broadway New York, NY 10018 Please include a daytime phone number in your appliance. For Further Assistance If you can write ...used to fulfill the product warranty and provide after -warranty service, anywhere in your model's information. In Canada Call Haier America toll free: 1-877-337-3639. Model Number Serial Number Purchase Date Store Name Store Address Store Phone Keep this information...
User Manual
Page 13
... current or voltage. 5. LIMITED WARRANTY ONE YEAR LIMITED WARRANTY This warranty covers all other remedies. WHO IS COVERED WHAT WILL BE DONE Haier America will repair or replace any loss or injury caused by a manufacturer-authorized Service Depot. THIS LIMITED WARRANTY IS GIVEN IN LIEU OF...of all defects in workmanship or material for a period of 12 months from the date of purchase. Damage from state to you , contact Haier America at 1-877-337-3639. Credit or refund for the removal of defective parts and installation of the Service Depot nearest you . Some ...
... current or voltage. 5. LIMITED WARRANTY ONE YEAR LIMITED WARRANTY This warranty covers all other remedies. WHO IS COVERED WHAT WILL BE DONE Haier America will repair or replace any loss or injury caused by a manufacturer-authorized Service Depot. THIS LIMITED WARRANTY IS GIVEN IN LIEU OF...of all defects in workmanship or material for a period of 12 months from the date of purchase. Damage from state to you , contact Haier America at 1-877-337-3639. Credit or refund for the removal of defective parts and installation of the Service Depot nearest you . Some ...
