Instruction Manual
Page 2
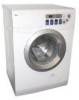
.... This appliance must be properly installed in or on the power cord. Do not use this appliance unless all instructions before use and care guide. 3. English IMPORTANT SAFETY INSTRUCTIONS Warning- Do not operate this appliance for commercial clothes washing. 17. This appliance must be connected to avoid an accident. 12. Read all enclosure panels are broken. 16. This will...
.... This appliance must be properly installed in or on the power cord. Do not use this appliance unless all instructions before use and care guide. 3. English IMPORTANT SAFETY INSTRUCTIONS Warning- Do not operate this appliance for commercial clothes washing. 17. This appliance must be connected to avoid an accident. 12. Read all enclosure panels are broken. 16. This will...

Instruction Manual
Page 3
... repair or replace any part of the appliance or attempt any servicing unless specifically recommended in the user-repair instructions that have been previously cleaned in, washed in, soaked in, or spotted with cooking oils may be explosive under certain circumstances. Do not place items exposed to carry out. 25. This could be produced if the water heater has not been used...
... repair or replace any part of the appliance or attempt any servicing unless specifically recommended in the user-repair instructions that have been previously cleaned in, washed in, soaked in, or spotted with cooking oils may be explosive under certain circumstances. Do not place items exposed to carry out. 25. This could be produced if the water heater has not been used...
Instruction Manual
Page 4
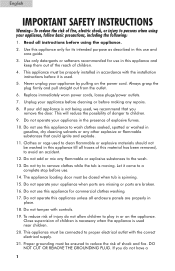
Model number Serial number Date of purchase Staple your manual. This easy-to your receipt to -use manual will need it to record the model and serial number. English DANGER Risk of the unit. Remember to obtain warranty service. 3 Before you for purchasing our Haier product. Thank you throw away your washer & dryer combo unit. You will guide you in back of child entrapment. They are on a label in getting the best use of your old appliance, take off the door so that children cannot easily get trapped inside.
Model number Serial number Date of purchase Staple your manual. This easy-to your receipt to -use manual will need it to record the model and serial number. English DANGER Risk of the unit. Remember to obtain warranty service. 3 Before you for purchasing our Haier product. Thank you throw away your washer & dryer combo unit. You will guide you in back of child entrapment. They are on a label in getting the best use of your old appliance, take off the door so that children cannot easily get trapped inside.
Instruction Manual
Page 5
... Selection 14-15 Washing Methods 16 Laundry Loading 16 Put Detergent in the Dispencer 16 Washing Program Setting 16 Additional Info 17-18 Tips ...17 Normal Operating Sounds 17 CARE AND CLEANING GUIDE 18-19 Cleaning and Maintenance 18 Moving and Vacationing and Storage of Your Unit 18 Warning Codes 19 TROUBLESHOOTING 20-22 ELECTRICAL CONNECTIONS 23 Grounding Instructions 23 Power...
... Selection 14-15 Washing Methods 16 Laundry Loading 16 Put Detergent in the Dispencer 16 Washing Program Setting 16 Additional Info 17-18 Tips ...17 Normal Operating Sounds 17 CARE AND CLEANING GUIDE 18-19 Cleaning and Maintenance 18 Moving and Vacationing and Storage of Your Unit 18 Warning Codes 19 TROUBLESHOOTING 20-22 ELECTRICAL CONNECTIONS 23 Grounding Instructions 23 Power...
Instruction Manual
Page 6
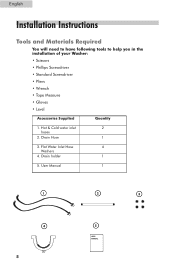
Drain Hose 1 3. Flat Water Inlet Hose 4 Washers 4. User Manual 1 1 2 3 4 5 5 USER MANUAL Drain holder 1 5. English Installation Instructions Tools and Materials Required You will need to have following tools to help you in the installation of your Washer: • Scissors • Phillips Screwdriver • Standard Screwdriver • Pliers • Wrench • Tape Measure • Gloves • Level Accessories Supplied Quantity 1. Hot & Cold water inlet 2 hoses 2.
Drain Hose 1 3. Flat Water Inlet Hose 4 Washers 4. User Manual 1 1 2 3 4 5 5 USER MANUAL Drain holder 1 5. English Installation Instructions Tools and Materials Required You will need to have following tools to help you in the installation of your Washer: • Scissors • Phillips Screwdriver • Standard Screwdriver • Pliers • Wrench • Tape Measure • Gloves • Level Accessories Supplied Quantity 1. Hot & Cold water inlet 2 hoses 2.
Instruction Manual
Page 8
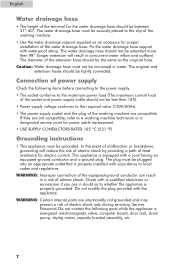
... extension will reduce the risk of electric shock by providing a path of least resistance for electric current. Grounding instructions • This appliance must not be immersed in concurrent water inflow and outflow). The plug must be securely placed to a washing machine technician or a designated service point for power cable replacement. • USE SUPPLY CONDUCTORS RATED 105 ºC (221...
... extension will reduce the risk of electric shock by providing a path of least resistance for electric current. Grounding instructions • This appliance must not be immersed in concurrent water inflow and outflow). The plug must be securely placed to a washing machine technician or a designated service point for power cable replacement. • USE SUPPLY CONDUCTORS RATED 105 ºC (221...
Instruction Manual
Page 9
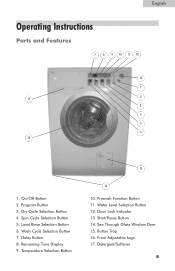
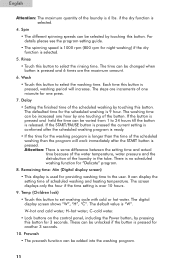
English Operating Instructions Parts and Features 7 8 9 10 11 12 13 1 2 17 3 4 5 6 14 1. Load Rinse Selection Button 6. Door Lock Indicator 13. Start/Pause Button 14. See Through Glass Window Door 15. Detergent/Softener 8 Dry Cycle Selection Button 4. Spin Cycle Selection Button 5. Delay Button 8. Temperature Selection Button 15 16 10. Prewash Function Button 11. Program Button 3. Wash Cycle Selection Button 7. Front Adjustable Legs 17. On/Off Button 2. Remaining Time Display 9. Button Trap 16. Water Level Selection Button 12.
English Operating Instructions Parts and Features 7 8 9 10 11 12 13 1 2 17 3 4 5 6 14 1. Load Rinse Selection Button 6. Door Lock Indicator 13. Start/Pause Button 14. See Through Glass Window Door 15. Detergent/Softener 8 Dry Cycle Selection Button 4. Spin Cycle Selection Button 5. Delay Button 8. Temperature Selection Button 15 16 10. Prewash Function Button 11. Program Button 3. Wash Cycle Selection Button 7. Front Adjustable Legs 17. On/Off Button 2. Remaining Time Display 9. Button Trap 16. Water Level Selection Button 12.
Instruction Manual
Page 11
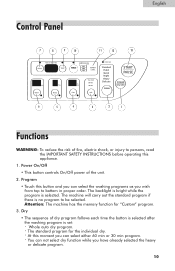
.... 3. English Control Panel 7 8 9 10 11 12 13 Remain time: Min DELAY TEMP Min WASH Time RINSE WATER LEVEL PREWASH WATER LEVEL 00 rpm SPIN Standard 60 Min 30 Min DRY Door lock Standard Habit Quick Night Heavy Delicate PROGRAM PROGRAMME START PAUSE POWER ON/OFF 6 5 4 3 2 1 Functions WARNING: To reduce the risk of fire, electric shock, or injury...
.... 3. English Control Panel 7 8 9 10 11 12 13 Remain time: Min DELAY TEMP Min WASH Time RINSE WATER LEVEL PREWASH WATER LEVEL 00 rpm SPIN Standard 60 Min 30 Min DRY Door lock Standard Habit Quick Night Heavy Delicate PROGRAM PROGRAMME START PAUSE POWER ON/OFF 6 5 4 3 2 1 Functions WARNING: To reduce the risk of fire, electric shock, or injury...
Instruction Manual
Page 12
...time setting is "W". The default value is over 10 hours. 9. C-cold water. • Lock buttons on the control panel, including the Power button, by touching this button to set washing cycle with cold or hot water. Prewash • The prewash function can be added into the washing ... water; These can display the setting time of scheduled washing and heating temperature. For details please see the program setting guide. • The spinning speed is 1000 rpm (800 rpm for the scheduled washing is used for "Delicate" program. 8. It can be changed when button is pressed, washing period...
...time setting is "W". The default value is over 10 hours. 9. C-cold water. • Lock buttons on the control panel, including the Power button, by touching this button to set washing cycle with cold or hot water. Prewash • The prewash function can be added into the washing ... water; These can display the setting time of scheduled washing and heating temperature. For details please see the program setting guide. • The spinning speed is 1000 rpm (800 rpm for the scheduled washing is used for "Delicate" program. 8. It can be changed when button is pressed, washing period...
Instruction Manual
Page 13
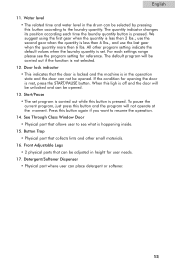
... Adjustable Legs • 2 physical parts that allows user to resume the operation. 14. The quantity indicator changes its position according each settings range please see what is not selected. 12. Door lock indicator • This indicates that collects lints and other program setting indicate the default values when the laundry quantity is pressed. use the last gear when...
... Adjustable Legs • 2 physical parts that allows user to resume the operation. 14. The quantity indicator changes its position according each settings range please see what is not selected. 12. Door lock indicator • This indicates that collects lints and other program setting indicate the default values when the laundry quantity is pressed. use the last gear when...
Instruction Manual
Page 14
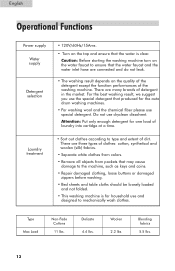
... Cottons 11 lbs. For the best washing result, we suggest you use the special detergent that the water is for one load of laundry into cartidge at a time. • Sort out clothes according to mechanically wash clothes. Delicate 4.4 lbs. Blending fabrics 5.5 lbs. 13 English Operational Functions Power supply Water supply Detergent selection Laundry treatment • 120V/60Hz/15Ams. •...
... Cottons 11 lbs. For the best washing result, we suggest you use the special detergent that the water is for one load of laundry into cartidge at a time. • Sort out clothes according to mechanically wash clothes. Delicate 4.4 lbs. Blending fabrics 5.5 lbs. 13 English Operational Functions Power supply Water supply Detergent selection Laundry treatment • 120V/60Hz/15Ams. •...
Instruction Manual
Page 15
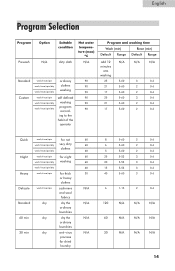
English Program Selection Program Prewash Option N/A Suitable condition dirty cloth Hot water temperature (max) ºC N/A Standard wash/rinse/spin ordinary 90 wash/rinse/spin/dry clothes 90 washing wash/rinse/spin/dry 90 Custom wash/rinse/spin self defined 90 wash/rinse/spin/dry washing 90 program wash/rinse/spin/dry 90 accord- ing to the habit of the operator Program and washing time Wash (min) Rinse (min) Default Range Default Range...
English Program Selection Program Prewash Option N/A Suitable condition dirty cloth Hot water temperature (max) ºC N/A Standard wash/rinse/spin ordinary 90 wash/rinse/spin/dry clothes 90 washing wash/rinse/spin/dry 90 Custom wash/rinse/spin self defined 90 wash/rinse/spin/dry washing 90 program wash/rinse/spin/dry 90 accord- ing to the habit of the operator Program and washing time Wash (min) Rinse (min) Default Range Default Range...
Instruction Manual
Page 18
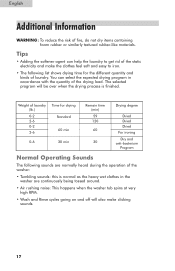
... following list shows drying time for drying Standard 60 min 0-6 30 min Remain time (min) 59 120 60 30 Drying degree Dried Dried Dried For ironing Dry and anti-bacterium Program Normal Operating Sounds The following sounds are continuously being tossed around. • Air rushing noise: This happens when the washer tub spins at very high RPM. • Wash and Rinse cycles going...
... following list shows drying time for drying Standard 60 min 0-6 30 min Remain time (min) 59 120 60 30 Drying degree Dried Dried Dried For ironing Dry and anti-bacterium Program Normal Operating Sounds The following sounds are continuously being tossed around. • Air rushing noise: This happens when the washer tub spins at very high RPM. • Wash and Rinse cycles going...
Instruction Manual
Page 19
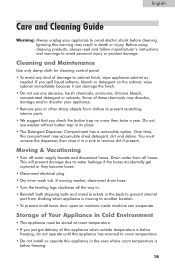
...Disconnect electrical plug. • Dry inner wash tub. Drain water from all the way in. • Reinstall both shipping bolts and metal brackets in Cold Environment • This appliance must remove the dispenser, then rinse it can evaporate. Cleaning and Maintenance Use only damp cloth for cleaning control panel. &#... temperature. • Do not install or operate this warning may accumulate dried detergent, dirt and debris. Storage of Your Appliance in the back to prevent internal part from shaking when appliance is moving washer, disconnect drain hose. • Turn the ...
...Disconnect electrical plug. • Dry inner wash tub. Drain water from all the way in. • Reinstall both shipping bolts and metal brackets in Cold Environment • This appliance must remove the dispenser, then rinse it can evaporate. Cleaning and Maintenance Use only damp cloth for cleaning control panel. &#... temperature. • Do not install or operate this warning may accumulate dried detergent, dirt and debris. Storage of Your Appliance in the back to prevent internal part from shaking when appliance is moving washer, disconnect drain hose. • Turn the ...
Instruction Manual
Page 20
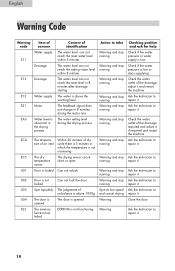
... Code Warning code E11 E12 E13 E31 EA3 EC4 EC5 U01 U02 U03 U04 E22 Item of concern Water supply Drainage Drainage Water supply Motor Water level is abnormal in the drying process The temperature of air vent The dry temperature sensor Door is locked Door is not locked Spin lopsidely...the setting water level within 8 mintues The water level can not reach the reset level in 8 minutes after drainage starting The water is above the warning level The feedback signal does not change in 8 minutes during the motor runs The water setting level during the drying process Within 30 minutes of dry cycle ...
... Code Warning code E11 E12 E13 E31 EA3 EC4 EC5 U01 U02 U03 U04 E22 Item of concern Water supply Drainage Drainage Water supply Motor Water level is abnormal in the drying process The temperature of air vent The dry temperature sensor Door is locked Door is not locked Spin lopsidely...the setting water level within 8 mintues The water level can not reach the reset level in 8 minutes after drainage starting The water is above the warning level The feedback signal does not change in 8 minutes during the motor runs The water setting level during the drying process Within 30 minutes of dry cycle ...
Instruction Manual
Page 21
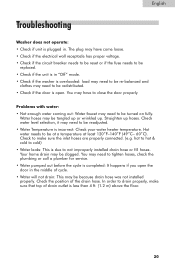
... call a plumber for service. • Water pumped out before the cycle is completed: It happens if you open . Problems with water: • Not enough water coming out: Water faucet may be replaced. • Check if the unit is incorrect: Check your water heater temperature. Check to drain properly, make sure the inlet hoses are properly connected. (e.g. English Troubleshooting Washer does not operate...
... call a plumber for service. • Water pumped out before the cycle is completed: It happens if you open . Problems with water: • Not enough water coming out: Water faucet may be replaced. • Check if the unit is incorrect: Check your water heater temperature. Check to drain properly, make sure the inlet hoses are properly connected. (e.g. English Troubleshooting Washer does not operate...
Instruction Manual
Page 22
... proper instructions on the container and follow proper directions for using undiluted bleach. You will need to wash them in warm or cold water. • Have soap residue: detergent may not be dissolving in "OFF" mode. English Washer is making noise: • Washer may need to be reinstalled. (Check washer installation section) • Washer load may need to read Operating Guide...
... proper instructions on the container and follow proper directions for using undiluted bleach. You will need to wash them in warm or cold water. • Have soap residue: detergent may not be dissolving in "OFF" mode. English Washer is making noise: • Washer may need to be reinstalled. (Check washer installation section) • Washer load may need to read Operating Guide...
Instruction Manual
Page 23
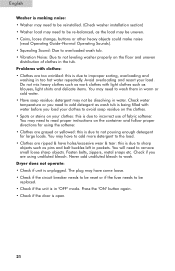
... dry setting may be required or clothes in the dryer may need to be leveled evenly. Adjust for shorter drying time. • Mix with synthetic fabric. English Dryer is clean and dust free. • Dryer load needs to be resorted. Read Operating Guide-Normal Operating Sounds. Sort and separate different fabrics. • Use a fabric softener. 22 Dryer making noise when drying: • Coins, loose change...
... dry setting may be required or clothes in the dryer may need to be leveled evenly. Adjust for shorter drying time. • Mix with synthetic fabric. English Dryer is clean and dust free. • Dryer load needs to be resorted. Read Operating Guide-Normal Operating Sounds. Sort and separate different fabrics. • Use a fabric softener. 22 Dryer making noise when drying: • Coins, loose change...
Instruction Manual
Page 24
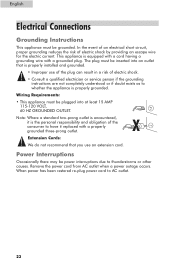
... other causes. Wiring Requirements: • This appliance must be plugged into an outlet that you use of the plug can result in a risk of electric shock. • Consult a qualified electrician or service person if the grounding instructions are not completely understood or if doubt exists as to have it replaced with a grounded plug. Remove the power cord...
... other causes. Wiring Requirements: • This appliance must be plugged into an outlet that you use of the plug can result in a risk of electric shock. • Consult a qualified electrician or service person if the grounding instructions are not completely understood or if doubt exists as to have it replaced with a grounded plug. Remove the power cord...
Instruction Manual
Page 25
Haier is solely responsible for the removal and replacement of the problem. A product whose original serial number has been removed or altered. Damage from any part free of original purchase 90 days parts from incorrect electrical current, voltage ...service center. For the name and telephone number of household fuses, circuit breakers, wiring or plumbing. NOTE: This warranty commences on how long an implied warranty lasts, so the above limitations may have available the following information: Model number and serial number of purchase. Any service charges not specifically...
Haier is solely responsible for the removal and replacement of the problem. A product whose original serial number has been removed or altered. Damage from any part free of original purchase 90 days parts from incorrect electrical current, voltage ...service center. For the name and telephone number of household fuses, circuit breakers, wiring or plumbing. NOTE: This warranty commences on how long an implied warranty lasts, so the above limitations may have available the following information: Model number and serial number of purchase. Any service charges not specifically...


