User Manual
Page 2
...prevent spoilage. 11 When using this appliance. Do not use a cord that a certified technician performs the service. 6) If your wine cooler before cleaning or before making any reason this product requires service, we recommend that have become frayed or otherwise damaged. Note:...we strongly recommend that shows cracks or abrasion damage along its intended purpose as described in this use and care guide. 2) This wine cooler must be properly installed in accordance with the installation instructions before using this appliance, always exercise basic safety precautions, including the...
...prevent spoilage. 11 When using this appliance. Do not use a cord that a certified technician performs the service. 6) If your wine cooler before cleaning or before making any reason this product requires service, we recommend that have become frayed or otherwise damaged. Note:...we strongly recommend that shows cracks or abrasion damage along its intended purpose as described in this use and care guide. 2) This wine cooler must be properly installed in accordance with the installation instructions before using this appliance, always exercise basic safety precautions, including the...
User Manual
Page 3
...you throw away your manual. You will guide you for using our Haier product. This easy-to-use of purchase Staple your receipt to your old wine cooler, take off the doors. Model number Serial number Date of your wine cooler. As per UL 250 11.2.6 Thank you in place so that... children may not easily climb inside. Remember to obtain warranty service. 22 EEnnggllisishh For Future Reference Please SAVE THESE INSTRUCTIONS DANGER Risk of the wine cooler. Leave the shelves in getting the best use manual will need it to record the model and serial number. They are on a ...
...you throw away your manual. You will guide you for using our Haier product. This easy-to-use of purchase Staple your receipt to your old wine cooler, take off the doors. Model number Serial number Date of your wine cooler. As per UL 250 11.2.6 Thank you in place so that... children may not easily climb inside. Remember to obtain warranty service. 22 EEnnggllisishh For Future Reference Please SAVE THESE INSTRUCTIONS DANGER Risk of the wine cooler. Leave the shelves in getting the best use manual will need it to record the model and serial number. They are on a ...
User Manual
Page 4
EEnngglliisshh Table Of Contents PAGE Safety Precautions 1 Parts And Features 4 Installing Your Wine Cooler 5 Unpacking Your Wine Cooler 5 Leveling Your Wine Cooler 5 Proper Air Circulation 5 Electrical Requirements 6 Wine Cooler Features And Use 7 Initial Set Up 7 Temperature Adjustment 7 Shelving 9 Interior Light 9 Door Lock 9 Normal Operating Sounds 9 Proper Wine Cooler Care and Cleaning 10 Cleaning and Maintenance 10 Power Interruptions 11 Vacation and Moving Care 11 Troubleshooting 12 Warranty Information 13 33
EEnngglliisshh Table Of Contents PAGE Safety Precautions 1 Parts And Features 4 Installing Your Wine Cooler 5 Unpacking Your Wine Cooler 5 Leveling Your Wine Cooler 5 Proper Air Circulation 5 Electrical Requirements 6 Wine Cooler Features And Use 7 Initial Set Up 7 Temperature Adjustment 7 Shelving 9 Interior Light 9 Door Lock 9 Normal Operating Sounds 9 Proper Wine Cooler Care and Cleaning 10 Cleaning and Maintenance 10 Power Interruptions 11 Vacation and Moving Care 11 Troubleshooting 12 Warranty Information 13 33
User Manual
Page 5
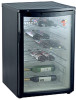
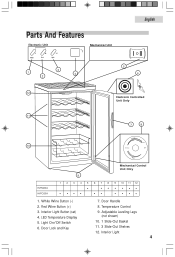
Door Handle 8. Adjustable Leveling Legs (not shown) 10. 1 Slide-Out Basket 11. 3 Slide-Out Shelves 12. Red Wine Button (+) 3. LED Temperature Display 5. Interior Light 44 Temperature Control 9. Interior Light Button (set) 4. Light On/Off Switch 6. Parts And Features Electronic Unit White + Red Set Light Mechanical Unit F 5 3 1 4 2 EEnngglilsishh 6 12 Electronic Controlled Unit Only 11 7 8 10 White Mid Range Coldest OFF Red Mechanical Control Unit Only 9 HVFM20A HVFO20A 1 2 3 4 5 6 7 8 9 10 11 12 1. White Wine Button (-) 2. Door Lock and Key 7.
Door Handle 8. Adjustable Leveling Legs (not shown) 10. 1 Slide-Out Basket 11. 3 Slide-Out Shelves 12. Red Wine Button (+) 3. LED Temperature Display 5. Interior Light 44 Temperature Control 9. Interior Light Button (set) 4. Light On/Off Switch 6. Parts And Features Electronic Unit White + Red Set Light Mechanical Unit F 5 3 1 4 2 EEnngglilsishh 6 12 Electronic Controlled Unit Only 11 7 8 10 White Mid Range Coldest OFF Red Mechanical Control Unit Only 9 HVFM20A HVFO20A 1 2 3 4 5 6 7 8 9 10 11 12 1. White Wine Button (-) 2. Door Lock and Key 7.
User Manual
Page 6
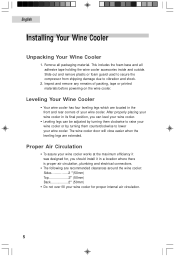
... 2. Slide out and remove plastic or foam guard used to secure the compressor from shipping damage due to lower your wine cooler. Remove all adhesive tape holding the wine cooler accessories inside and outside. This includes the foam base and all packaging material. After properly placing your...the front and rear corners of packing, tape or printed materials before powering on the wine cooler. Leveling Your Wine Cooler • Your wine cooler has four leveling legs which are extended. The wine cooler door will close easier when the leveling legs are located in its final position,...
... 2. Slide out and remove plastic or foam guard used to secure the compressor from shipping damage due to lower your wine cooler. Remove all adhesive tape holding the wine cooler accessories inside and outside. This includes the foam base and all packaging material. After properly placing your...the front and rear corners of packing, tape or printed materials before powering on the wine cooler. Leveling Your Wine Cooler • Your wine cooler has four leveling legs which are extended. The wine cooler door will close easier when the leveling legs are located in its final position,...
User Manual
Page 7
...for free-standing installation only. Any floor unevenness should be corrected with proper grounding to power the wine cooler. • Avoid the use of the wine cooler. • Your wine cooler is designed for built-in any location not properly insulated or heated e.g. Install Limitations •...cutting off the third grounding in order to operate in temperature settings below 55˚ Fahrenheit. • Select a suitable location for the wine cooler and may result in shock hazard. EEnngglilsishh Electrical Requirement • Make sure there is a suitable power Outlet (115 volts, 15 ...
...for free-standing installation only. Any floor unevenness should be corrected with proper grounding to power the wine cooler. • Avoid the use of the wine cooler. • Your wine cooler is designed for built-in any location not properly insulated or heated e.g. Install Limitations •...cutting off the third grounding in order to operate in temperature settings below 55˚ Fahrenheit. • Select a suitable location for the wine cooler and may result in shock hazard. EEnngglilsishh Electrical Requirement • Make sure there is a suitable power Outlet (115 volts, 15 ...
User Manual
Page 8
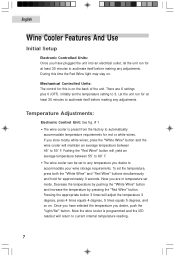
... degrees, 5 times equals 5 degrees, and so on the back of the unit. Decrease the temperature by pushing the "White Wine" button and increase the temperature by pressing the "Red Wine" button. Once you have plugged the unit into an electrical outlet, let the unit run for red or white.... Pressing the appropriate button 3 times will yield an average temperature between 45˚ to 60˚ F. • The wine cooler can be set mode. EEnngglliisshh Wine Cooler Features And Use Initial Setup Electronic Controlled Units: Once you have selected the temperature you desire, push the "Light/Set"...
... degrees, 5 times equals 5 degrees, and so on the back of the unit. Decrease the temperature by pushing the "White Wine" button and increase the temperature by pressing the "Red Wine" button. Once you have plugged the unit into an electrical outlet, let the unit run for red or white.... Pressing the appropriate button 3 times will yield an average temperature between 45˚ to 60˚ F. • The wine cooler can be set mode. EEnngglliisshh Wine Cooler Features And Use Initial Setup Electronic Controlled Units: Once you have selected the temperature you desire, push the "Light/Set"...
User Manual
Page 9
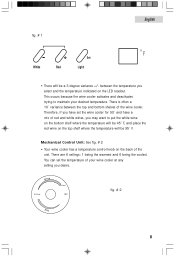
... # 1 White + Red Set Light EEnngglilsishh F • There will be a 3 degree variance +/- Mechanical Control Unit: See fig. # 2 • Your wine cooler has a temperature control knob on the LED readout. White Mid Range Coldest OFF fig. # 2 Red 88 Therefore, if you desire. There are 6 settings...: 1 being the warmest and 6 being the coolest. between the top and bottom shelves of your desired temperature. This occurs because the wine cooler activates and deactivates trying to put the white wine on the bottom shelf where the temperature will be 45˚ F, and place the red...
... # 1 White + Red Set Light EEnngglilsishh F • There will be a 3 degree variance +/- Mechanical Control Unit: See fig. # 2 • Your wine cooler has a temperature control knob on the LED readout. White Mid Range Coldest OFF fig. # 2 Red 88 Therefore, if you desire. There are 6 settings...: 1 being the warmest and 6 being the coolest. between the top and bottom shelves of your desired temperature. This occurs because the wine cooler activates and deactivates trying to put the white wine on the bottom shelf where the temperature will be 45˚ F, and place the red...
User Manual
Page 10
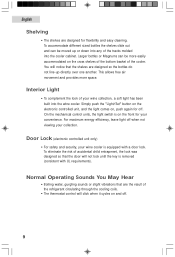
Interior Light • To complement the look of your wine cooler is equipped with UL requirements). On the mechanical control units, the light switch is...For maximum energy efficiency, leave light off . Door Lock (electronic controlled unit only) • For safety and security, your wine collection, a soft light has been built into the cooler cabinet. Larger bottles or Magnums can be more space. Simply push the... do not line-up or down into any of the tracks molded into the wine cooler. You will not lock until the key is on , push again for flexibility and easy cleaning.
Interior Light • To complement the look of your wine cooler is equipped with UL requirements). On the mechanical control units, the light switch is...For maximum energy efficiency, leave light off . Door Lock (electronic controlled unit only) • For safety and security, your wine collection, a soft light has been built into the cooler cabinet. Larger bottles or Magnums can be more space. Simply push the... do not line-up or down into any of the tracks molded into the wine cooler. You will not lock until the key is on , push again for flexibility and easy cleaning.
User Manual
Page 11
..., ammonia, chlorine bleach,concentrated detergents, solvents or metal scouring pads. EEnngglilsishh Proper Wine Cooler Care and Cleaning Cleaning and Maintenance Warning: To avoid electric shock always unplug your wine cooler. • Rinse with clean warm water and dry with warm water. Caution... always read and follow manufacturer's instructions and warnings to general instructions. Ignoring this warning may dissolve, damage and/or discolor your wine cooler. Use sponge or soft cloth, dampened with the cleaning solution, to assure a proper seal. • Petroleum jelly applied...
..., ammonia, chlorine bleach,concentrated detergents, solvents or metal scouring pads. EEnngglilsishh Proper Wine Cooler Care and Cleaning Cleaning and Maintenance Warning: To avoid electric shock always unplug your wine cooler. • Rinse with clean warm water and dry with warm water. Caution... always read and follow manufacturer's instructions and warnings to general instructions. Ignoring this warning may dissolve, damage and/or discolor your wine cooler. Use sponge or soft cloth, dampened with the cleaning solution, to assure a proper seal. • Petroleum jelly applied...
User Manual
Page 12
When moving always move with the unit lying down. Do not move the wine cooler vertically. Vacation and Moving Care • For long vacations or absences, unplug the wine cooler and clean the wine cooler and door gaskets according to thunderstorms or other causes. EEnngglliisshh Power Interruptions • Occasionally there may be power interruptions...
When moving always move with the unit lying down. Do not move the wine cooler vertically. Vacation and Moving Care • For long vacations or absences, unplug the wine cooler and clean the wine cooler and door gaskets according to thunderstorms or other causes. EEnngglliisshh Power Interruptions • Occasionally there may be power interruptions...
User Manual
Page 13
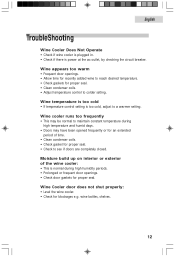
.... • Check gasket for proper seal. • Check to see if doors are completely closed. wine bottles, shelves. 1212 EEnngglilsishh TroubleShooting Wine Cooler Does Not Operate • Check if wine cooler is plugged in. • Check if there is normal during high temperature and humid days. &#...• Check door gaskets for proper seal. Wine cooler runs too frequently • This may be normal to colder setting. Wine appears too warm • Frequent door openings. • Allow time for recently added wine to a warmer setting. Wine temperature is too cold • If temperature ...
.... • Check gasket for proper seal. • Check to see if doors are completely closed. wine bottles, shelves. 1212 EEnngglilsishh TroubleShooting Wine Cooler Does Not Operate • Check if wine cooler is plugged in. • Check if there is normal during high temperature and humid days. &#...• Check door gaskets for proper seal. Wine cooler runs too frequently • This may be normal to colder setting. Wine appears too warm • Frequent door openings. • Allow time for recently added wine to a warmer setting. Wine temperature is too cold • If temperature ...


