User Manual
Page 2
Do not use and care guide. 2) This wine cooler must be properly installed in accordance with the installation instructions before it is used , we recommend that you remove the door and leave the shelves in place. Note: If for its length, the plug or the connector end. 5) Unplug your wine cooler by pulling on the power cord. It is not being used . Always grasp the plug firmly and pull straight out...
Do not use and care guide. 2) This wine cooler must be properly installed in accordance with the installation instructions before it is used , we recommend that you remove the door and leave the shelves in place. Note: If for its length, the plug or the connector end. 5) Unplug your wine cooler by pulling on the power cord. It is not being used . Always grasp the plug firmly and pull straight out...
User Manual
Page 3
... warranty service. 22 You will guide you in getting the best use manual will need it to -use of child entrapment. Before you for using our Haier product. As per UL 250 11.2.6 Thank you throw away your manual. They are on a label in place so that children may not easily climb inside. Remember to your old wine cooler, take off the doors. Leave the shelves...
... warranty service. 22 You will guide you in getting the best use manual will need it to -use of child entrapment. Before you for using our Haier product. As per UL 250 11.2.6 Thank you throw away your manual. They are on a label in place so that children may not easily climb inside. Remember to your old wine cooler, take off the doors. Leave the shelves...
User Manual
Page 4
EEnngglliisshh Table Of Contents PAGE Safety Precautions 1 Parts And Features 4 Installing Your Wine Cooler 5 Unpacking Your Wine Cooler 5 Leveling Your Wine Cooler 5 Proper Air Circulation 5 Electrical Requirements 6 Wine Cooler Features And Use 7 Initial Set Up 7 Temperature Adjustment 7 Shelving 9 Interior Light 9 Door Lock 9 Normal Operating Sounds 9 Proper Wine Cooler Care and Cleaning 10 Cleaning and Maintenance 10 Power Interruptions 11 Vacation and Moving Care 11 Troubleshooting 12 Warranty Information 13 33
EEnngglliisshh Table Of Contents PAGE Safety Precautions 1 Parts And Features 4 Installing Your Wine Cooler 5 Unpacking Your Wine Cooler 5 Leveling Your Wine Cooler 5 Proper Air Circulation 5 Electrical Requirements 6 Wine Cooler Features And Use 7 Initial Set Up 7 Temperature Adjustment 7 Shelving 9 Interior Light 9 Door Lock 9 Normal Operating Sounds 9 Proper Wine Cooler Care and Cleaning 10 Cleaning and Maintenance 10 Power Interruptions 11 Vacation and Moving Care 11 Troubleshooting 12 Warranty Information 13 33
User Manual
Page 5
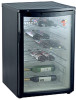
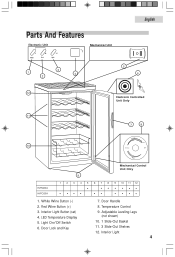
White Wine Button (-) 2. Interior Light Button (set) 4. LED Temperature Display 5. Door Lock and Key 7. Interior Light 44 Door Handle 8. Adjustable Leveling Legs (not shown) 10. 1 Slide-Out Basket 11. 3 Slide-Out Shelves 12. Parts And Features Electronic Unit White + Red Set Light Mechanical Unit F 5 3 1 4 2 EEnngglilsishh 6 12 Electronic Controlled Unit Only 11 7 8 10 White Mid Range Coldest OFF Red Mechanical Control Unit Only 9 HVFM20A HVFO20A 1 2 3 4 5 6 7 8 9 10 11 12 1. Red Wine Button (+) 3. Light On/Off Switch 6. Temperature Control 9.
White Wine Button (-) 2. Interior Light Button (set) 4. LED Temperature Display 5. Door Lock and Key 7. Interior Light 44 Door Handle 8. Adjustable Leveling Legs (not shown) 10. 1 Slide-Out Basket 11. 3 Slide-Out Shelves 12. Parts And Features Electronic Unit White + Red Set Light Mechanical Unit F 5 3 1 4 2 EEnngglilsishh 6 12 Electronic Controlled Unit Only 11 7 8 10 White Mid Range Coldest OFF Red Mechanical Control Unit Only 9 HVFM20A HVFO20A 1 2 3 4 5 6 7 8 9 10 11 12 1. Red Wine Button (+) 3. Light On/Off Switch 6. Temperature Control 9.
User Manual
Page 6
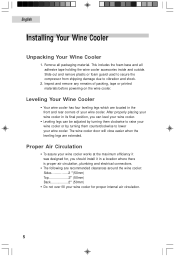
... wine cooler accessories inside and outside. Leveling Your Wine Cooler • Your wine cooler has four leveling legs which are extended. Slide out and remove plastic or foam guard used to secure the compressor from shipping damage due to lower your wine cooler. The wine cooler door will close easier when the leveling legs are located in the front and rear corners of packing, tape or printed materials before powering on the wine cooler...
... wine cooler accessories inside and outside. Leveling Your Wine Cooler • Your wine cooler has four leveling legs which are extended. Slide out and remove plastic or foam guard used to secure the compressor from shipping damage due to lower your wine cooler. The wine cooler door will close easier when the leveling legs are located in the front and rear corners of packing, tape or printed materials before powering on the wine cooler...
User Manual
Page 7
... install your wine cooler in temperature settings below 55˚ Fahrenheit. • Select a suitable location for the wine cooler on the front and rear bottom corners of three plug adapters or cutting off the third grounding in order to operate in any location not properly insulated or heated e.g. EEnngglilsishh Electrical Requirement • Make sure there is a suitable power Outlet (115 volts, 15 amps outlet) with the leveling...
... install your wine cooler in temperature settings below 55˚ Fahrenheit. • Select a suitable location for the wine cooler on the front and rear bottom corners of three plug adapters or cutting off the third grounding in order to operate in any location not properly insulated or heated e.g. EEnngglilsishh Electrical Requirement • Make sure there is a suitable power Outlet (115 volts, 15 amps outlet) with the leveling...
User Manual
Page 8
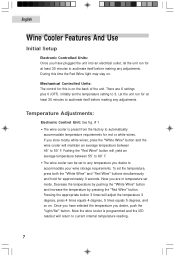
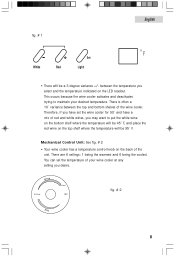
... 3 seconds. To set the temperature setting to current internal temperature reading. 77 Temperature Adjustments: Electronic Control Unit: See fig. # 1 • The wine cooler is programmed and the LED readout will yield an average temperature between 45˚ to accommodate your wine storage requirements. If you desire to 50˚ F. Pushing the "Red Wine" button will return to 3. Initially set the temperature, press both the "White Wine" and "Red Wine" buttons simultaneously and hold...
... 3 seconds. To set the temperature setting to current internal temperature reading. 77 Temperature Adjustments: Electronic Control Unit: See fig. # 1 • The wine cooler is programmed and the LED readout will yield an average temperature between 45˚ to accommodate your wine storage requirements. If you desire to 50˚ F. Pushing the "Red Wine" button will return to 3. Initially set the temperature, press both the "White Wine" and "Red Wine" buttons simultaneously and hold...
User Manual
Page 9
... 6 being the coolest. You can set the wine cooler for 50˚ and have set the temperature of red and white wines, you select and the temperature indicated on the top shelf where the temperature will be a 3 degree variance +/- White Mid Range Coldest OFF fig. # 2 Red 88 fig. # 1 White + Red Set Light EEnngglilsishh F • There will be 55˚ F. between the top and bottom shelves of the unit.
... 6 being the coolest. You can set the wine cooler for 50˚ and have set the temperature of red and white wines, you select and the temperature indicated on the top shelf where the temperature will be a 3 degree variance +/- White Mid Range Coldest OFF fig. # 2 Red 88 fig. # 1 White + Red Set Light EEnngglilsishh F • There will be 55˚ F. between the top and bottom shelves of the unit.
User Manual
Page 10
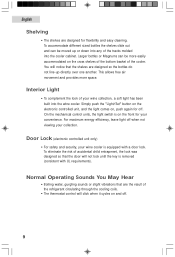
... sounds or slight vibrations that are designed for flexibility and easy cleaning. For maximum energy efficiency, leave light off when not viewing your wine collection, a soft light has been built into the cooler cabinet. To accommodate different sized bottles the shelves slide out and can be moved up directly over one another. Interior Light • To complement the look of your collection. Door Lock (electronic controlled...
... sounds or slight vibrations that are designed for flexibility and easy cleaning. For maximum energy efficiency, leave light off when not viewing your wine collection, a soft light has been built into the cooler cabinet. To accommodate different sized bottles the shelves slide out and can be moved up directly over one another. Interior Light • To complement the look of your collection. Door Lock (electronic controlled...
User Manual
Page 11
...injury. Door Gaskets: • Clean door gaskets every three months according to avoid personal injury or product damage. Caution: Before using cleaning products, always read and follow manufacturer's instructions and warnings to general instructions. EEnngglilsishh Proper Wine Cooler Care and Cleaning Cleaning and Maintenance Warning: To avoid electric shock always unplug your wine cooler before cleaning. Ignoring this warning may dissolve, damage and/or discolor your wine cooler. • Rinse with clean warm water and dry with warm water. General: • Prepare a cleaning...
...injury. Door Gaskets: • Clean door gaskets every three months according to avoid personal injury or product damage. Caution: Before using cleaning products, always read and follow manufacturer's instructions and warnings to general instructions. EEnngglilsishh Proper Wine Cooler Care and Cleaning Cleaning and Maintenance Warning: To avoid electric shock always unplug your wine cooler before cleaning. Ignoring this warning may dissolve, damage and/or discolor your wine cooler. • Rinse with clean warm water and dry with warm water. General: • Prepare a cleaning...
User Manual
Page 12
... move with the unit lying down. Prop doors open, so air can circulate inside. Possible damage to thunderstorms or other causes. Remove the power cord from AC outlet when a power outage occurs. Vacation and Moving Care • For long vacations or absences, unplug the wine cooler and clean the wine cooler and door gaskets according to AC outlet. When power has been restored, replug power cord to "General cleaning" section.
... move with the unit lying down. Prop doors open, so air can circulate inside. Possible damage to thunderstorms or other causes. Remove the power cord from AC outlet when a power outage occurs. Vacation and Moving Care • For long vacations or absences, unplug the wine cooler and clean the wine cooler and door gaskets according to AC outlet. When power has been restored, replug power cord to "General cleaning" section.
User Manual
Page 13
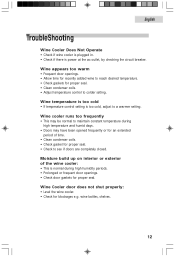
.... wine bottles, shelves. 1212 Wine temperature is too cold • If temperature control setting is power at the ac outlet, by checking the circuit breaker. Wine appears too warm • Frequent door openings. • Allow time for recently added wine to reach desired temperature. • Check gaskets for blockages e.g. Wine Cooler door does not shut properly: • Level the wine cooler. • Check for proper seal. • Clean condenser coils. • Adjust temperature control to colder setting. EEnngglilsishh TroubleShooting Wine Cooler Does...
.... wine bottles, shelves. 1212 Wine temperature is too cold • If temperature control setting is power at the ac outlet, by checking the circuit breaker. Wine appears too warm • Frequent door openings. • Allow time for recently added wine to reach desired temperature. • Check gaskets for blockages e.g. Wine Cooler door does not shut properly: • Level the wine cooler. • Check for proper seal. • Clean condenser coils. • Adjust temperature control to colder setting. EEnngglilsishh TroubleShooting Wine Cooler Does...

User Manual
Page 14
..., lack of the sealed system e.g. Decorative trims or replaceable light bulbs. Engglliisshh Limited Warranty What is covered. 1. IT DOES NOT COVER THE FOLLOWING: Damages from other rights, which proves to you. Damage from improper installation. Labor is granted in shipping. Contact your nearest authorized service center. New York, NY 10018. This warranty covers all parts except finish, and trim...
..., lack of the sealed system e.g. Decorative trims or replaceable light bulbs. Engglliisshh Limited Warranty What is covered. 1. IT DOES NOT COVER THE FOLLOWING: Damages from other rights, which proves to you. Damage from improper installation. Labor is granted in shipping. Contact your nearest authorized service center. New York, NY 10018. This warranty covers all parts except finish, and trim...


