
Product Manual
Page 4
...of purchase Staple your receipt to your old refrigerator or freezer, take off the doors. They are on a label in getting the best use manual will need it to record the model and serial number. It is designed for using our Haier product. Before you in back of child entrapment.... Remember to obtain warranty service. 2 SAVE THESE INSTRUCTIONS DANGER Risk of the refrigerator. You will guide you throw away your manual.
...of purchase Staple your receipt to your old refrigerator or freezer, take off the doors. They are on a label in getting the best use manual will need it to record the model and serial number. It is designed for using our Haier product. Before you in back of child entrapment.... Remember to obtain warranty service. 2 SAVE THESE INSTRUCTIONS DANGER Risk of the refrigerator. You will guide you throw away your manual.
Product Manual
Page 6
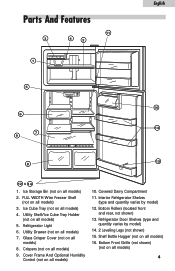
Ice Cube Tray (not on all models) 4. Glass Crisper Cover (not on all models) 8. Utility Drawer (not on all models) 7. Crispers (not on all models) 9. Interior Refrigerator Shelves (type and quantity varies by model) 14. 2 Leveling Legs (not shown) 15. Bottom Front Grille (not shown) (not on all models) 4 Utility Shelf/Ice Cube Tray Holder (not on all...
Ice Cube Tray (not on all models) 4. Glass Crisper Cover (not on all models) 8. Utility Drawer (not on all models) 7. Crispers (not on all models) 9. Interior Refrigerator Shelves (type and quantity varies by model) 14. 2 Leveling Legs (not shown) 15. Bottom Front Grille (not shown) (not on all models) 4 Utility Shelf/Ice Cube Tray Holder (not on all...
Product Manual
Page 9
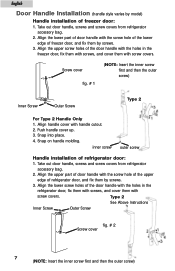
...lower part of freezer door, and fix them by screws. 3. Snap on handle molding. Take out door handle, screws and screw covers from refrigerator accessory bag. 2. Align handle cover with the screw hole of the lower edge of door handle with handle cutout. 2. Align the lower screw... holes of the door handle with the holes in the freezer door, fix them with screws, and cover them by model) Handle installation of door handle with screw covers. Align the upper part of freezer door: 1. Type 2 See Above Instructions Inner Screw Outer Screw...
...lower part of freezer door, and fix them by screws. 3. Snap on handle molding. Take out door handle, screws and screw covers from refrigerator accessory bag. 2. Align handle cover with the screw hole of the lower edge of door handle with handle cutout. 2. Align the lower screw... holes of the door handle with the holes in the freezer door, fix them with screws, and cover them by model) Handle installation of door handle with screw covers. Align the upper part of freezer door: 1. Type 2 See Above Instructions Inner Screw Outer Screw...
Product Manual
Page 13
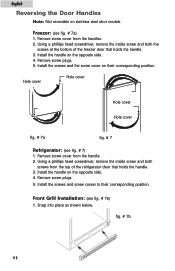
...opposite side. 4. Install the handle on the opposite side. 4. Install the screws and the screw cover on stainless steel door models. English Reversing the Door Handles Note: Not reversible on their corresponding position. Remove screw cover from the handle. 2. Snap into...Remove screw plugs. 5. Front Grill Installation: (see fig. # 7a) 1. Hole cover Hole cover Hole cover Hole cover fig. # 7a fig. # 7 Refrigerator: (see fig. # 7) 1. Using a phillips head screwdriver, remove the inside screw and both screws from the top of the freezer door that holds the handle. ...
...opposite side. 4. Install the handle on the opposite side. 4. Install the screws and the screw cover on stainless steel door models. English Reversing the Door Handles Note: Not reversible on their corresponding position. Remove screw cover from the handle. 2. Snap into...Remove screw plugs. 5. Front Grill Installation: (see fig. # 7a) 1. Hole cover Hole cover Hole cover Hole cover fig. # 7a fig. # 7 Refrigerator: (see fig. # 7) 1. Using a phillips head screwdriver, remove the inside screw and both screws from the top of the freezer door that holds the handle. ...
Product Manual
Page 14
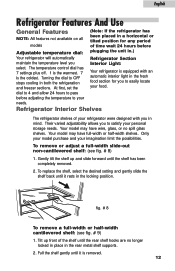
...hours before adjusting the temperature to satisfy your food. At first, set the Interior Light: Your refrigerator is equipped with you to OFF stops cooling in both the refrigeration and freezer sections. Only your model purchase and your needs. fig. # 8 To remove a full-width or half-width cantilevered ...see fig. # 8) 1. Pull the shelf gently until it is the coldest. English Refrigerator Features And Use General Features NOTE: All features not available on all models (Note: If the refrigerator has been placed in a horizontal or tilted position for you in mind. Turning the ...
...hours before adjusting the temperature to satisfy your food. At first, set the Interior Light: Your refrigerator is equipped with you to OFF stops cooling in both the refrigeration and freezer sections. Only your model purchase and your needs. fig. # 8 To remove a full-width or half-width cantilevered ...see fig. # 8) 1. Pull the shelf gently until it is the coldest. English Refrigerator Features And Use General Features NOTE: All features not available on all models (Note: If the refrigerator has been placed in a horizontal or tilted position for you in mind. Turning the ...
Product Manual
Page 17
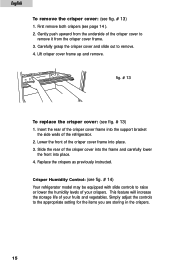
... to remove it from the crisper cover frame. 3. Lift crisper cover frame up and remove. English To remove the crisper cover: (see fig. # 14) Your refrigerator model may be equipped with slide controls to raise or lower the humidity levels of your fruits and vegetables.
... to remove it from the crisper cover frame. 3. Lift crisper cover frame up and remove. English To remove the crisper cover: (see fig. # 14) Your refrigerator model may be equipped with slide controls to raise or lower the humidity levels of your fruits and vegetables.

Product Manual
Page 21
English Ice Cube Trays: Your refrigerator is not prepackaged, be sure to maximize shelf life. • Fruit should be washed and dried then stored in a crisper set for safe storage: • ... necessary. Follow the suggestions below for low humidity. If you have humidity controlled crispers place the items in sealed plastic bags before storing in the refrigeration. This will prevent unnecessary energy use. • Fresh seafood should be used the same day as purchased. • When storing meats in the fresh food...
English Ice Cube Trays: Your refrigerator is not prepackaged, be sure to maximize shelf life. • Fruit should be washed and dried then stored in a crisper set for safe storage: • ... necessary. Follow the suggestions below for low humidity. If you have humidity controlled crispers place the items in sealed plastic bags before storing in the refrigeration. This will prevent unnecessary energy use. • Fresh seafood should be used the same day as purchased. • When storing meats in the fresh food...
Product Manual
Page 26
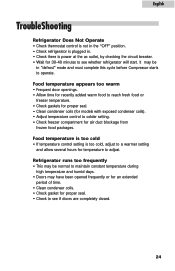
... setting and allow several hours for proper seal. • Check to operate. English TroubleShooting Refrigerator Does Not Operate • Check thermostat control is not in the "OFF" position. • Check refrigerator is plugged in "defrost" mode and must complete this cycle before Compressor starts to see ...food to reach fresh food or freezer temperature. • Check gaskets for proper seal. • Clean condenser coils (for models with exposed condenser coils). • Adjust temperature control to colder setting. • Check freezer compartment for 30-40 minutes to adjust.
... setting and allow several hours for proper seal. • Check to operate. English TroubleShooting Refrigerator Does Not Operate • Check thermostat control is not in the "OFF" position. • Check refrigerator is plugged in "defrost" mode and must complete this cycle before Compressor starts to see ...food to reach fresh food or freezer temperature. • Check gaskets for proper seal. • Clean condenser coils (for models with exposed condenser coils). • Adjust temperature control to colder setting. • Check freezer compartment for 30-40 minutes to adjust.


