
Product Manual
Page 3
... these extremely cold surfaces. 9) Do not refreeze foods, which have any off-odor or offcolor should not be refrozen and should be properly installed in accordance with the installation instructions before making any reason this appliance. Always grasp the plug firmly and pull straight out from the outlet. 4) Repair or replace immediately, all of the instructions before using this appliance...
... these extremely cold surfaces. 9) Do not refreeze foods, which have any off-odor or offcolor should not be refrozen and should be properly installed in accordance with the installation instructions before making any reason this appliance. Always grasp the plug firmly and pull straight out from the outlet. 4) Repair or replace immediately, all of the instructions before using this appliance...
Product Manual
Page 4
... the model and serial number. SAVE THESE INSTRUCTIONS DANGER Risk of child entrapment. Leave the shelves in back of the refrigerator. They are on a label in place so that children may not easily climb inside. You will guide you in getting the best use of your manual. Before you for freestanding installation only. 11) Do not operate your old refrigerator or freezer, take off the doors...
... the model and serial number. SAVE THESE INSTRUCTIONS DANGER Risk of child entrapment. Leave the shelves in back of the refrigerator. They are on a label in place so that children may not easily climb inside. You will guide you in getting the best use of your manual. Before you for freestanding installation only. 11) Do not operate your old refrigerator or freezer, take off the doors...
Product Manual
Page 5
... 5 Electrical Requirements 6 Door Handle Installation 7 Door Alignment 8 Reversing the Door Swing 8 Reversing The Door Handles 11 Installing Front Grill 11 Refrigerator Features And Use 12 General Features 12 Refrigerator Interior Shelves 12 Utility Drawer And Cover 13 Crisper and Crisper Cover 14 Refrigerator Door Shelves 16 Freezer Features 17 Food Storage Information 19 Normal Operating Sounds 21 Proper Refrigerator Care and Cleaning 22 Cleaning and Maintenance 22 Light Bulb Replacement 23 Power Interruptions 23 Vacation and Moving Care 23 Troubleshooting 24 Warranty...
... 5 Electrical Requirements 6 Door Handle Installation 7 Door Alignment 8 Reversing the Door Swing 8 Reversing The Door Handles 11 Installing Front Grill 11 Refrigerator Features And Use 12 General Features 12 Refrigerator Interior Shelves 12 Utility Drawer And Cover 13 Crisper and Crisper Cover 14 Refrigerator Door Shelves 16 Freezer Features 17 Food Storage Information 19 Normal Operating Sounds 21 Proper Refrigerator Care and Cleaning 22 Cleaning and Maintenance 22 Light Bulb Replacement 23 Power Interruptions 23 Vacation and Moving Care 23 Troubleshooting 24 Warranty...
Product Manual
Page 6
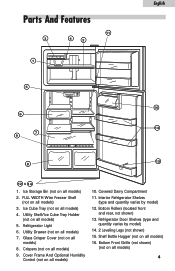
... 11. Refrigerator Door Shelves (type and quantity varies by model) 12. Cover Frame And Optional Humidity Control (not on all models) 10. Bottom Rollers (located front and rear, not shown) 13. Ice Cube Tray (not on all models) 4. Bottom Front Grille (not shown) (not on all models) 4 Refrigerator Light 6. English Parts And Features 11 3 4 2 1 5 10 6 13 7 9 15 8 12 & 14 1. Ice Storage Bin (not on all models) 2. FULL WIDTH Wire Freezer Shelf (not...
... 11. Refrigerator Door Shelves (type and quantity varies by model) 12. Cover Frame And Optional Humidity Control (not on all models) 10. Bottom Rollers (located front and rear, not shown) 13. Ice Cube Tray (not on all models) 4. Bottom Front Grille (not shown) (not on all models) 4 Refrigerator Light 6. English Parts And Features 11 3 4 2 1 5 10 6 13 7 9 15 8 12 & 14 1. Ice Storage Bin (not on all models) 2. FULL WIDTH Wire Freezer Shelf (not...
Product Manual
Page 7
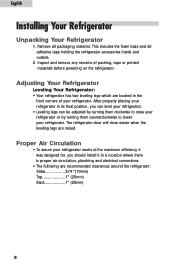
... your refrigerator in a location where there is proper air circulation, plumbing and electrical connections. • The following are recommended clearances around the refrigerator: Sides 3/4 "(19mm) Top 1" (25mm) Back 1" (25mm) 5 Inspect and remove any remains of your refrigerator. Adjusting Your Refrigerator Leveling Your Refrigerator: • Your refrigerator has two leveling legs which are raised. English Installing Your Refrigerator Unpacking Your Refrigerator 1. Proper Air Circulation • To assure your refrigerator works at...
... your refrigerator in a location where there is proper air circulation, plumbing and electrical connections. • The following are recommended clearances around the refrigerator: Sides 3/4 "(19mm) Top 1" (25mm) Back 1" (25mm) 5 Inspect and remove any remains of your refrigerator. Adjusting Your Refrigerator Leveling Your Refrigerator: • Your refrigerator has two leveling legs which are raised. English Installing Your Refrigerator Unpacking Your Refrigerator 1. Proper Air Circulation • To assure your refrigerator works at...
Product Manual
Page 8
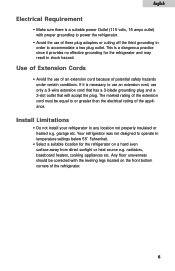
... power the refrigerator. • Avoid the use of the appliance. Install Limitations • Do not install your refrigerator in order to accommodate a two plug outlet. Your refrigerator was not designed to operate in temperature settings below 55˚ Fahrenheit. • Select a suitable location for the refrigerator and may result in shock hazard. Any floor unevenness should be equal to or greater than the electrical rating...
... power the refrigerator. • Avoid the use of the appliance. Install Limitations • Do not install your refrigerator in order to accommodate a two plug outlet. Your refrigerator was not designed to operate in temperature settings below 55˚ Fahrenheit. • Select a suitable location for the refrigerator and may result in shock hazard. Any floor unevenness should be equal to or greater than the electrical rating...
Product Manual
Page 10
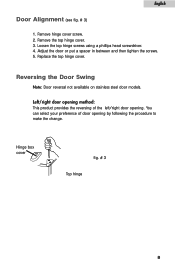
... preference of the left/right door opening by following the procedure to make the change. Remove the top hinge cover. 3. Reversing the Door Swing Note: Door reversal not available on stainless steel door models. Loosen the top hinge screws using a phillips head screwdriver. 4. Left/right door opening method: This product provides the reversing of door opening . Adjust the door or put a spacer in between and then tighten the screws. 5. Hinge box cover fig. # 3 Top hinge 8 Remove hinge cover screw. 2. Replace the top hinge cover.
... preference of the left/right door opening by following the procedure to make the change. Remove the top hinge cover. 3. Reversing the Door Swing Note: Door reversal not available on stainless steel door models. Loosen the top hinge screws using a phillips head screwdriver. 4. Left/right door opening method: This product provides the reversing of door opening . Adjust the door or put a spacer in between and then tighten the screws. 5. Hinge box cover fig. # 3 Top hinge 8 Remove hinge cover screw. 2. Replace the top hinge cover.
Product Manual
Page 12
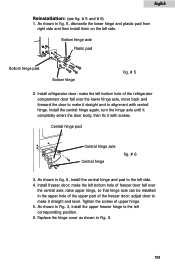
... make it with central hinge. adjust door to make the left side. 4. As shown in alignment with screws. English Reinstallation: (see fig. # 5 and # 6) 1. Install the central hinge again, turn the hinge axle until it completely enters the door body, then fix it straight and level. Central hinge pad Central hinge axle Central hinge fig. # 6 3. Install refrigerator door: make it straight and in Fig. 3, install the upper freezer hinge to the left bottom hole of freezer door...
... make it with central hinge. adjust door to make the left side. 4. As shown in alignment with screws. English Reinstallation: (see fig. # 5 and # 6) 1. Install the central hinge again, turn the hinge axle until it completely enters the door body, then fix it straight and level. Central hinge pad Central hinge axle Central hinge fig. # 6 3. Install refrigerator door: make it straight and in Fig. 3, install the upper freezer hinge to the left bottom hole of freezer door...
Product Manual
Page 13
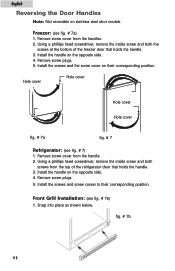
.... # 7a) 1. Remove screw cover from the handle. 2. Remove screw plugs. 5. Remove screw cover from the handles. 2. fig. # 7b 11 Freezer: (see fig. # 7b) 1. Hole cover Hole cover Hole cover Hole cover fig. # 7a fig. # 7 Refrigerator: (see fig. # 7) 1. Install the screws and screw covers to their corresponding position. English Reversing the Door Handles Note: Not reversible on the opposite side. 4. Snap into place as shown below. Using a phillips head screwdriver, remove the inside screw...
.... # 7a) 1. Remove screw cover from the handle. 2. Remove screw plugs. 5. Remove screw cover from the handles. 2. fig. # 7b 11 Freezer: (see fig. # 7b) 1. Hole cover Hole cover Hole cover Hole cover fig. # 7a fig. # 7 Refrigerator: (see fig. # 7) 1. Install the screws and screw covers to their corresponding position. English Reversing the Door Handles Note: Not reversible on the opposite side. 4. Snap into place as shown below. Using a phillips head screwdriver, remove the inside screw...
Product Manual
Page 14
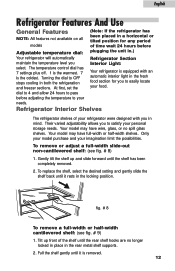
... temperature control dial has 7 settings plus off. 1 is the warmest. 7 is removed. 12 Your model may have wire, glass, or no longer locked in place in the rear metal shelf supports. 2. fig. # 8 To remove a full-width or half-width cantilevered shelf: (see fig. # 8) 1. Their varied adjustability allows you to OFF stops cooling in both the refrigeration and freezer sections. Turning the dial to satisfy your personal storage needs...
... temperature control dial has 7 settings plus off. 1 is the warmest. 7 is removed. 12 Your model may have wire, glass, or no longer locked in place in the rear metal shelf supports. 2. fig. # 8 To remove a full-width or half-width cantilevered shelf: (see fig. # 8) 1. Their varied adjustability allows you to OFF stops cooling in both the refrigeration and freezer sections. Turning the dial to satisfy your personal storage needs...
Product Manual
Page 15
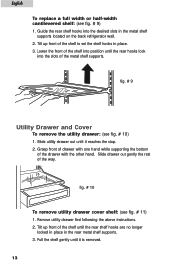
... stop. 2. Remove utility drawer first following the above instructions. 2. Guide the rear shelf hooks into the slots of the shelf to set the shelf hooks in the metal shelf supports located on the back refrigerator wall. 2. fig. # 9 Utility Drawer and Cover To remove the utility drawer: (see fig. # 11) 1. Slide utility drawer out until the rear shelf hooks are no longer locked in place in the rear metal shelf supports. 3. fig. # 10 To remove utility drawer cover shelf...
... stop. 2. Remove utility drawer first following the above instructions. 2. Guide the rear shelf hooks into the slots of the shelf to set the shelf hooks in the metal shelf supports located on the back refrigerator wall. 2. fig. # 9 Utility Drawer and Cover To remove the utility drawer: (see fig. # 11) 1. Slide utility drawer out until the rear shelf hooks are no longer locked in place in the rear metal shelf supports. 3. fig. # 10 To remove utility drawer cover shelf...
Product Manual
Page 16
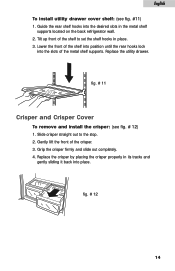
... the stop. 2. Replace the crisper by placing the crisper properly in the metal shelf supports located on the back refrigerator wall. 2. English To install utility drawer cover shelf: (see fig. # 12) 1. fig. # 11 Crisper and Crisper Cover To remove and install the crisper: (see fig. #11) 1. Grip the crisper firmly and slide out completely. 4. Replace the utility drawer. Lower the front of the metal shelf supports. Slide crisper straight out to set the shelf hooks in place. 3. Guide...
... the stop. 2. Replace the crisper by placing the crisper properly in the metal shelf supports located on the back refrigerator wall. 2. English To install utility drawer cover shelf: (see fig. # 12) 1. fig. # 11 Crisper and Crisper Cover To remove and install the crisper: (see fig. #11) 1. Grip the crisper firmly and slide out completely. 4. Replace the utility drawer. Lower the front of the metal shelf supports. Slide crisper straight out to set the shelf hooks in place. 3. Guide...
Product Manual
Page 17
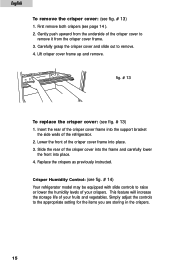
... the support bracket the side walls of the crisper cover to the appropriate setting for the items you are storing in the crispers. 15 Gently push upward from the crisper cover frame. 3. Simply adjust the controls to remove it from the underside of the refrigerator. 2. Lift crisper cover frame up and remove. Replace the crispers as previously instructed. First remove both crispers (see fig. # 13) 1. Crisper Humidity Control: (see fig. # 13) 1. Carefully...
... the support bracket the side walls of the crisper cover to the appropriate setting for the items you are storing in the crispers. 15 Gently push upward from the crisper cover frame. 3. Simply adjust the controls to remove it from the underside of the refrigerator. 2. Lift crisper cover frame up and remove. Replace the crispers as previously instructed. First remove both crispers (see fig. # 13) 1. Crisper Humidity Control: (see fig. # 13) 1. Carefully...

Product Manual
Page 18
... skins. • HIGH setting retains moist air in the crisper for the storage of the door shelf brackets and then remove. Align the ends of fresh, leafy vegetables. To replace refrigerator door shelves: (see fig. # 15) 1. This feature will allow for optimum storage of the shelves with gallon door storage shelves. Gently push up each side until the shelf is clear of gallon size containers.
... skins. • HIGH setting retains moist air in the crisper for the storage of the door shelf brackets and then remove. Align the ends of fresh, leafy vegetables. To replace refrigerator door shelves: (see fig. # 15) 1. This feature will allow for optimum storage of the shelves with gallon door storage shelves. Gently push up each side until the shelf is clear of gallon size containers.
Product Manual
Page 20
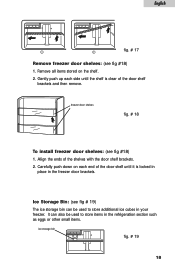
... the door shelf until the shelf is locked in place in your freezer. freezer door shelves fig. # 18 To install freezer door shelves: (see fig #18) 1. English fig. # 17 1 2 Remove freezer door shelves: (see fig #18) 1. Align the ends of the door shelf brackets and then remove. Carefully push down on the shelf. 2. It can be used to store items in the refrigeration section such as eggs or other small items. ice storage bin...
... the door shelf until the shelf is locked in place in your freezer. freezer door shelves fig. # 18 To install freezer door shelves: (see fig #18) 1. English fig. # 17 1 2 Remove freezer door shelves: (see fig #18) 1. Align the ends of the door shelf brackets and then remove. Carefully push down on the shelf. 2. It can be used to store items in the refrigeration section such as eggs or other small items. ice storage bin...

Product Manual
Page 21
... or store food in the freezer section. 19 English Ice Cube Trays: Your refrigerator is not prepackaged, be sure to cool before storing in the crisper. • Vegetables with skins should be stored in plastic bags or containers and stored in crisper with low humidity setting. • Leafy vegetables should be washed and drained and then stored in plastic...
... or store food in the freezer section. 19 English Ice Cube Trays: Your refrigerator is not prepackaged, be sure to cool before storing in the crisper. • Vegetables with skins should be stored in plastic bags or containers and stored in crisper with low humidity setting. • Leafy vegetables should be washed and drained and then stored in plastic...
Product Manual
Page 25
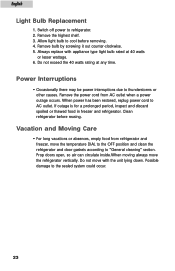
... door gaskets according to refrigerator. 2. Possible damage to cool before reusing. When power has been restored, replug power cord to thunderstorms or other causes. Power Interruptions • Occasionally there may be power interruptions due to AC outlet. Prop doors open, so air can circulate inside.When moving always move with appliance type light bulb rated at any time. Do not move the refrigerator vertically. English Light Bulb Replacement 1. Switch off power to "General cleaning...
... door gaskets according to refrigerator. 2. Possible damage to cool before reusing. When power has been restored, replug power cord to thunderstorms or other causes. Power Interruptions • Occasionally there may be power interruptions due to AC outlet. Prop doors open, so air can circulate inside.When moving always move with appliance type light bulb rated at any time. Do not move the refrigerator vertically. English Light Bulb Replacement 1. Switch off power to "General cleaning...
Product Manual
Page 26
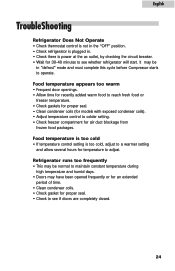
English TroubleShooting Refrigerator Does Not Operate • Check thermostat control is not in the "OFF" position. • Check refrigerator is plugged in "defrost" mode and must complete this cycle before Compressor starts to operate. Food temperature is too cold • If temperature control setting is power at the ac outlet, by checking the circuit breaker. • Wait for temperature to adjust. Refrigerator runs too frequently • This may be normal to maintain...
English TroubleShooting Refrigerator Does Not Operate • Check thermostat control is not in the "OFF" position. • Check refrigerator is plugged in "defrost" mode and must complete this cycle before Compressor starts to operate. Food temperature is too cold • If temperature control setting is power at the ac outlet, by checking the circuit breaker. • Wait for temperature to adjust. Refrigerator runs too frequently • This may be normal to maintain...
Product Manual
Page 27
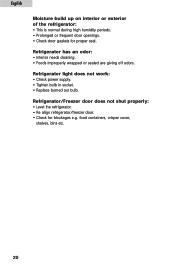
... periods. • Prolonged or frequent door openings. • Check door gaskets for blockages e.g. food containers, crisper cover, shelves, bins etc. 25 Refrigerator has an odor: • Interior needs cleaning. • Foods improperly wrapped or sealed are giving off odors. Refrigerator light does not work: • Check power supply. • Tighten bulb in socket. • Replace burned out bulb. Refrigerator/Freezer door does not shut properly: • Level the refrigerator. • Re align refrigerator/freezer door. • Check for proper...
... periods. • Prolonged or frequent door openings. • Check door gaskets for blockages e.g. food containers, crisper cover, shelves, bins etc. 25 Refrigerator has an odor: • Interior needs cleaning. • Foods improperly wrapped or sealed are giving off odors. Refrigerator light does not work: • Check power supply. • Tighten bulb in socket. • Replace burned out bulb. Refrigerator/Freezer door does not shut properly: • Level the refrigerator. • Re align refrigerator/freezer door. • Check for proper...
Product Manual
Page 28
... from state to the authorized service center before warranty repairs are covered in the remaining warranty. Transportation and shipping. Haier America New York, NY 10018 26 English Limited Warranty What is granted in lieu of all other than household use. The mechanical and electrical parts, which serve as a functional, purpose of this appliance for a period of proper care and maintenance or incorrect...
... from state to the authorized service center before warranty repairs are covered in the remaining warranty. Transportation and shipping. Haier America New York, NY 10018 26 English Limited Warranty What is granted in lieu of all other than household use. The mechanical and electrical parts, which serve as a functional, purpose of this appliance for a period of proper care and maintenance or incorrect...


