User Manual
Page 6
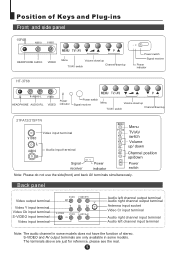
...; Note: The audio channel in some models does not have the function of Keys and Plug-ins Front and side panel 15F6B HEADPHONE AUDIO VIDEO Menu Volume down/up TV/AV switch Channel down/up Power switch Signal receiver Power indicator HT-3768 HEADPHONE AUDIO R/L VIDEO Power indicator Power switch Signal receiver Menu Volume down/up TV/AV switch Channel down/up 21FA12/21SF1N Video input terminal Audio input terminal Menu TV/AV switch Volume up/ down Channel position up/down Signal receiver Power indicator Power switch Note: Please do...
...; Note: The audio channel in some models does not have the function of Keys and Plug-ins Front and side panel 15F6B HEADPHONE AUDIO VIDEO Menu Volume down/up TV/AV switch Channel down/up Power switch Signal receiver Power indicator HT-3768 HEADPHONE AUDIO R/L VIDEO Power indicator Power switch Signal receiver Menu Volume down/up TV/AV switch Channel down/up 21FA12/21SF1N Video input terminal Audio input terminal Menu TV/AV switch Volume up/ down Channel position up/down Signal receiver Power indicator Power switch Note: Please do...

User Manual
Page 7
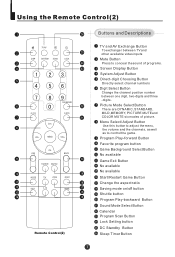
...control the game. Screen Display Button DC Standby Button NOTE: Remote Contorl(1) on this manual is just take Remote Control(2) for example. System Adjust Button Program Scan Button Calendar Favorite program button No available Start/Restart Game Button Game Exit Button Saving mode on this page and Remote Control(2) on the manual for the different models. The instructions on /off button Lock Setting button Sound Mode Select Button Program Play-backward Button Digit Select Button Change the channel position number between TV and other available video inputs Direct-digit Choosing Button...
...control the game. Screen Display Button DC Standby Button NOTE: Remote Contorl(1) on this manual is just take Remote Control(2) for example. System Adjust Button Program Scan Button Calendar Favorite program button No available Start/Restart Game Button Game Exit Button Saving mode on this page and Remote Control(2) on the manual for the different models. The instructions on /off button Lock Setting button Sound Mode Select Button Program Play-backward Button Digit Select Button Change the channel position number between TV and other available video inputs Direct-digit Choosing Button...
User Manual
Page 8
... Program Scan Button Lock Setting button DC Standby Button Sleep Timer Button Menu Select/ Adjust Button Use this button to adjust the menu, the volume and the channels, as well as to conceal the sound of picture. MENU VOL+ CH- Picture Mode Select Button There are DYNAMIC, STANDARD, MILD,MEMORY, PICTURE MUTEand COLOR MUTE six modes of programs. Screen Display Button System Adjust Button Direct-digit Choosing Button Directly select channel numbers Digit Select Button Change the channel position number between TV and other available video inputs Mute Button Press to control the game...
... Program Scan Button Lock Setting button DC Standby Button Sleep Timer Button Menu Select/ Adjust Button Use this button to adjust the menu, the volume and the channels, as well as to conceal the sound of picture. MENU VOL+ CH- Picture Mode Select Button There are DYNAMIC, STANDARD, MILD,MEMORY, PICTURE MUTEand COLOR MUTE six modes of programs. Screen Display Button System Adjust Button Direct-digit Choosing Button Directly select channel numbers Digit Select Button Change the channel position number between TV and other available video inputs Mute Button Press to control the game...

User Manual
Page 9
... the TV set with the switches on the TV and on the remote control. Direct-digit Choosing Button Power supply auto-off the TV. Connect the power supply wire, then press power switch button, the power indicator will light, in the state of standby, press the button on /off the standby status. DC Standby Button 3. button on the television to call off Connect/disconnect to the power 1. If the TV is no signal , screen protection works, and...
... the TV set with the switches on the TV and on the remote control. Direct-digit Choosing Button Power supply auto-off the TV. Connect the power supply wire, then press power switch button, the power indicator will light, in the state of standby, press the button on /off the standby status. DC Standby Button 3. button on the television to call off Connect/disconnect to the power 1. If the TV is no signal , screen protection works, and...

User Manual
Page 10
... appear alternately). MENU VOL+ If the color of the channel. button, and move the indicator to decrease the channel position number. 3. Viewing TV programs Direct-digit Choosing button Digit Select button PRE BACK SYSTEM How to SOUND, and press VOL+/- Use CH+/- button Press CH+ to adjust the volume. For example, if you have viewed channel 1,2,3,4,5,6 after the TV is powered on, and the channel you can go back to select the proper color(AUTO, NTSC3...
... appear alternately). MENU VOL+ If the color of the channel. button, and move the indicator to decrease the channel position number. 3. Viewing TV programs Direct-digit Choosing button Digit Select button PRE BACK SYSTEM How to SOUND, and press VOL+/- Use CH+/- button Press CH+ to adjust the volume. For example, if you have viewed channel 1,2,3,4,5,6 after the TV is powered on, and the channel you can go back to select the proper color(AUTO, NTSC3...

User Manual
Page 11
... the present channel. Viewing TV Programs(continued) Program scanning function is to let the television automatically scan all preconcerted channel program(about two seconds per channel and until all the preconcerted programs have been displayed once, the TV set will return to the starting channel. 2. If you press the DISP button, the channel number will appear on the top right corner of two seconds per channel). DISP Screen display Usually...
... the present channel. Viewing TV Programs(continued) Program scanning function is to let the television automatically scan all preconcerted channel program(about two seconds per channel and until all the preconcerted programs have been displayed once, the TV set will return to the starting channel. 2. If you press the DISP button, the channel number will appear on the top right corner of two seconds per channel). DISP Screen display Usually...

User Manual
Page 12
Using the QSET button Press the QSET button to adjust the channel. and CH+/- QSET ENERGY AMBI-LUM AMBI-SND ADJUST SELECT SAVE BRI. to switch the saving mode on/off at the same time. MENU VOL+ CH- You could set 8 favorite programs. After the setting, press FAVORITE button to achieve the better picture and sound effect . to adjust the bright/volum -e.etc to select your favorite channel you have set . NOISE ADJUST FAVORITE Note...
Using the QSET button Press the QSET button to adjust the channel. and CH+/- QSET ENERGY AMBI-LUM AMBI-SND ADJUST SELECT SAVE BRI. to switch the saving mode on/off at the same time. MENU VOL+ CH- You could set 8 favorite programs. After the setting, press FAVORITE button to achieve the better picture and sound effect . to adjust the bright/volum -e.etc to select your favorite channel you have set . NOISE ADJUST FAVORITE Note...
User Manual
Page 13
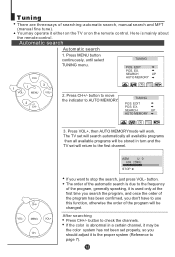
... channel, it may operate it to the proper system (Reference to use this function, otherwise the order of searching: automatic search, manual search and MFT (manual fine tune). Press CH+/- If the color is mainly about the remote control. MENU VOL+ CH- 2. The TV set will search automatically all available programs then all available programs will be the color system has not been set...
... channel, it may operate it to the proper system (Reference to use this function, otherwise the order of searching: automatic search, manual search and MFT (manual fine tune). Press CH+/- If the color is mainly about the remote control. MENU VOL+ CH- 2. The TV set will search automatically all available programs then all available programs will be the color system has not been set...
User Manual
Page 17
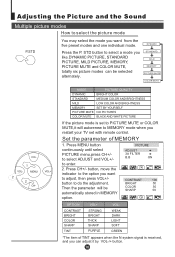
... select a mode you want from the five preset modes and one individual mode. Press CH+/- PICTURE ADJUST 3A FILTER B.B ON CONTRAST 100 BRIGHT 50 COLOR 50 SHARP 50 OPTION CONTRAST BRIGHT COLOR SHARP TINT VOL+ STRONG BRIGHT THICK SHARP PURPLE VOLWEAK DARK LIGHT SOFT GREEN *The item of MEMORY 1. Set the parameter of TINT appears when the N system signal is set with remote control...
... select a mode you want from the five preset modes and one individual mode. Press CH+/- PICTURE ADJUST 3A FILTER B.B ON CONTRAST 100 BRIGHT 50 COLOR 50 SHARP 50 OPTION CONTRAST BRIGHT COLOR SHARP TINT VOL+ STRONG BRIGHT THICK SHARP PURPLE VOLWEAK DARK LIGHT SOFT GREEN *The item of MEMORY 1. Set the parameter of TINT appears when the N system signal is set with remote control...
User Manual
Page 18
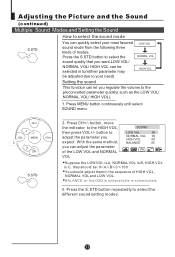
... VOL/ HIGH VOL can be selected in turn(their parameter may be : 0 A B C 100 You should adjust them in some models. 3. LOW VOL NORMAL VOL HIGH VOL Setting the sound This function can let you regulate the volume to adjust the parameter you can quickly select your need). Press MENU button continuously until select SOUND menu. MENU VOL+ CH- button to the preconcerted parameter quickly( such as the LOW VOL...
... VOL/ HIGH VOL can be selected in turn(their parameter may be : 0 A B C 100 You should adjust them in some models. 3. LOW VOL NORMAL VOL HIGH VOL Setting the sound This function can let you regulate the volume to adjust the parameter you can quickly select your need). Press MENU button continuously until select SOUND menu. MENU VOL+ CH- button to the preconcerted parameter quickly( such as the LOW VOL...

User Manual
Page 19
.... button to set it is set "ON", the picture will switch into standby mode automatically to save your energy. MENU VOL+ CH- 1. FUNCTION AUTO OFF S.C.C ON OFF CURTAIN 3A OPT I OFF Auto off To prevent from forgetting turning off the TV, this TV will fade in and fade out when the channel is changed. In order to the S.C.C, then press VOL+/- Adjusting the Picture and...
.... button to set it is set "ON", the picture will switch into standby mode automatically to save your energy. MENU VOL+ CH- 1. FUNCTION AUTO OFF S.C.C ON OFF CURTAIN 3A OPT I OFF Auto off To prevent from forgetting turning off the TV, this TV will fade in and fade out when the channel is changed. In order to the S.C.C, then press VOL+/- Adjusting the Picture and...

User Manual
Page 21
... and display the preset program. 1. MENU VOL+ CH- 3. POS 00:00 00:00 OFF 0 OFF 0 4. Setting the Timer (continued) Sleep timer and on at the preset time in turn the power on timer Sleep timer Using this function, the TV set can be the standard of the clock of off-time. 2. VOL- TIMER CLOCK OFF TIMER ON TIMER ON POS APP. TIME APP. Press the button repeatedly, the screen will be changed into...
... and display the preset program. 1. MENU VOL+ CH- 3. POS 00:00 00:00 OFF 0 OFF 0 4. Setting the Timer (continued) Sleep timer and on at the preset time in turn the power on timer Sleep timer Using this function, the TV set can be the standard of the clock of off-time. 2. VOL- TIMER CLOCK OFF TIMER ON TIMER ON POS APP. TIME APP. Press the button repeatedly, the screen will be changed into...

User Manual
Page 22
... the TIMER menu. At the preset time, the TV set will automatically change to set the channel number you want (e.g. 100). button, and you can set in the status of standby or power off. Press CH+/- button, and follow the instructions of step 4 and 5, you can do the setting of the next channel. 7. Channels appointment Channels appointment CH+ VOL- MENU VOL+ CH- 1. Setting the Timer (continued) The channels appointment function can help...
... the TIMER menu. At the preset time, the TV set will automatically change to set the channel number you want (e.g. 100). button, and you can set in the status of standby or power off. Press CH+/- button, and follow the instructions of step 4 and 5, you can do the setting of the next channel. 7. Channels appointment Channels appointment CH+ VOL- MENU VOL+ CH- 1. Setting the Timer (continued) The channels appointment function can help...

User Manual
Page 23
... change into the form on the right shows if the screen protection is set it . button to adjust it ON. Then press CH+/- MENU VOL+ CH- to enter PICTURE ADJUST 3A FILTER B.B ON 2.Press CH+/- How to B.B, and press VOL+/- Then press CH+/- MENU VOL+ CH- button to move the indicator to use the 3A filter function 1.Press MENU button continuously until select the PICTURE menu. Setting...
... change into the form on the right shows if the screen protection is set it . button to adjust it ON. Then press CH+/- MENU VOL+ CH- to enter PICTURE ADJUST 3A FILTER B.B ON 2.Press CH+/- How to B.B, and press VOL+/- Then press CH+/- MENU VOL+ CH- button to move the indicator to use the 3A filter function 1.Press MENU button continuously until select the PICTURE menu. Setting...

User Manual
Page 25
... enable you to exchange any two programs and you can conveniently adjust the order of the programs due to your own need. SEARCH UP AUTO MEMORY CH- 2. Press CH+/- button, move the indicator to EX.POS2, EX.POS1 1 Direct-digit Choosing then press VOL+ button to set EX.POS2 9 Button the channel number to enter the sub-menu. Channel exchange Channel Exchange for example, to confirm...
... enable you to exchange any two programs and you can conveniently adjust the order of the programs due to your own need. SEARCH UP AUTO MEMORY CH- 2. Press CH+/- button, move the indicator to EX.POS2, EX.POS1 1 Direct-digit Choosing then press VOL+ button to set EX.POS2 9 Button the channel number to enter the sub-menu. Channel exchange Channel Exchange for example, to confirm...

User Manual
Page 26
... need to protect your password LOCK CH+ VOL- Changing your TV set. OFF OFF OFF CHILD LOCK MAX. TUNING LOCK CHANGE PW. , and press VOL+ button to LOCK SET UP PASSWORD ---CHANGE PW. UNLOCK OFF OFF OFF OFF OFF 3. Direct-digit Choosing Button 4. Press LOCK button, the screen will show as shown on the right. button and move the indicator to enter the sub-menu of LOCK setting. Press the Direct-digit Choosing button and input a four-digits password. Setting the Lock...
... need to protect your password LOCK CH+ VOL- Changing your TV set. OFF OFF OFF CHILD LOCK MAX. TUNING LOCK CHANGE PW. , and press VOL+ button to LOCK SET UP PASSWORD ---CHANGE PW. UNLOCK OFF OFF OFF OFF OFF 3. Direct-digit Choosing Button 4. Press LOCK button, the screen will show as shown on the right. button and move the indicator to enter the sub-menu of LOCK setting. Press the Direct-digit Choosing button and input a four-digits password. Setting the Lock...

User Manual
Page 27
...+ button to your need. 1. The TV set will show as the form on the TV are TUNING LOCK, PRESET PROG. ,AV LOCK, CHILD LOCK and MAX.VOLUME five lock setting, you to set all the lock to OFF . LOCK SET UP PASSWORD ---CHANGE PW. Press the LOCK button, the screen will be used, hence the screen will change into black and indicate that it has been locked. VOLUME UNLOCK OFF OFF OFF OFF OFF Direct-digit Choosing Button...
...+ button to your need. 1. The TV set will show as the form on the TV are TUNING LOCK, PRESET PROG. ,AV LOCK, CHILD LOCK and MAX.VOLUME five lock setting, you to set all the lock to OFF . LOCK SET UP PASSWORD ---CHANGE PW. Press the LOCK button, the screen will be used, hence the screen will change into black and indicate that it has been locked. VOLUME UNLOCK OFF OFF OFF OFF OFF Direct-digit Choosing Button...

User Manual
Page 29
... a higher quality of picture and sound effect. Do not connect the both at the same time . Signal flow White (Audio left channel) Red (Cr and audio right channel) Blue (Cb) Green (Y) Yellow (Video) DVD, VCD or other units Video output Audio output DVD, VCD or otherunits Laser DVD with output terminal To S-VIDEO input To video input To audio input To audio output To DVD output Note: About the S-VIDEO You should only connect S-VIDEO or VIDEO terminal when you use the first AV...
... a higher quality of picture and sound effect. Do not connect the both at the same time . Signal flow White (Audio left channel) Red (Cr and audio right channel) Blue (Cb) Green (Y) Yellow (Video) DVD, VCD or other units Video output Audio output DVD, VCD or otherunits Laser DVD with output terminal To S-VIDEO input To video input To audio input To audio output To DVD output Note: About the S-VIDEO You should only connect S-VIDEO or VIDEO terminal when you use the first AV...
User Manual
Page 30
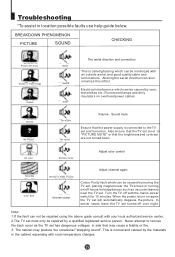
... connected to remove the back cover as vacuumcleaners near the TV screen or turning on . When the power is called ghosting which can be repaired using the above guide consult with the mains power switch for 15 minutes. Normal No Picture No sound No sound Volume Sound mute Ensure that the brightness and contrast are not turned down No color Normal volume Adjust color control Scramble Color Spot Normal or Weak Volume Normal volume Adjust channel...
... connected to remove the back cover as vacuumcleaners near the TV screen or turning on . When the power is called ghosting which can be repaired using the above guide consult with the mains power switch for 15 minutes. Normal No Picture No sound No sound Volume Sound mute Ensure that the brightness and contrast are not turned down No color Normal volume Adjust color control Scramble Color Spot Normal or Weak Volume Normal volume Adjust channel...
User Manual
Page 31
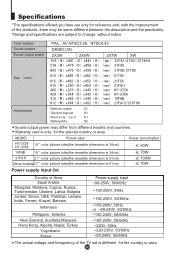
... different models and countries. Color system PAL AV NTSC3.58 NTSC4.43 Sound system DK(BG,I,M) Sound output power 2X3W 2X5W 2X7W 5W Size mm Accessories Remote control X1 Owner's manual X1 Warranty card X1 Battery(AA) X2 Sound output power may be some different between the description and the practicality. *Design and specifications are only for reference and, with the improvement of the TV set is...
... different models and countries. Color system PAL AV NTSC3.58 NTSC4.43 Sound system DK(BG,I,M) Sound output power 2X3W 2X5W 2X7W 5W Size mm Accessories Remote control X1 Owner's manual X1 Warranty card X1 Battery(AA) X2 Sound output power may be some different between the description and the practicality. *Design and specifications are only for reference and, with the improvement of the TV set is...


