User Manual
Page 1
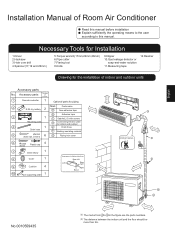
Accessory parts Number of articles 1 Remote controller 1 Optional parts for piping 2 R-03 dry battery 2 Mark A Parts name Non-adhesive tape B Adhesive tape 3 1 C Saddle(L.S) with screws Mounting plate D Connecting electric cable for the installation of indoor and outdoor units Accessory parts No. The distance between the indoor unit and the floor should be paid to the rising up of Room Air Conditioner Read this manual. Installation Manual of drain hose A more than 10cm C more than 10cm No...
Accessory parts Number of articles 1 Remote controller 1 Optional parts for piping 2 R-03 dry battery 2 Mark A Parts name Non-adhesive tape B Adhesive tape 3 1 C Saddle(L.S) with screws Mounting plate D Connecting electric cable for the installation of indoor and outdoor units Accessory parts No. The distance between the indoor unit and the floor should be paid to the rising up of Room Air Conditioner Read this manual. Installation Manual of drain hose A more than 10cm C more than 10cm No...
User Manual
Page 2
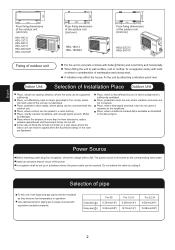
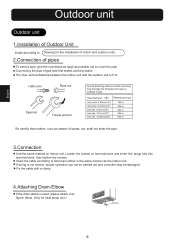
... a power receptacle, with the outdoor unit. Selection of fixing the remote controller on a wall, place where the indoor unit can receive signals when the fluorescent lamps in the room are not increased. 280 256 319.5 140 415 140 Floor fixing dimensions of the outdoor unit (Unit:mm) HSU-09C12 HSU-12C12 HSU-09C13 HSU-12C13 HSU-09C03/Z1 HSU-12C03/Z1 140 500 140 Floor fixing dimensions of the outdoor unit (Unit:mm) HSU-18C13 HSU...
... a power receptacle, with the outdoor unit. Selection of fixing the remote controller on a wall, place where the indoor unit can receive signals when the fluorescent lamps in the room are not increased. 280 256 319.5 140 415 140 Floor fixing dimensions of the outdoor unit (Unit:mm) HSU-09C12 HSU-12C12 HSU-09C13 HSU-12C13 HSU-09C03/Z1 HSU-12C03/Z1 140 500 140 Floor fixing dimensions of the outdoor unit (Unit:mm) HSU-18C13 HSU...
User Manual
Page 3
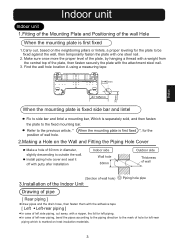
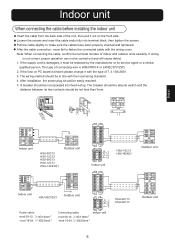
Install piping hole cover and seal it off with putty after installation Indoor side Wall hole 60mm Outdoor side Thickness of wall (Section of wall hole) G Piping hole pipe 3.Installation of the Indoor Unit Drawing of pipe [ Rear piping ] Draw pipes and the drain hose, then fasten them with the adhesive tape [ Left Left-rear piping ] In case of left side piping, cut away, with the attachment steel nail. 3. Find the wall hole location A using a measuring tape B= 60mm 30mm A=145mm...
Install piping hole cover and seal it off with putty after installation Indoor side Wall hole 60mm Outdoor side Thickness of wall (Section of wall hole) G Piping hole pipe 3.Installation of the Indoor Unit Drawing of pipe [ Rear piping ] Draw pipes and the drain hose, then fasten them with the adhesive tape [ Left Left-rear piping ] In case of left side piping, cut away, with the attachment steel nail. 3. Find the wall hole location A using a measuring tape B= 60mm 30mm A=145mm...

User Manual
Page 4
... off wiring cover by protecting tape. [Other direction piping] Cut away, with refrigerant oil and connect pipes. Fixing the indoor unit body Hang surely the unit body onto the upper notches of connecting part specially. When connecting the cable after installing the indoor unit 1. Insert from backside of indoor unit, and pull it down perpendicularly. 4.Connecting the indoor/outdoor Electric Cable Removing the wiring cover Remove terminal cover at right bottom corner of the wall hole...
... off wiring cover by protecting tape. [Other direction piping] Cut away, with refrigerant oil and connect pipes. Fixing the indoor unit body Hang surely the unit body onto the upper notches of connecting part specially. When connecting the cable after installing the indoor unit 1. Insert from backside of indoor unit, and pull it down perpendicularly. 4.Connecting the indoor/outdoor Electric Cable Removing the wiring cover Remove terminal cover at right bottom corner of the wall hole...
User Manual
Page 5
... switch and the distance between its service agent or a similar qualified person. If the supply cord is broken please change it must be in line with the local wiring standard. 4. A breaker should be replaced by the manufacturer or its two contacts should be not less than 3mm. 4 1(L) 2(N) 1(L) 2(N) { { Indoor unit HSU-09C12 HSU-12C12 HSU-09C13 HSU-12C13 HSU-12C03/Z1 Outdoor unit LN G N L Indoor unit POWER PLUG HSU-18C13 HSU-18CK03 Outdoor unit 1(L) 2(N) 4 Indoor unit HSU-09C03/Z1 Outdoor unit...
... switch and the distance between its service agent or a similar qualified person. If the supply cord is broken please change it must be in line with the local wiring standard. 4. A breaker should be replaced by the manufacturer or its two contacts should be not less than 3mm. 4 1(L) 2(N) 1(L) 2(N) { { Indoor unit HSU-09C12 HSU-12C12 HSU-09C13 HSU-12C13 HSU-12C03/Z1 Outdoor unit LN G N L Indoor unit POWER PLUG HSU-18C13 HSU-18CK03 Outdoor unit 1(L) 2(N) 4 Indoor unit HSU-09C03/Z1 Outdoor unit...
User Manual
Page 6
... careful centering may be damaged. Insert the cable according to terminal number in the same manner as possible not to Drawing for heat pump unit.) 6 The max vertical distance between the indoor unit and the outdoor unit is not correct, proper operation can not be carried out and controller may damage the threads and cause a leakage of gas. If wiring is 5 m.
... careful centering may be damaged. Insert the cable according to terminal number in the same manner as possible not to Drawing for heat pump unit.) 6 The max vertical distance between the indoor unit and the outdoor unit is not correct, proper operation can not be carried out and controller may damage the threads and cause a leakage of gas. If wiring is 5 m.
User Manual
Page 7
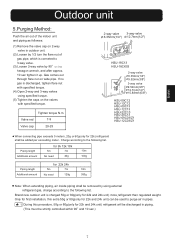
... need 120g 10m 300g Note: When extending piping, air inside piping shall be used to the following list. Gas comes out through flare nut on the valves with specified torque. (4) Open 2-way and 3-way valves using specified torque. (5) Tighten the caps on wide pipe. Outdoor unit 5.Purging Method: Push the air out of the indoor unit and piping as followes: (1) Remove the valve cap on 2-way valve in outdoor unit...
... need 120g 10m 300g Note: When extending piping, air inside piping shall be used to the following list. Gas comes out through flare nut on the valves with specified torque. (4) Open 2-way and 3-way valves using specified torque. (5) Tighten the caps on wide pipe. Outdoor unit 5.Purging Method: Push the air out of the indoor unit and piping as followes: (1) Remove the valve cap on 2-way valve in outdoor unit...
User Manual
Page 8
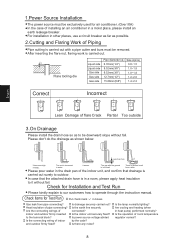
... air conditioner in the drain pan of flare Crack Partial Too outside 3.On Drainage Please install the drain hose so as to be downward slope without fail. Heat insulation of indoor and outdoor firmly inserted to operate through the instruction manual. Less than 5cm It becomes high midway. Is power source voltage abided by the code? After inserting the flare nut, flaring work is immersed in a room...
... air conditioner in the drain pan of flare Crack Partial Too outside 3.On Drainage Please install the drain hose so as to be downward slope without fail. Heat insulation of indoor and outdoor firmly inserted to operate through the instruction manual. Less than 5cm It becomes high midway. Is power source voltage abided by the code? After inserting the flare nut, flaring work is immersed in a room...


