User Manual
Page 2
... defrosting your refrigerated cooler. 7) If your old refrigerated cooler is not being used . Skin may adhere to store foods which must be properly installed in accordance with the installation instructions before making any sharp instrument in an enclosed cabinet. Always grasp the plug firmly and pull straight out from the outlet. 4) Repair or replace immediately, all electric service cords that you remove the doors and leave the shelves...
... defrosting your refrigerated cooler. 7) If your old refrigerated cooler is not being used . Skin may adhere to store foods which must be properly installed in accordance with the installation instructions before making any sharp instrument in an enclosed cabinet. Always grasp the plug firmly and pull straight out from the outlet. 4) Repair or replace immediately, all electric service cords that you remove the doors and leave the shelves...
User Manual
Page 3
... entrapment. You will guide you in place so that children may not easily climb inside. Model number Serial number Date of your refrigerated cooler. This easy-to your old refrigerated cooler or refrigerated cooler, take off the doors. Thank you throw away your manual. Remember to obtain warranty service. 2 Leave the shelves in getting the best use of purchase Staple your receipt to -use manual will need it to record the model and serial number.
... entrapment. You will guide you in place so that children may not easily climb inside. Model number Serial number Date of your refrigerated cooler. This easy-to your old refrigerated cooler or refrigerated cooler, take off the doors. Thank you throw away your manual. Remember to obtain warranty service. 2 Leave the shelves in getting the best use of purchase Staple your receipt to -use manual will need it to record the model and serial number.
User Manual
Page 4
English Table of Contents PAGE Safety Precautions 1 Parts And Features 4 Installing Your Refrigerated cooler 5 Unpacking Your Refrigerated cooler 5 Proper Air Circulation 5 Electrical Requirements 5 Use of Extension Cords 6 Install Limitations 6 Door Alignment 6 Refrigerated cooler Features And Use 7 General Features 7 Proper Refrigerated cooler Care and Cleaning 8 Cleaning and Maintenance 8 Power Interruptions 8 Vacation and Moving Care 8 Troubleshooting 9 Warranty Information 10 3
English Table of Contents PAGE Safety Precautions 1 Parts And Features 4 Installing Your Refrigerated cooler 5 Unpacking Your Refrigerated cooler 5 Proper Air Circulation 5 Electrical Requirements 5 Use of Extension Cords 6 Install Limitations 6 Door Alignment 6 Refrigerated cooler Features And Use 7 General Features 7 Proper Refrigerated cooler Care and Cleaning 8 Cleaning and Maintenance 8 Power Interruptions 8 Vacation and Moving Care 8 Troubleshooting 9 Warranty Information 10 3
User Manual
Page 5
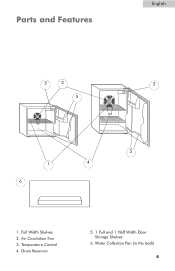
Full Width Shelves 2. Water Collection Pan (in the back) 4 Drain Reservoir 5. 1 Full and 1 Half Width Door Storage Shelves 6. Air Circulation Fan 3. English Parts and Features 3 2 3 5 5 1 4 6 1. Temperature Control 4.
Full Width Shelves 2. Water Collection Pan (in the back) 4 Drain Reservoir 5. 1 Full and 1 Half Width Door Storage Shelves 6. Air Circulation Fan 3. English Parts and Features 3 2 3 5 5 1 4 6 1. Temperature Control 4.
User Manual
Page 6
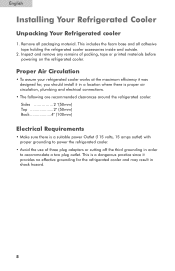
Remove all adhesive tape holding the refrigerated cooler accessories inside and outside. 2. Proper Air Circulation • To assure your refrigerated cooler works at the maximum efficiency it was designed for, you should install it in a location where there is proper air circulation, plumbing and electrical connections. • The following are recommended clearances around the refrigerated cooler: Sides 2 "(50mm) Top 2" (50mm) Back 4" (100mm) Electrical Requirements • Make sure there...
Remove all adhesive tape holding the refrigerated cooler accessories inside and outside. 2. Proper Air Circulation • To assure your refrigerated cooler works at the maximum efficiency it was designed for, you should install it in a location where there is proper air circulation, plumbing and electrical connections. • The following are recommended clearances around the refrigerated cooler: Sides 2 "(50mm) Top 2" (50mm) Back 4" (100mm) Electrical Requirements • Make sure there...
User Manual
Page 7
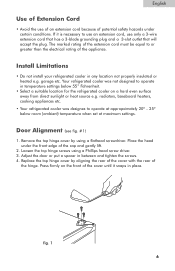
... hinge screws using a flathead screwdriver. English Use of Extension Cord • Avoid the use only a 3-wire extension cord that has a 3-blade grounding plug and a 3-slot outlet that will accept the plug. garage etc. Press firmly on a hard even surface away from direct sunlight or heat source e.g. Replace the top hinge cover by using a Phillips head screw driver. 3. Install Limitations • Do not install your refrigerated cooler...
... hinge screws using a flathead screwdriver. English Use of Extension Cord • Avoid the use only a 3-wire extension cord that has a 3-blade grounding plug and a 3-slot outlet that will accept the plug. garage etc. Press firmly on a hard even surface away from direct sunlight or heat source e.g. Replace the top hinge cover by using a Phillips head screw driver. 3. Install Limitations • Do not install your refrigerated cooler...
User Manual
Page 8
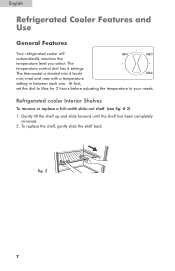
... adjusting the temperature to your needs. Gently tilt the shelf up and slide forward until the shelf has been completely removed. 2. The • • temperature control dial has 6 settings. Refrigerated cooler Interior Shelves To remove or replace a full-width slide-out shelf: (see fig. # 2) 1. English Refrigerated Cooler Features and Use General Features Your refrigerated cooler will • MIN MED automatically maintain the temperature level you select. To replace the shelf, gently slide the shelf back. fig. 2 7 The thermostat...
... adjusting the temperature to your needs. Gently tilt the shelf up and slide forward until the shelf has been completely removed. 2. The • • temperature control dial has 6 settings. Refrigerated cooler Interior Shelves To remove or replace a full-width slide-out shelf: (see fig. # 2) 1. English Refrigerated Cooler Features and Use General Features Your refrigerated cooler will • MIN MED automatically maintain the temperature level you select. To replace the shelf, gently slide the shelf back. fig. 2 7 The thermostat...

User Manual
Page 9
.... • Do not use harsh chemicals, abrasives, ammonia, chlorine bleach,concentrated detergents, solvents or metal scouring pads. Remove the power cord from refrigerated cooler, move the temperature DIAL to the OFF position and clean the door gaskets according to AC outlet. When power has been restored, replug power cord to "General cleaning" section. Prop doors open, so air can circulate inside. 8 Vacation and Moving Care • For long...
.... • Do not use harsh chemicals, abrasives, ammonia, chlorine bleach,concentrated detergents, solvents or metal scouring pads. Remove the power cord from refrigerated cooler, move the temperature DIAL to the OFF position and clean the door gaskets according to AC outlet. When power has been restored, replug power cord to "General cleaning" section. Prop doors open, so air can circulate inside. 8 Vacation and Moving Care • For long...
User Manual
Page 10
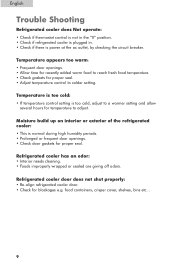
... not shut properly: • Re-align refrigerated cooler door. • Check for temperature to colder setting. food containers, crisper cover, shelves, bins etc... 9 Refrigerated cooler has an odor: • Interior needs cleaning. • Foods improperly wrapped or sealed are giving off odors. Moisture build up on interior or exterior of the refrigerated cooler: • This is too cold, adjust to a warmer setting and allow several hours for blockages e.g. English Trouble Shooting Refrigerated cooler does Not operate...
... not shut properly: • Re-align refrigerated cooler door. • Check for temperature to colder setting. food containers, crisper cover, shelves, bins etc... 9 Refrigerated cooler has an odor: • Interior needs cleaning. • Foods improperly wrapped or sealed are giving off odors. Moisture build up on interior or exterior of the refrigerated cooler: • This is too cold, adjust to a warmer setting and allow several hours for blockages e.g. English Trouble Shooting Refrigerated cooler does Not operate...
User Manual
Page 11
... Haier with a refurbished or new product the same or similar to refurbished product or unit purchased as a direct result of mechanical failure of the product or of purchase, brand, model and serial number for parts (Functional Parts Only) Carry In The warranty commences on the date of all parts except finish and trim. 2. Damage from improper installation. Decorative trims or replaceable light bulbs...
... Haier with a refurbished or new product the same or similar to refurbished product or unit purchased as a direct result of mechanical failure of the product or of purchase, brand, model and serial number for parts (Functional Parts Only) Carry In The warranty commences on the date of all parts except finish and trim. 2. Damage from improper installation. Decorative trims or replaceable light bulbs...


