User Manual
Page 1
... below. Model number: Serial number: Date of the refrigerator. You can retrieve that information from the product label attached to purchase a Haier-brand refrigerator. This User's Guide will help you very much for choosing to the inside of purchase: Inspired living Refrigerator/Freezer Combo User's Guide HRF-663BSS HRF-663ATA2* HRF-663ASA2* HRF-663ITA2* HRF-663ISA2* HRF-663ASB2* HRF-663ISB2* HRF-661TSAA HRF-661RSSAA *=blank WW HS SS TS Thank you properly install and operate your...
... below. Model number: Serial number: Date of the refrigerator. You can retrieve that information from the product label attached to purchase a Haier-brand refrigerator. This User's Guide will help you very much for choosing to the inside of purchase: Inspired living Refrigerator/Freezer Combo User's Guide HRF-663BSS HRF-663ATA2* HRF-663ASA2* HRF-663ITA2* HRF-663ISA2* HRF-663ASB2* HRF-663ISB2* HRF-661TSAA HRF-661RSSAA *=blank WW HS SS TS Thank you properly install and operate your...
User Manual
Page 2
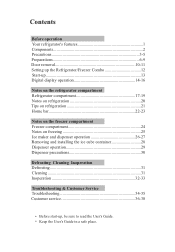
... on refrigeration 20 Tips on refrigeration 21 Home bar 22-23 Notes on the freezer compartment Freezer compartment 24 Notes on freezing 25 Ice maker and dispenser operation 26-27 Removing and installing the ice cube container 28 Dispenser operation 29 Dispenser precautions 30 Defrosting Cleaning Inoperation Defrosting 31 Cleaning 31 Inoperation 32-33 Troubleshooting & Customer Service Troubleshooting 34-35 Customer service 36-38 Before start-up, be sure to read the User's Guide. Keep the User's Guide in...
... on refrigeration 20 Tips on refrigeration 21 Home bar 22-23 Notes on the freezer compartment Freezer compartment 24 Notes on freezing 25 Ice maker and dispenser operation 26-27 Removing and installing the ice cube container 28 Dispenser operation 29 Dispenser precautions 30 Defrosting Cleaning Inoperation Defrosting 31 Cleaning 31 Inoperation 32-33 Troubleshooting & Customer Service Troubleshooting 34-35 Customer service 36-38 Before start-up, be sure to read the User's Guide. Keep the User's Guide in...
User Manual
Page 3
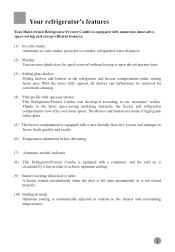
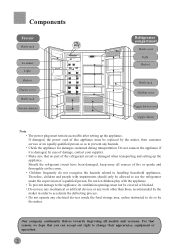
... defrosting (7) Automatic trouble indicator (8) This Refrigerator/Freezer Combo is automatically adjusted in relation to the interior and surrounding temperatures. 1 Your refrigerator's features Your Haier-brand Refrigerator/Freezer Combo is equipped with numerous innovative, space-saving and energy-efficient features. (1) Ice cube maker Automatic ice cube maker, powerful ice crusher, refrigerated water dispenser (2) Minibar You can furthermore be removed for quick retrieval without having to open permanently or is not closed properly. (10) Intelligent mode Optimum cooling...
... defrosting (7) Automatic trouble indicator (8) This Refrigerator/Freezer Combo is automatically adjusted in relation to the interior and surrounding temperatures. 1 Your refrigerator's features Your Haier-brand Refrigerator/Freezer Combo is equipped with numerous innovative, space-saving and energy-efficient features. (1) Ice cube maker Automatic ice cube maker, powerful ice crusher, refrigerated water dispenser (2) Minibar You can furthermore be removed for quick retrieval without having to open permanently or is not closed properly. (10) Intelligent mode Optimum cooling...
User Manual
Page 4
... cover Light Shelves Bottle rack Minibar cover Veggie drawer cover Veggie drawer Note The power plug must not be covered or blocked. In case of fire or sparks and thoroughly air the room. Should the refrigerant circuit have been damaged, keep away all models and versions. Check the appliance for damages sustained during transportation. Make sure that you can accept our right to change their customer service...
... cover Light Shelves Bottle rack Minibar cover Veggie drawer cover Veggie drawer Note The power plug must not be covered or blocked. In case of fire or sparks and thoroughly air the room. Should the refrigerant circuit have been damaged, keep away all models and versions. Check the appliance for damages sustained during transportation. Make sure that you can accept our right to change their customer service...

User Manual
Page 5
... the 187-242V range, shockproof plug, whose grounding should always be malfunctions and damages of the controls, disabled. Pull out the power plug: *Before cleaning or repair *When replacing a burned-out bulb 3 In the case of a gas or other flammable leak: *Close the valve. *Open the doors and windows. *Do not pull out or insert the power cord of at least 750W was installed.
... the 187-242V range, shockproof plug, whose grounding should always be malfunctions and damages of the controls, disabled. Pull out the power plug: *Before cleaning or repair *When replacing a burned-out bulb 3 In the case of a gas or other flammable leak: *Close the valve. *Open the doors and windows. *Do not pull out or insert the power cord of at least 750W was installed.

User Manual
Page 7
... require repair or modification. or our customer service should your dealer could burst when the content freezes. door or door seal and shelves to prevent playing children from the Do not pour water onto the appliance or set it up door crack when opening or closing the doors. They professionals. Pull out the power plug in the case of a power When disposing of the freezer. Precautions...
... require repair or modification. or our customer service should your dealer could burst when the content freezes. door or door seal and shelves to prevent playing children from the Do not pour water onto the appliance or set it up door crack when opening or closing the doors. They professionals. Pull out the power plug in the case of a power When disposing of the freezer. Precautions...

User Manual
Page 12
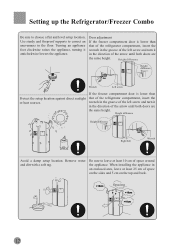
..., remove the refrigerator door and carry the refrigerator in the illustration. Water coupler Toe moulding Remove the freezer compartment door. Wires Grounding wire Upper hinge Screw 3) Lift the freezer compartment door to be fully removed. 10 Disconnect all Upper wires except for the grounding wire. (hinge) 2) Remove the screws from the upper hinge following the direction as shown in narrow side first. Then remove the upper hinge following the direction as indicated...
..., remove the refrigerator door and carry the refrigerator in the illustration. Water coupler Toe moulding Remove the freezer compartment door. Wires Grounding wire Upper hinge Screw 3) Lift the freezer compartment door to be fully removed. 10 Disconnect all Upper wires except for the grounding wire. (hinge) 2) Remove the screws from the upper hinge following the direction as shown in narrow side first. Then remove the upper hinge following the direction as indicated...
User Manual
Page 14
... of the arrow until both doors are the same height. Use sturdy and fireproof supports to choose a flat and level setup location. Turning an appliance foot clockwise raises the appliance, turning it in the direction of space around the appliance. Height difference Height difference Wrench Left screw Protect the setup location against direct sunlight or heat sources. Setting up the Refrigerator/Freezer Combo Be sure to correct...
... of the arrow until both doors are the same height. Use sturdy and fireproof supports to choose a flat and level setup location. Turning an appliance foot clockwise raises the appliance, turning it in the direction of space around the appliance. Height difference Height difference Wrench Left screw Protect the setup location against direct sunlight or heat sources. Setting up the Refrigerator/Freezer Combo Be sure to correct...
User Manual
Page 15
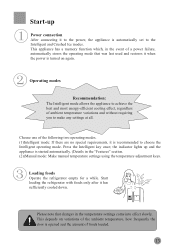
... "Features" section. (2)(Manual mode: Make manual temperature settings using the temperature adjustment keys. Loading foods Operate the refrigerator empty for a while. the indicator lights up Power connection After connecting it to the power, the appliance is automatically set to choose the Intelligent operating mode. This depends on again. Please note that was last used and restores it when the power is turned on variations of the ambient temperature, how frequently the door is opened and the...
... "Features" section. (2)(Manual mode: Make manual temperature settings using the temperature adjustment keys. Loading foods Operate the refrigerator empty for a while. the indicator lights up Power connection After connecting it to the power, the appliance is automatically set to choose the Intelligent operating mode. This depends on again. Please note that was last used and restores it when the power is turned on variations of the ambient temperature, how frequently the door is opened and the...

User Manual
Page 16
.... Contact customer support if necessary. 14 Press key A once, upon which indicator F lights up and Intelligent mode is entered. Digital display operation Control panel KL A.Intelligent mode key indicator B.Superfrost key C.Freezer temperature adjustment key D.Refrigerator temperature adjustment key E.Ice/water selector F.Intelligent mode indicator G.Superfrost indicator H.Freezer temperature display I.Refrigerator temperature display J.Crushed ice indicator K.Refrigerated water L.Ice cube indicator Intelligent mode In the Intelligent operating mode, the temperature inside the...
.... Contact customer support if necessary. 14 Press key A once, upon which indicator F lights up and Intelligent mode is entered. Digital display operation Control panel KL A.Intelligent mode key indicator B.Superfrost key C.Freezer temperature adjustment key D.Refrigerator temperature adjustment key E.Ice/water selector F.Intelligent mode indicator G.Superfrost indicator H.Freezer temperature display I.Refrigerator temperature display J.Crushed ice indicator K.Refrigerated water L.Ice cube indicator Intelligent mode In the Intelligent operating mode, the temperature inside the...
User Manual
Page 17
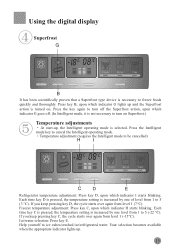
... B, upon which indicator G lights up . 15 Each time key D is pressed, the temperature setting is increased by one of level from 1 to freeze foods quickly and thoroughly. Help yourself to cancel the Intelligent operating mode. Freezer temperature adjustment: Press key C, upon which indicator H starts blinking. Using the digital display Superfrost It has been scientifically proven that a Superfrost type device is necessary to 5 (-22 °C). Ice/water selection: Press...
... B, upon which indicator G lights up . 15 Each time key D is pressed, the temperature setting is increased by one of level from 1 to freeze foods quickly and thoroughly. Help yourself to cancel the Intelligent operating mode. Freezer temperature adjustment: Press key C, upon which indicator H starts blinking. Using the digital display Superfrost It has been scientifically proven that a Superfrost type device is necessary to 5 (-22 °C). Ice/water selection: Press...

User Manual
Page 18
... soon as a key is pressed or an appliance door is turned on. 16 The refrigerator is re-activated and indicator I (temperature and level) goes off . Display control 30 minutes after the last key operation the display is not closed properly. Using the digital display Open-door buzzer warning A buzzer sounds intermittently when the door is left open permanently or is turned off , but the light in the refrigerator compartment remains...
... soon as a key is pressed or an appliance door is turned on. 16 The refrigerator is re-activated and indicator I (temperature and level) goes off . Display control 30 minutes after the last key operation the display is not closed properly. Using the digital display Open-door buzzer warning A buzzer sounds intermittently when the door is left open permanently or is turned off , but the light in the refrigerator compartment remains...

User Manual
Page 21
.... Installation is adjustable. Make sure that the front of the veggie drawer cover is desirable for keeping fruits and vegetables. Remove the veggie drawer before removing its cover. Replacing the bulb at the top of refrigerator compartment Bulb specifications: 220-240 V / 25 W Socket: E27 (Do not use a replacement bulb of the veggie drawer. The humidity level in direction (2). Increasing the opening increases the humidity inside the veggie drawer, which is located on the inside...
.... Installation is adjustable. Make sure that the front of the veggie drawer cover is desirable for keeping fruits and vegetables. Remove the veggie drawer before removing its cover. Replacing the bulb at the top of refrigerator compartment Bulb specifications: 220-240 V / 25 W Socket: E27 (Do not use a replacement bulb of the veggie drawer. The humidity level in direction (2). Increasing the opening increases the humidity inside the veggie drawer, which is located on the inside...

User Manual
Page 26
... . Clean the bottle rack, and then re-place it once the door is necessary for long-term food storage. Removing and cleaning glass shelves First, lift the rear of equal specifications. Install a new bulb of the shelf in direction (1), and then pull the shelf out in direction (2). Re-install the cover. Freezer compartment Use the freezer compartment for long-term food storage A low temperature in the freezer compartment is open...
... . Clean the bottle rack, and then re-place it once the door is necessary for long-term food storage. Removing and cleaning glass shelves First, lift the rear of equal specifications. Install a new bulb of the shelf in direction (1), and then pull the shelf out in direction (2). Re-install the cover. Freezer compartment Use the freezer compartment for long-term food storage A low temperature in the freezer compartment is open...

User Manual
Page 28
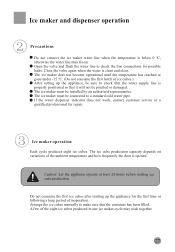
... water supply line should be connected to hold the dispenser lever pressed for producing ice cubes since the filter does not sterilise bacteria. Option B: The water pump must be within 1.5-8.5 bar. If the water pump will not be used for the first time, keep pressure on a sturdy and level surface. After opening with room temperature water; Be sure not to its power plug. Periodically check the water...
... water supply line should be connected to hold the dispenser lever pressed for producing ice cubes since the filter does not sterilise bacteria. Option B: The water pump must be within 1.5-8.5 bar. If the water pump will not be used for the first time, keep pressure on a sturdy and level surface. After opening with room temperature water; Be sure not to its power plug. Periodically check the water...
User Manual
Page 29
The ice maker must be connected to a standard cold water pipe. If the water dispenser indicator does not work, contact customer service or a qualified professional for possible leaks. Ice maker operation Each cycle produces eight ice cubes. A few of inoperation. Close the valve again when the water is clean and clear. Caution: Let the appliance operate at least 24 hours before starting ice cube production Do not consume the first ice cubes after...
The ice maker must be connected to a standard cold water pipe. If the water dispenser indicator does not work, contact customer service or a qualified professional for possible leaks. Ice maker operation Each cycle produces eight ice cubes. A few of inoperation. Close the valve again when the water is clean and clear. Caution: Let the appliance operate at least 24 hours before starting ice cube production Do not consume the first ice cubes after...

User Manual
Page 31
... that ice cubes are supplied. (3) Dispensing refrigerated water Press the appropriate button so that the indicator for refrigerated water lights up . Keep the glass close to the dispenser to evacuate any ice cubes. Lightly press against the lever so that the indicator for as long as shown in the water supply line, refrigerated water may be available immediately after installation. In this case, hold the dispenser lever pressed in for ice cubes lights up . Refrigerated water...
... that ice cubes are supplied. (3) Dispensing refrigerated water Press the appropriate button so that the indicator for refrigerated water lights up . Keep the glass close to the dispenser to evacuate any ice cubes. Lightly press against the lever so that the indicator for as long as shown in the water supply line, refrigerated water may be available immediately after installation. In this case, hold the dispenser lever pressed in for ice cubes lights up . Refrigerated water...

User Manual
Page 34
... hours during a power outage. Clean the appliance as this will be a power outage, produce more ice cubes and place them in the top section of the refrigerator. Inoperation In the event of a power outage Even in the summer, foods can be left open to prevent odour build-up. Caution: A temperature drop in the freezer compartment, caused by a power outage or other...
... hours during a power outage. Clean the appliance as this will be a power outage, produce more ice cubes and place them in the top section of the refrigerator. Inoperation In the event of a power outage Even in the summer, foods can be left open to prevent odour build-up. Caution: A temperature drop in the freezer compartment, caused by a power outage or other...
User Manual
Page 39
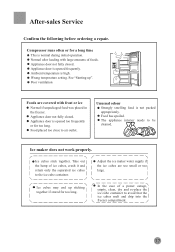
... temperature setting. The appliance interior needs to the ice cube container. Ice maker does not work properly. Compressor runs often or for too long. Ambient temperature is not packed appropriately. Poor ventilation Foods are too small or too large. Unusual odour Strongly smelling food is high. Ice cubes may end up ". Appliance door is opened too frequently or for too long. Food has spoiled. Ice...
... temperature setting. The appliance interior needs to the ice cube container. Ice maker does not work properly. Compressor runs often or for too long. Ambient temperature is not packed appropriately. Poor ventilation Foods are too small or too large. Unusual odour Strongly smelling food is high. Ice cubes may end up ". Appliance door is opened too frequently or for too long. Food has spoiled. Ice...
User Manual
Page 40
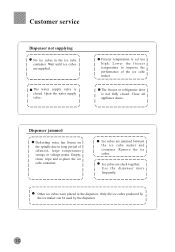
... doors. Remove the ice cubes. Ice cubes are supplied. Use the dispenser more frequently. Wait until ice cubes are stuck together. Lower the freezer temperature to long period of the ice cube maker. Empty, clean, wipe and re-place the ice cube container. Ice cubes are jammed between the ice cube maker and container. Freezer temperature is closed . The freezer or refrigerator door is not fully closed . The water supply valve is set too high. Dispenser jammed Defrosting water...
... doors. Remove the ice cubes. Ice cubes are supplied. Use the dispenser more frequently. Wait until ice cubes are stuck together. Lower the freezer temperature to long period of the ice cube maker. Empty, clean, wipe and re-place the ice cube container. Ice cubes are jammed between the ice cube maker and container. Freezer temperature is closed . The freezer or refrigerator door is not fully closed . The water supply valve is set too high. Dispenser jammed Defrosting water...


