User Manual
Page 2
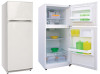
... with the installation instructions before cleaning or making any sharp instrument in defrosting your refrigerator. 7) If your refrigerator is used , we recommend that of many other foods. Note: If for its intended purpose as described in this use and care guide. 2) This refrigerator must be dangerous to these extremely cold surfaces. 9) Do not refreeze foods, which have any reason this appliance. Thawed ice cream...
... with the installation instructions before cleaning or making any sharp instrument in defrosting your refrigerator. 7) If your refrigerator is used , we recommend that of many other foods. Note: If for its intended purpose as described in this use and care guide. 2) This refrigerator must be dangerous to these extremely cold surfaces. 9) Do not refreeze foods, which have any reason this appliance. Thawed ice cream...
User Manual
Page 3
... in getting the best use manual will need it to -use from your refrigerator. This easy-to obtain warranty service. 2 Remember to your refrigerator in back of explosive fumes. Model number Serial number Date of child entrapment. It is designed for using our Haier product. Leave the shelves in an enclosed cabinet. Thank you for freestanding installation only. 11) Do not operate your manual. English 10) This refrigerator should not...
... in getting the best use manual will need it to -use from your refrigerator. This easy-to obtain warranty service. 2 Remember to your refrigerator in back of explosive fumes. Model number Serial number Date of child entrapment. It is designed for using our Haier product. Leave the shelves in an enclosed cabinet. Thank you for freestanding installation only. 11) Do not operate your manual. English 10) This refrigerator should not...
User Manual
Page 7
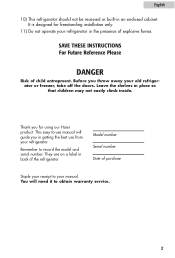
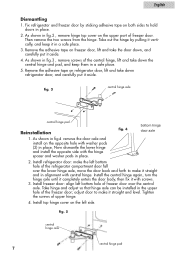
... select your refrigerator in temperature settings below 55˚ Fahrenheit. • Select a suitable location for the refrigerator on the front bottom corners of the left/right door opening method: This product provides the reversing of the refrigerator. fig. 2 hinge cover top hinge 6 Remove hinge cover screw. 2. Remove top hinge cover. 3. Reversing the Door Swing (see fig. 2) 1. Door Alignment (see fig. 2 to make the change. English Install Limitations • Do not install your preference of door opening by following...
... select your refrigerator in temperature settings below 55˚ Fahrenheit. • Select a suitable location for the refrigerator on the front bottom corners of the left/right door opening method: This product provides the reversing of the refrigerator. fig. 2 hinge cover top hinge 6 Remove hinge cover screw. 2. Remove top hinge cover. 3. Reversing the Door Swing (see fig. 2) 1. Door Alignment (see fig. 2 to make the change. English Install Limitations • Do not install your preference of door opening by following...
User Manual
Page 8
... level. Take hinge and adjust so that hinge axle can be installed in place. 2. fig. 5 central hinge axle 7 central hinge pad 8 Fix refrigerator and freezer door by pulling it aside. Now dismantle the lower hinge and install the opposite side with screws. 3. adjust door to hold doors in fig 4 remove the door axle and install on refrigerator door, lift and take down refrigerator door, and carefully put it aside. 4. Install top hinge cover on both sides to make...
... level. Take hinge and adjust so that hinge axle can be installed in place. 2. fig. 5 central hinge axle 7 central hinge pad 8 Fix refrigerator and freezer door by pulling it aside. Now dismantle the lower hinge and install the opposite side with screws. 3. adjust door to hold doors in fig 4 remove the door axle and install on refrigerator door, lift and take down refrigerator door, and carefully put it aside. 4. Install top hinge cover on both sides to make...
User Manual
Page 9
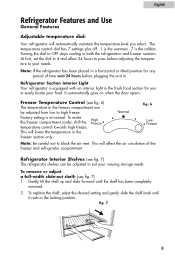
... freeze. Refrigerator Interior Shelves (see fig. 7) 1. To replace the shelf, select the desired setting and gently slide the shelf back until the shelf has been completely removed. 2. This will automatically maintain the temperature level you to block the air vent. fig. 7 8 English Refrigerator Features and Use General Features Adjustable temperature dial: Your refrigerator will lower the temperature in the freezer section only. Refrigerator Section Interior Light Your refrigerator is equipped with an interior light in both the refrigeration...
... freeze. Refrigerator Interior Shelves (see fig. 7) 1. To replace the shelf, select the desired setting and gently slide the shelf back until the shelf has been completely removed. 2. This will automatically maintain the temperature level you to block the air vent. fig. 7 8 English Refrigerator Features and Use General Features Adjustable temperature dial: Your refrigerator will lower the temperature in the freezer section only. Refrigerator Section Interior Light Your refrigerator is equipped with an interior light in both the refrigeration...
User Manual
Page 10
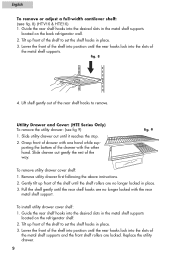
... rear shelf hooks to set the shelf hooks in the metal shelf supports located on the refrigerator shelf. 2. Lift shelf gently out of the drawer with the rear metal shelf support. Slide drawer out gently the rest of the shelf to remove. fig. 9 To remove utility drawer cover shelf: 1. Guide the rear shelf hooks into the desired slots in place. 3. Pull the shelf gently until it reaches the stop. 2. Utility Drawer and Cover: (HTE Series Only) To remove the utility drawer...
... rear shelf hooks to set the shelf hooks in the metal shelf supports located on the refrigerator shelf. 2. Lift shelf gently out of the drawer with the rear metal shelf support. Slide drawer out gently the rest of the shelf to remove. fig. 9 To remove utility drawer cover shelf: 1. Guide the rear shelf hooks into the desired slots in place. 3. Pull the shelf gently until it reaches the stop. 2. Utility Drawer and Cover: (HTE Series Only) To remove the utility drawer...

User Manual
Page 11
.... 11 2. Simply adjust the controls to raise or lower the humidity levels of the crisper cover frame into place. Crisper Humidity Control: (see fig. # 11) 1. English Crisper and Crisper Cover Crispers HTV Series: This series of glass. Crisper cover on both crispers. Grip the crisper firmly and slide out completely. 4. To remove the crisper cover: (see fig. # 12) (HTE Series Only) Your refrigerator model may be equipped with slide control to the appropriate setting for you...
.... 11 2. Simply adjust the controls to raise or lower the humidity levels of the crisper cover frame into place. Crisper Humidity Control: (see fig. # 11) 1. English Crisper and Crisper Cover Crispers HTV Series: This series of glass. Crisper cover on both crispers. Grip the crisper firmly and slide out completely. 4. To remove the crisper cover: (see fig. # 12) (HTE Series Only) Your refrigerator model may be equipped with slide control to the appropriate setting for you...
User Manual
Page 12
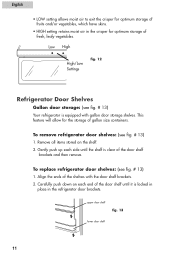
... door shelf 11 To remove refrigerator door shelves: (see fig. # 13) Your refrigerator is locked in place in the crisper for optimum storage of fresh, leafy vegetables. Align the ends of gallon size containers. To replace refrigerator door shelves: (see fig. # 13) 1. Carefully push down on the shelf. 2. This feature will allow for the storage of the shelves with gallon door storage shelves. English • LOW setting allows moist air...
... door shelf 11 To remove refrigerator door shelves: (see fig. # 13) Your refrigerator is locked in place in the crisper for optimum storage of fresh, leafy vegetables. Align the ends of gallon size containers. To replace refrigerator door shelves: (see fig. # 13) 1. Carefully push down on the shelf. 2. This feature will allow for the storage of the shelves with gallon door storage shelves. English • LOW setting allows moist air...
User Manual
Page 14
... fan circulating air inside the interior of your unit to maintain the temperature you have selected. • Boiling water, gurgling sounds or slight vibrations that are the result of the refrigerant circulating through the cooling coils. • Sizzling or popping sounds resulting from frost melting during the defrost cycle and dripping on the defrost heater. • The sound of dripping water as ice melts...
... fan circulating air inside the interior of your unit to maintain the temperature you have selected. • Boiling water, gurgling sounds or slight vibrations that are the result of the refrigerant circulating through the cooling coils. • Sizzling or popping sounds resulting from frost melting during the defrost cycle and dripping on the defrost heater. • The sound of dripping water as ice melts...

User Manual
Page 15
Remove the highest shelf. 3. Door Gaskets: • Clean door gaskets every three months according to the electrical wall outlet. 1614 Light Bulb Replacement 1. To remove the bulb cover, hold the left side and gently press in death or injury. Plug back the refrigerator power cord to general instructions. Caution: Before using cleaning products, always read and follow manufacturer's instructions and warnings to assure a proper seal. • Petroleum jelly applied lightly on the hinge side of these...
Remove the highest shelf. 3. Door Gaskets: • Clean door gaskets every three months according to the electrical wall outlet. 1614 Light Bulb Replacement 1. To remove the bulb cover, hold the left side and gently press in death or injury. Plug back the refrigerator power cord to general instructions. Caution: Before using cleaning products, always read and follow manufacturer's instructions and warnings to assure a proper seal. • Petroleum jelly applied lightly on the hinge side of these...

User Manual
Page 16
... doors open, so air may circulate inside the refrigerator before Compressor starts to "General cleaning" section. Trouble Shooting Refrigerator Does Not Operate • Check if the thermostat control is in the "OFF" position. • Check if the refrigerator is plugged in. • Check if there is power at the ac outlet, by frequent opening of the door. • Allow time for recently added warm food to reach fresh food or freezer temperature...
... doors open, so air may circulate inside the refrigerator before Compressor starts to "General cleaning" section. Trouble Shooting Refrigerator Does Not Operate • Check if the thermostat control is in the "OFF" position. • Check if the refrigerator is plugged in. • Check if there is power at the ac outlet, by frequent opening of the door. • Allow time for recently added warm food to reach fresh food or freezer temperature...
User Manual
Page 17
Refrigerator light does not work • Check power supply. • Tighten bulb in socket. • Replace burned out bulb. Refrigerator has an odor • Interior needs cleaning. • Foods improperly wrapped or sealed may have been opened frequently or for an extended period of the refrigerator • This is normal during high temperature and humid days. • Doors may give off odors. Refrigerator/Freezer door does not shut properly • Level the...
Refrigerator light does not work • Check power supply. • Tighten bulb in socket. • Replace burned out bulb. Refrigerator has an odor • Interior needs cleaning. • Foods improperly wrapped or sealed may have been opened frequently or for an extended period of the refrigerator • This is normal during high temperature and humid days. • Doors may give off odors. Refrigerator/Freezer door does not shut properly • Level the...


