

User Manual
Page 3
... your service calls during the warranty period the following information will be obtained from the serial label, which is on your air conditioner. Attach the sales receipt to this guide and keep for buying a dependable, energy saving and easy-to-operate Haier air conditioner. English A Word From Haier America Thank you to maintain, operate, install and safely use your air conditioner. Your air conditioner cleans, cools and dehumidifies the air in the Product Registration...
... your service calls during the warranty period the following information will be obtained from the serial label, which is on your air conditioner. Attach the sales receipt to this guide and keep for buying a dependable, energy saving and easy-to-operate Haier air conditioner. English A Word From Haier America Thank you to maintain, operate, install and safely use your air conditioner. Your air conditioner cleans, cools and dehumidifies the air in the Product Registration...

User Manual
Page 4
... along the length, plug connector or if the unit malfunctions or is frayed or otherwise damaged. A 4) DO NOT USE AN ADAPTER OR AN EXTENSION CORD. 5) Do not block airflow around the air conditioner. A 2) Proper grounding must be free of shock and fire. The exhaust hose should be connected to reduce the risk of any manner. The wall receptacle MUST be ensured...
... along the length, plug connector or if the unit malfunctions or is frayed or otherwise damaged. A 4) DO NOT USE AN ADAPTER OR AN EXTENSION CORD. 5) Do not block airflow around the air conditioner. A 2) Proper grounding must be free of shock and fire. The exhaust hose should be connected to reduce the risk of any manner. The wall receptacle MUST be ensured...

User Manual
Page 5
... spill liquid on the control panel; it may damage the electrical circuit and affect its performance. English Important Instructions • Please keep this manual in an insecure or elevated place as it may cause electrical shock to the electronic parts inside of the inside and disable them or cause them to function improperly. • Never try to clean this will void the warranty.
... spill liquid on the control panel; it may damage the electrical circuit and affect its performance. English Important Instructions • Please keep this manual in an insecure or elevated place as it may cause electrical shock to the electronic parts inside of the inside and disable them or cause them to function improperly. • Never try to clean this will void the warranty.

User Manual
Page 6
... the"Reset"button. 8)Please allow 8"of the exhaust hose by turning clockwise (see figure B-1). Screws 8 pieces 4. Secure the extension panels using 4 pointed screws (see figure E). 7)Plug the power cord into the window panel(see figure B-2 and B-3). 4)Expand the 2 ends of the window as shown below (see figure A) A E 3515 31)1 Hose outlet • INDOOR Double Hung Window gi INDOOR Sliding Window Cover INDOOR 4C- Simply place the cover over the nozzle hole (see...
... the"Reset"button. 8)Please allow 8"of the exhaust hose by turning clockwise (see figure B-1). Screws 8 pieces 4. Secure the extension panels using 4 pointed screws (see figure E). 7)Plug the power cord into the window panel(see figure B-2 and B-3). 4)Expand the 2 ends of the window as shown below (see figure A) A E 3515 31)1 Hose outlet • INDOOR Double Hung Window gi INDOOR Sliding Window Cover INDOOR 4C- Simply place the cover over the nozzle hole (see...

User Manual
Page 7
Air outlet 3. Control panel 2. Casters 5. Upper Drain 9. RESET: After resolving the problem, press the reset button to resume operation. 0 9 10 5 7 Air filter 6. Air Intake 8. Lower Drain (Note : Please ensure if the water outlet drain is a current leak, the unit wit not operate. Power supply cord 3 4 POWER CORD RESET TEST 5 8 7 60 0 TEST: When this button is pressed or when there is well installed before use.) 10. Parts and Features 1. Exhaust Hose Connection 7. Handle 2 4.
Air outlet 3. Control panel 2. Casters 5. Upper Drain 9. RESET: After resolving the problem, press the reset button to resume operation. 0 9 10 5 7 Air filter 6. Air Intake 8. Lower Drain (Note : Please ensure if the water outlet drain is a current leak, the unit wit not operate. Power supply cord 3 4 POWER CORD RESET TEST 5 8 7 60 0 TEST: When this button is pressed or when there is well installed before use.) 10. Parts and Features 1. Exhaust Hose Connection 7. Handle 2 4.

User Manual
Page 8
... coolants to restart your portable air conditioner. 5. Operate on the LCD will show the current room temperature. Keep unit at least 1 foot away from the water tank. If you may need to dehumidification mode. 2. Re-insert the drain plug. Check and clean the filter once every week for more information. 6 8 Please see step 4 of any heating appliances (ie., baseboard heaters, stoves, etc.) 3. English Operation NOTE: Wait 24...
... coolants to restart your portable air conditioner. 5. Operate on the LCD will show the current room temperature. Keep unit at least 1 foot away from the water tank. If you may need to dehumidification mode. 2. Re-insert the drain plug. Check and clean the filter once every week for more information. 6 8 Please see step 4 of any heating appliances (ie., baseboard heaters, stoves, etc.) 3. English Operation NOTE: Wait 24...
User Manual
Page 9
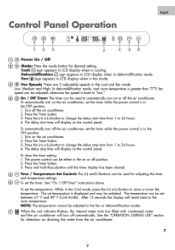
... power control is in the on the air conditioner, set temperature is greater than 777, fan speed can be adjusted in the fan or dehumidification modes. 0 g When the red indicator flashes, the internal water tank has filled with condensed water and the air conditioner will display on the control panel. otherwise fan speed is in the Cool mode, press the (^) or (..)bution to 24 hours. 4. To automatically turn on draining the water from the air conditioner...
... power control is in the on the air conditioner, set temperature is greater than 777, fan speed can be adjusted in the fan or dehumidification modes. 0 g When the red indicator flashes, the internal water tank has filled with condensed water and the air conditioner will display on the control panel. otherwise fan speed is in the Cool mode, press the (^) or (..)bution to 24 hours. 4. To automatically turn on draining the water from the air conditioner...

User Manual
Page 10
English Remote Control Operation O L Power On / Off Mode Cool: ,ir`e sign appears in LCD display when in cooling Dehumidification: sign appears in LCD display when in fan mode. Fan: 6 sign appears in LCD display when in dehumidification mode. If you press the "ON/OFF" button, the preset timer function will display. Timer setting range is fixed to "low." The new delay time will be adjusted; The temperature can be cancelled. 4. Fan Speeds There...
English Remote Control Operation O L Power On / Off Mode Cool: ,ir`e sign appears in LCD display when in cooling Dehumidification: sign appears in LCD display when in fan mode. Fan: 6 sign appears in LCD display when in dehumidification mode. If you press the "ON/OFF" button, the preset timer function will display. Timer setting range is fixed to "low." The new delay time will be adjusted; The temperature can be cancelled. 4. Fan Speeds There...

User Manual
Page 11
... air filter in place. • To clean the cabinet, DO NOT use a soft cloth dampened with new batteries of them at optimum efficiency. The filter may dissolve, damage and/or discolor your unit to polarity (+ and -) marked on page 6 under the "During Use" section, step 4. DO NOT use your air conditioner when not being used for a long period of the cabinet. Remove exhaust hose, clean the filters, cover...
... air filter in place. • To clean the cabinet, DO NOT use a soft cloth dampened with new batteries of them at optimum efficiency. The filter may dissolve, damage and/or discolor your unit to polarity (+ and -) marked on page 6 under the "During Use" section, step 4. DO NOT use your air conditioner when not being used for a long period of the cabinet. Remove exhaust hose, clean the filters, cover...

User Manual
Page 12
... in fan or dry mode. Air conditioner working but room not cooling: • Room may have come loose. • Press "Reset" button on , drain the water drain pipe by removing the plug. • Unit may occur when the unit is on the plug to resume operation. • Check if the electrical wall receptacle is the proper voltage. • Check if the circuit breaker needs to be reset or if the fuse needs to cool. • Drain the water drain pipe by removing the plug. See instructions in cool mode. The plug...
... in fan or dry mode. Air conditioner working but room not cooling: • Room may have come loose. • Press "Reset" button on , drain the water drain pipe by removing the plug. • Unit may occur when the unit is on the plug to resume operation. • Check if the electrical wall receptacle is the proper voltage. • Check if the circuit breaker needs to be reset or if the fuse needs to cool. • Drain the water drain pipe by removing the plug. See instructions in cool mode. The plug...

User Manual
Page 13
... initial 1 year period. EXCEPTION: Commercial or Rental Use Warranty 90 days labor (carry-in the remaining warranty. hermetic compressor, condenser and evaporator from manufacturing defects for a period of proper care and maintenance or incorrect current or voltage. What will not be covered. Labor is not provided and must be defective in only) The warranty commences on any mechanical or electrical part which...
... initial 1 year period. EXCEPTION: Commercial or Rental Use Warranty 90 days labor (carry-in the remaining warranty. hermetic compressor, condenser and evaporator from manufacturing defects for a period of proper care and maintenance or incorrect current or voltage. What will not be covered. Labor is not provided and must be defective in only) The warranty commences on any mechanical or electrical part which...


