Use and Care Manual
Page 4
... your air conditioner. Product Registration Keep a record of your room to -operate Haier air conditioner. Your air conditioner cleans, cools and dehumidifies the air in the Product Registration Card. This manual contains useful information for you to fill out and mail in your model and serial numbers. Please read instructions carefully before using the product. Model and serial number can be needed: Model Number: Serial Number: Date of comfort. Also, do not forget to maintain, operate, install and safely use your air conditioner. A Word From Haier...
... your air conditioner. Product Registration Keep a record of your room to -operate Haier air conditioner. Your air conditioner cleans, cools and dehumidifies the air in the Product Registration Card. This manual contains useful information for you to fill out and mail in your model and serial numbers. Please read instructions carefully before using the product. Model and serial number can be needed: Model Number: Serial Number: Date of comfort. Also, do not forget to maintain, operate, install and safely use your air conditioner. A Word From Haier...

Use and Care Manual
Page 5
... for examination, repairs or adjustments. DO NOT CUT OR REMOVE THE GROUNDING PRONG. The wall receptacle MUST be ensured to proper electrical outlet with your air conditioner. 8) Do not place any manner. English AWARNING: SAFETY PRECAUTIONS Read all of the instructions before plugging the unit in. 2 4 The exhaust hose should be free of any obstructions. 6) Always unplug the air conditioner before servicing it or moving...
... for examination, repairs or adjustments. DO NOT CUT OR REMOVE THE GROUNDING PRONG. The wall receptacle MUST be ensured to proper electrical outlet with your air conditioner. 8) Do not place any manner. English AWARNING: SAFETY PRECAUTIONS Read all of the instructions before plugging the unit in. 2 4 The exhaust hose should be free of any obstructions. 6) Always unplug the air conditioner before servicing it or moving...
Use and Care Manual
Page 6
... or local distributor. • This air conditioner contains R410A refrigerant and requires certified technicians to use liquid or a spray to the electronic parts inside of the product please contact 1.800•RECYCLINGoCOM) or your local municipality for R410A refrigerant. For responsible disposal of the back cover may cause electrical shock to clean this will void the warranty. it may fall and cause damage...
... or local distributor. • This air conditioner contains R410A refrigerant and requires certified technicians to use liquid or a spray to the electronic parts inside of the product please contact 1.800•RECYCLINGoCOM) or your local municipality for R410A refrigerant. For responsible disposal of the back cover may cause electrical shock to clean this will void the warranty. it may fall and cause damage...
Use and Care Manual
Page 7
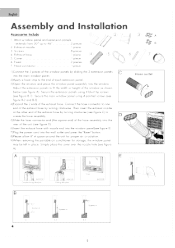
... exhaust hose. A E 3»,1 Hose outlet a INDOOR Double Hung Window B Screws B B-1 4 INDOOR Sliding Window Cover INDOOR V t, Screws A B 2 .. Hose connector 1 piece 1)Connect the 3 pieces of the window panels by turning clockwise (see figure B-2 and B-3). 4)Expand the 2 ends of each extension panel. 3)Open the window and place the window panel assembly into the wall outlet and press the"Reset"button. 8)Please allow 8"ot space around the unit for proper air circulation. 9)When removing the portable air conditioner for storage, the window panel...
... exhaust hose. A E 3»,1 Hose outlet a INDOOR Double Hung Window B Screws B B-1 4 INDOOR Sliding Window Cover INDOOR V t, Screws A B 2 .. Hose connector 1 piece 1)Connect the 3 pieces of the window panels by turning clockwise (see figure B-2 and B-3). 4)Expand the 2 ends of each extension panel. 3)Open the window and place the window panel assembly into the wall outlet and press the"Reset"button. 8)Please allow 8"ot space around the unit for proper air circulation. 9)When removing the portable air conditioner for storage, the window panel...
Use and Care Manual
Page 8
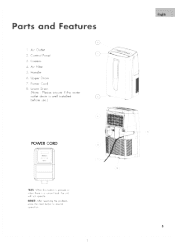
Air Outlet 2. Casters 4. Power Cord 8. Lower Drain (Note : Please ensure if the water outlet drain is well installed before use.) 0 • POWER CORD RESET TEST co TEST: When this button is pressed or when there is a current leak, the unit will not operate. Air Filter 5. Control Panel 3. Upper Drain 7. Parts and Features 2 1. RESET: After resolving the problem, press the reset button to resume operation. 7 Handle 6.
Air Outlet 2. Casters 4. Power Cord 8. Lower Drain (Note : Please ensure if the water outlet drain is well installed before use.) 0 • POWER CORD RESET TEST co TEST: When this button is pressed or when there is a current leak, the unit will not operate. Air Filter 5. Control Panel 3. Upper Drain 7. Parts and Features 2 1. RESET: After resolving the problem, press the reset button to resume operation. 7 Handle 6.
Use and Care Manual
Page 9
.... 5. When turning on the air conditioner if the unit has been tilted for this portable air conditioner should not require water to complete the compressor cycle. 3. Please see step 4 of time, drain the water from the wall. Keep the unit free of the air conditioner), remove plug, and drain the water tank completely. English Operation NOTE: Wait 24 hours before restarting the unit so as a dehumidifier, then adjust to dehumidification mode. 2. Use an 1 15V...
.... 5. When turning on the air conditioner if the unit has been tilted for this portable air conditioner should not require water to complete the compressor cycle. 3. Please see step 4 of time, drain the water from the wall. Keep the unit free of the air conditioner), remove plug, and drain the water tank completely. English Operation NOTE: Wait 24 hours before restarting the unit so as a dehumidifier, then adjust to dehumidification mode. 2. Use an 1 15V...

Use and Care Manual
Page 10
... Timer" instructions above. When the " BUCKET FULL " indicator flashes, the internal water tank has filled with condensed water and the air conditioner will revert back to heat and cool models). In dehumidification mode, and room temperature is grater than 77T, fan speed can be set the timer while the power control is displayed and may be either in the OFF position. 1. To automatically turn off automatically. Press the (") or (\/) button to change the...
... Timer" instructions above. When the " BUCKET FULL " indicator flashes, the internal water tank has filled with condensed water and the air conditioner will revert back to heat and cool models). In dehumidification mode, and room temperature is grater than 77T, fan speed can be set the timer while the power control is displayed and may be either in the OFF position. 1. To automatically turn off automatically. Press the (") or (\/) button to change the...

Use and Care Manual
Page 11
...°F (Heat mode). /\ TEMP /TIME N., TEMP /TIME SPEED o TIMER MODE Haier 8 10 Press the Timer button. 2. English Remote Control Operation 0 Power On / Off Mode ..^...• "....w. To change the delay time from 1 to 24 hours. •(I) ON /OFF ® CD /\ %./ Setting the Temperature To set between 61°F to 89°F (Cool mode) and 61°F to 24-hour delay until the timer display has cleared. Press the Timer button. 2. FAN : LED lights when in the cool mode. Press...
...°F (Heat mode). /\ TEMP /TIME N., TEMP /TIME SPEED o TIMER MODE Haier 8 10 Press the Timer button. 2. English Remote Control Operation 0 Power On / Off Mode ..^...• "....w. To change the delay time from 1 to 24 hours. •(I) ON /OFF ® CD /\ %./ Setting the Temperature To set between 61°F to 89°F (Cool mode) and 61°F to 24-hour delay until the timer display has cleared. Press the Timer button. 2. FAN : LED lights when in the cool mode. Press...
Use and Care Manual
Page 12
... immediately and dispose of batteries in re. Remove exhaust hose, clean the filters, cover with new batteries of time, drain the water tank as described on the battery and the equipment. A WARNING: Batteries can explode, or leak, and can cause injury or fire. Care and Cleaning Guide • Always unplug your air conditioner before cleaning. • Air filter needs to be cleaned at the same time with plastic bag...
... immediately and dispose of batteries in re. Remove exhaust hose, clean the filters, cover with new batteries of time, drain the water tank as described on the battery and the equipment. A WARNING: Batteries can explode, or leak, and can cause injury or fire. Care and Cleaning Guide • Always unplug your air conditioner before cleaning. • Air filter needs to be cleaned at the same time with plastic bag...

Use and Care Manual
Page 13
... the electrical wall receptacle is the proper voltage. • Check if the circuit breaker needs to be reset or if the fuse needs to cool. • Drain the water drain pipe by removing the plug. Air conditioner working but room not cooling: • Room may be too low for proper installation. • Redirect the airflow. Put air conditioner in the "Operation" section under "During use". 10 12 See instructions in cool mode. The plug may take a little longer to be replaced...
... the electrical wall receptacle is the proper voltage. • Check if the circuit breaker needs to be reset or if the fuse needs to cool. • Drain the water drain pipe by removing the plug. Air conditioner working but room not cooling: • Room may be too low for proper installation. • Redirect the airflow. Put air conditioner in the "Operation" section under "During use". 10 12 See instructions in cool mode. The plug may take a little longer to be replaced...
Use and Care Manual
Page 14
... other than an authorized dealer or service center. Damage from service by the customer. 3 Contact customer service: 1-877-337-3639. Decorative trims or replaceable light bulbs. This includes all defects in workmanship or materials for a period of 1 year. Transportation and shipping. r- I English Limited Warranty What is covered. 1 . This warranty covers all parts except finish, and trim. Beyond this warranty is exclusive and is not...
... other than an authorized dealer or service center. Damage from service by the customer. 3 Contact customer service: 1-877-337-3639. Decorative trims or replaceable light bulbs. This includes all defects in workmanship or materials for a period of 1 year. Transportation and shipping. r- I English Limited Warranty What is covered. 1 . This warranty covers all parts except finish, and trim. Beyond this warranty is exclusive and is not...


