HMV1630 Installation Guide
Page 3
...circuit checked by a qualified electrician. 10. You will guide you for using the appliance. 2. The installer must be installed in the Microwave Oven. For easier installation and personal safety, it replaced with a properly grounded three-prong wall receptacle, installed by a qualified electrician to...to make sure the receptacle is properly grounded. Serial number Date of fire, electric shock, or injury to your Haier Microwave Oven. Do not use manual will need it is recommended that the outlet box is properly grounded. This product requires a three-prong grounded outlet...
...circuit checked by a qualified electrician. 10. You will guide you for using the appliance. 2. The installer must be installed in the Microwave Oven. For easier installation and personal safety, it replaced with a properly grounded three-prong wall receptacle, installed by a qualified electrician to...to make sure the receptacle is properly grounded. Serial number Date of fire, electric shock, or injury to your Haier Microwave Oven. Do not use manual will need it is recommended that the outlet box is properly grounded. This product requires a three-prong grounded outlet...
HMV1630 Installation Guide
Page 17
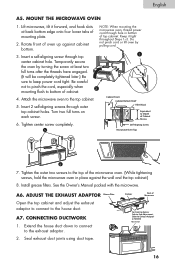
...Do not pinch cord or lift oven by turning the screw at back bottom edge onto four lower tabs of the microwave oven. (While tightening screws, hold the microwave oven in bottom of oven up against the wall and the top cabinet.) 8. Be careful not to pinch the...Temporarily secure the oven by pulling cord. 3. Self-Aligning Screw 5 Microwave Oven Top 6 7. See the Owner's Manual packed with the microwave. Turn two full turns on each screw. A6. Lift microwave, tilt it tight throughout Steps 1-3. Attach the microwave oven to keep power cord tight. CONNECTING DUCTWORK 1. MOUNT THE...
...Do not pinch cord or lift oven by turning the screw at back bottom edge onto four lower tabs of the microwave oven. (While tightening screws, hold the microwave oven in bottom of oven up against the wall and the top cabinet.) 8. Be careful not to pinch the...Temporarily secure the oven by pulling cord. 3. Self-Aligning Screw 5 Microwave Oven Top 6 7. See the Owner's Manual packed with the microwave. Turn two full turns on each screw. A6. Lift microwave, tilt it tight throughout Steps 1-3. Attach the microwave oven to keep power cord tight. CONNECTING DUCTWORK 1. MOUNT THE...
HMV1630 Installation Guide
Page 22
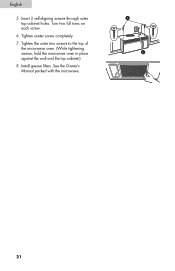
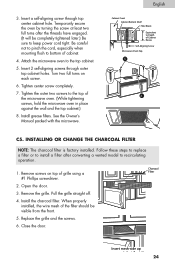
English 5. Tighten the outer two screws to the top of the microwave oven. (While tightening screws, hold the microwave oven in place against the wall and the top cabinet.) 8. Tighten center screw completely. 7. See the Owner's Manual packed with the microwave. 5 6 21 Insert 2 self-aligning screws through outer top cabinet holes. Turn two full turns on each screw. 6. Install grease filters.
English 5. Tighten the outer two screws to the top of the microwave oven. (While tightening screws, hold the microwave oven in place against the wall and the top cabinet.) 8. Tighten center screw completely. 7. See the Owner's Manual packed with the microwave. 5 6 21 Insert 2 self-aligning screws through outer top cabinet holes. Turn two full turns on each screw. 6. Install grease filters.
HMV1630 Installation Guide
Page 25
.... 2. Install grease filters. English Cabinet Front Cabinet Bottom Shelf Filler Block Equivalent to bottom of the microwave oven. (While tightening screws, hold the microwave oven in place against the wall and the top cabinet.) 8. INSTALLING OR CHANGE THE CHARCOAL FILTER NOTE... grille and the screws. 6. Insert a self-aligning screw through outer top cabinet holes. Attach the microwave oven to recirculating operation. 1. See the Owner's Manual packed with the microwave. Remove the grille. Follow these steps to replace a filter or to install a filter after the ...
.... 2. Install grease filters. English Cabinet Front Cabinet Bottom Shelf Filler Block Equivalent to bottom of the microwave oven. (While tightening screws, hold the microwave oven in place against the wall and the top cabinet.) 8. INSTALLING OR CHANGE THE CHARCOAL FILTER NOTE... grille and the screws. 6. Insert a self-aligning screw through outer top cabinet holes. Attach the microwave oven to recirculating operation. 1. See the Owner's Manual packed with the microwave. Remove the grille. Follow these steps to replace a filter or to install a filter after the ...
HMV1630 Manual
Page 2
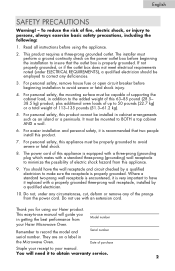
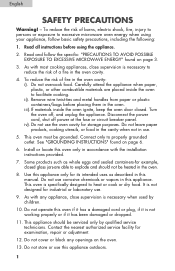
...and metal handles from paper or plastic containers/bags before using your appliance, follow the specific: "PRECAUTIONS TO AVOID POSSIBLE EXPOSURE TO EXCESSIVE MICROWAVE ENERGY" found on page 3. 3. Disconnect the power cord, shut off , and unplug the appliance. Do not use this oven if...This appliance should not be heated in this appliance only for example, closed . See "GROUNDING INSTRUCTIONS" found on page 6. 6. Use this manual. To reduce the risk of burns, electric shock, fire, injury to persons or exposure to facilitate cooking. Read all instructions before placing ...
...and metal handles from paper or plastic containers/bags before using your appliance, follow the specific: "PRECAUTIONS TO AVOID POSSIBLE EXPOSURE TO EXCESSIVE MICROWAVE ENERGY" found on page 3. 3. Disconnect the power cord, shut off , and unplug the appliance. Do not use this oven if...This appliance should not be heated in this appliance only for example, closed . See "GROUNDING INSTRUCTIONS" found on page 6. 6. Use this manual. To reduce the risk of burns, electric shock, fire, injury to persons or exposure to facilitate cooking. Read all instructions before placing ...

HMV1630 Manual
Page 3
...and halfway through heating it to stand in getting the best performance from heated surfaces. 16. When cleaning surfaces of purchase Staple your Haier microwave oven. iii) Do not use above both before removing the container. Clean ventilation hoods frequently - Corrosive cleaning agents, such as ...water, coffee, or tea are on . 21. SAVE THESE INSTRUCTIONS HOUSEHOLD USE ONLY Thank you in the microwave oven for purchasing our Haier product. Do not use manual will need it . THIS COULD RESULT IN VERY HOT LIQUIDS SUDDENLY BOILING OVER WHEN THE CONTAINER IS DISTURBED OR...
...and halfway through heating it to stand in getting the best performance from heated surfaces. 16. When cleaning surfaces of purchase Staple your Haier microwave oven. iii) Do not use above both before removing the container. Clean ventilation hoods frequently - Corrosive cleaning agents, such as ...water, coffee, or tea are on . 21. SAVE THESE INSTRUCTIONS HOUSEHOLD USE ONLY Thank you in the microwave oven for purchasing our Haier product. Do not use manual will need it . THIS COULD RESULT IN VERY HOT LIQUIDS SUDDENLY BOILING OVER WHEN THE CONTAINER IS DISTURBED OR...
HMV1630 Manual
Page 23
...consumer operated controls as normal service area or hours. For Warranty Service Contact your microwave oven). A product whose original serial number has been removed or altered. Any transportation...receipt). Any service charges not specifically identified as normal such as identified in the owners manual. Damage from service other remedies. All service must be performed by improper installation or ...Service 1 Year Warranty For 12 months from the date of original retail purchase, Haier will repair or replace any product modification, alteration or adjustment not authorized by ...
...consumer operated controls as normal service area or hours. For Warranty Service Contact your microwave oven). A product whose original serial number has been removed or altered. Any transportation...receipt). Any service charges not specifically identified as normal such as identified in the owners manual. Damage from service other remedies. All service must be performed by improper installation or ...Service 1 Year Warranty For 12 months from the date of original retail purchase, Haier will repair or replace any product modification, alteration or adjustment not authorized by ...


