Use and Care Manual
Page 4
Connect only to these temperatures usually protects against foodborne illness. See "GROUNDING INSTRUCTIONS" found on top of the microwave oven when the microwave oven is in the manual. It is not designed for industrial or laboratory use straight-sided containers with maximum width of 36" (91.44 cm). • ... or other combustible materials are placed inside the oven ignite, keep oven door closed glass jars - To reduce the risk of fire in the "Microwave Oven Care" section. • Do not mount this appliance over edge of hot food. To reduce the risk of burns: • Be ...
Connect only to these temperatures usually protects against foodborne illness. See "GROUNDING INSTRUCTIONS" found on top of the microwave oven when the microwave oven is in the manual. It is not designed for industrial or laboratory use straight-sided containers with maximum width of 36" (91.44 cm). • ... or other combustible materials are placed inside the oven ignite, keep oven door closed glass jars - To reduce the risk of fire in the "Microwave Oven Care" section. • Do not mount this appliance over edge of hot food. To reduce the risk of burns: • Be ...
Use and Care Manual
Page 16
For future reference, record the model and serial number located on the inside frame of the microwave, and the date of purchase 16 49-2000373 Rev. 2 Staple your new microwave. Model number Serial number Date of purchase. This user manual will help you for purchasing this manual to this Haier product. ENGLISH RECORD KEEPING Thank you get the best performance from your proof of purchase to aid in obtaining warranty service if needed.
For future reference, record the model and serial number located on the inside frame of the microwave, and the date of purchase 16 49-2000373 Rev. 2 Staple your new microwave. Model number Serial number Date of purchase. This user manual will help you for purchasing this manual to this Haier product. ENGLISH RECORD KEEPING Thank you get the best performance from your proof of purchase to aid in obtaining warranty service if needed.

Installation Instructions
Page 4
... or serious bodily injury. IMPORTANT SAFETY INSTRUCTIONS IMPORTANT: To reduce the risk of fire, electrical shock, injury to whether the microwave oven is the safety alert symbol. We have provided many important safety messages in moderate or minor injury. WARNING A potentially ...must be properly grounded. CAUTION A potentially hazardous situation which , if not avoided, could be properly installed and located in this manual and on your appliance. These words mean: DANGER An imminently hazardous situation. All safety messages will tell you what the potential...
... or serious bodily injury. IMPORTANT SAFETY INSTRUCTIONS IMPORTANT: To reduce the risk of fire, electrical shock, injury to whether the microwave oven is the safety alert symbol. We have provided many important safety messages in moderate or minor injury. WARNING A potentially ...must be properly grounded. CAUTION A potentially hazardous situation which , if not avoided, could be properly installed and located in this manual and on your appliance. These words mean: DANGER An imminently hazardous situation. All safety messages will tell you what the potential...

Installation Instructions
Page 8
... so can result in back or other injury. 1. Remove the grease filters and User Manual from the front of the plastic bag. Locate and remove the two screws attaching the mounting plate to the back of the microwave, remove the foam packing that contains the turntable and turntable ring. STEP 1 - ENGLISH INSTALLATION...
... so can result in back or other injury. 1. Remove the grease filters and User Manual from the front of the plastic bag. Locate and remove the two screws attaching the mounting plate to the back of the microwave, remove the foam packing that contains the turntable and turntable ring. STEP 1 - ENGLISH INSTALLATION...

Installation Instructions
Page 18
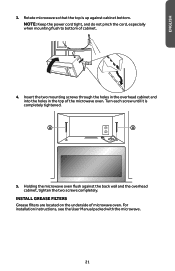
.... Remove and save the screw(s) fastening the blower plate to the rear wall, aligning it with the microwave. ENGLISH INSTALL GREASE FILTERS Grease filters are located on the Mounting Plate/Rear Wall template. 2. ab c A Surface Lights B Door C Grease Filters d METHOD B - ... EDGE 12" Trim the rear wall template along the dotted line. Tape the Mounting Plate/Template to the microwave. 2. Lift off the blower plate. 16 For installation instructions, see the User Manual packed with the holes previously drilled for the blower motor and blower plate are securely tightened when they are...
.... Remove and save the screw(s) fastening the blower plate to the rear wall, aligning it with the microwave. ENGLISH INSTALL GREASE FILTERS Grease filters are located on the Mounting Plate/Rear Wall template. 2. ab c A Surface Lights B Door C Grease Filters d METHOD B - ... EDGE 12" Trim the rear wall template along the dotted line. Tape the Mounting Plate/Template to the microwave. 2. Lift off the blower plate. 16 For installation instructions, see the User Manual packed with the holes previously drilled for the blower motor and blower plate are securely tightened when they are...
Installation Instructions
Page 23
... of cabinet. 4. For installation instructions, see the User Manual packed with the microwave. 21 Turn each screw until it is up against the back wall and the overhead cabinet, tighten the two screws completely. Rotate microwave so that the top is completely tightened. NOTE: Keep ...the power cord tight, and do not pinch the cord, especially when mounting flush to bottom of microwave oven. ENGLISH 3. a a 5. Insert the two mounting screws...
... of cabinet. 4. For installation instructions, see the User Manual packed with the microwave. 21 Turn each screw until it is up against the back wall and the overhead cabinet, tighten the two screws completely. Rotate microwave so that the top is completely tightened. NOTE: Keep ...the power cord tight, and do not pinch the cord, especially when mounting flush to bottom of microwave oven. ENGLISH 3. a a 5. Insert the two mounting screws...

Installation Instructions
Page 27
... death, fire or electrical shock. 25 ENGLISH a a 5. Do not use an extension cord. For installation instructions, see the User Manual packed with the microwave. Do not use an adapter. Holding the microwave oven flush against the back wall and the overhead cabinet, tighten the two screws completely. INSTALL GREASE FILTERS Grease filters...
... death, fire or electrical shock. 25 ENGLISH a a 5. Do not use an extension cord. For installation instructions, see the User Manual packed with the microwave. Do not use an adapter. Holding the microwave oven flush against the back wall and the overhead cabinet, tighten the two screws completely. INSTALL GREASE FILTERS Grease filters...
Installation Instructions
Page 28
Test vent fan and exhaust by placing 1 cup (250 mL) of water on the turntable, and programming a cook time of microwave oven by operating the vent fan. 4. If the problem continues, call an electrician. • Check that a circuit breaker has not tripped. Installation is... 3 prong outlet. 2. ENGLISH 1. Reconnect power. 3. Replace the fuse or reset the circuit breaker. Check the operation of 1 minute at 100% power. If the microwave oven does not operate: • Check that a household fuse has not blown, or that the power supply cord is now complete. 26 Plug into a grounded...
Test vent fan and exhaust by placing 1 cup (250 mL) of water on the turntable, and programming a cook time of microwave oven by operating the vent fan. 4. If the problem continues, call an electrician. • Check that a circuit breaker has not tripped. Installation is... 3 prong outlet. 2. ENGLISH 1. Reconnect power. 3. Replace the fuse or reset the circuit breaker. Check the operation of 1 minute at 100% power. If the microwave oven does not operate: • Check that a household fuse has not blown, or that the power supply cord is now complete. 26 Plug into a grounded...

