Instruction Manual
Page 4
... SOCKET IF NOT USE THE UNIT FOR LONG TIME. BATTERY USAGE AND HANDING: --KEEP BATTERY AWAY FROM CHILDREN AND PETS. --REMOVE THE BATTERY FROM THE REMOTE CONTROL WHEN THE PRODUCT WILL NOT BE USED FOR AN EXTENDED PERIOD. --NEVER THROW BATTERY INTO A FIRE. Mute function is not rightly adjusted. The headphone...
... SOCKET IF NOT USE THE UNIT FOR LONG TIME. BATTERY USAGE AND HANDING: --KEEP BATTERY AWAY FROM CHILDREN AND PETS. --REMOVE THE BATTERY FROM THE REMOTE CONTROL WHEN THE PRODUCT WILL NOT BE USED FOR AN EXTENDED PERIOD. --NEVER THROW BATTERY INTO A FIRE. Mute function is not rightly adjusted. The headphone...
Instruction Manual
Page 5
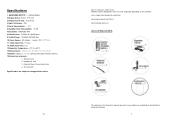
...) *480 8.Dots Distance: 0.276(H) X 0.0925(V)mm 9.Visible Range: 132.48(H) X222.0(V)mm 10.Power Source: AC adaptor (normal: DC 12V ---2A) 11. FULL FUNCTION REMOTE CONTROL RECHARGEABLE BATTERY ON SCREEN DISPLAY ACCESSORIES ll the pictures in one of lithium battery) 16.Connection terminals: 1. Antenna Jack 2. External Power Source Input Jack...
...) *480 8.Dots Distance: 0.276(H) X 0.0925(V)mm 9.Visible Range: 132.48(H) X222.0(V)mm 10.Power Source: AC adaptor (normal: DC 12V ---2A) 11. FULL FUNCTION REMOTE CONTROL RECHARGEABLE BATTERY ON SCREEN DISPLAY ACCESSORIES ll the pictures in one of lithium battery) 16.Connection terminals: 1. Antenna Jack 2. External Power Source Input Jack...
Instruction Manual
Page 6
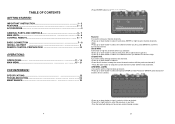
... channel抯. Channel NO . TABLE OF CONTENTS GETTING STARTED: IMPORTANT INSTRUCTION 1 - 2 FEATURES 2 - 3 ACCESSORIES 3 GENERAL PARTS AND CONTROLS 5 - 7 MAIN UNITL 5 - 6 CONTROL REMOTO 6 - 7 BASIC CONNECTION 7 - 8 INSTALL BATTERY 8 REMOTE CONTROL PREPARATION 10 OPERATIONS: OPERATIONS 11 - 14 MAIN MENU 15 - 21 FOR REFERENCE: SPECIFICATIONS 22 TROUBLESHOOTING 23 MAINTENANCE 23 -Press ENTER button to start to...
... channel抯. Channel NO . TABLE OF CONTENTS GETTING STARTED: IMPORTANT INSTRUCTION 1 - 2 FEATURES 2 - 3 ACCESSORIES 3 GENERAL PARTS AND CONTROLS 5 - 7 MAIN UNITL 5 - 6 CONTROL REMOTO 6 - 7 BASIC CONNECTION 7 - 8 INSTALL BATTERY 8 REMOTE CONTROL PREPARATION 10 OPERATIONS: OPERATIONS 11 - 14 MAIN MENU 15 - 21 FOR REFERENCE: SPECIFICATIONS 22 TROUBLESHOOTING 23 MAINTENANCE 23 -Press ENTER button to start to...
Instruction Manual
Page 7
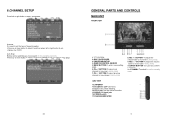
.... -Press up or down button to select it and press ENTER to get in scanning setup page: 20 1.TFT SCREEN 2.BUILT-IN SPEAKER 3.POWER INDICATOR 4.REMOTE CONTROL SENSOR 5.MENU BUTTON-To enter menu setting page. 6.CH+/∧BUTTON-To select next channel or move right in jack- 6.CHANNEL SETUP Press left...
.... -Press up or down button to select it and press ENTER to get in scanning setup page: 20 1.TFT SCREEN 2.BUILT-IN SPEAKER 3.POWER INDICATOR 4.REMOTE CONTROL SENSOR 5.MENU BUTTON-To enter menu setting page. 6.CH+/∧BUTTON-To select next channel or move right in jack- 6.CHANNEL SETUP Press left...
Instruction Manual
Page 8
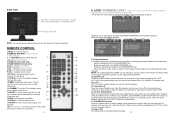
... followings: Enter old password in the OLD PASSWORD row Enter new password in the NEW PASSWORD row Enter the new password again in standby mode; REMOTE CONTROL 1.MUTE-To mute the sound. 2.NUMERIC BUTTONS-To input channel numbers directly. 3. -/-- Press the left or right button to select the LOCK icon, then...
... followings: Enter old password in the OLD PASSWORD row Enter new password in the NEW PASSWORD row Enter the new password again in standby mode; REMOTE CONTROL 1.MUTE-To mute the sound. 2.NUMERIC BUTTONS-To input channel numbers directly. 3. -/-- Press the left or right button to select the LOCK icon, then...
Instruction Manual
Page 12
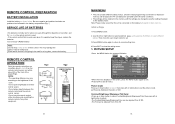
... for about 60o of the front of the player(Fig2). Note: Please make sure either the unit is charged to 50. 15 REMOTE CONTROL OPERATION Point the remote control from no morethan about 6 meter from -50 to retain memory. PICTURE SETUP -Press the MENU button the screen will be ... to close the setting menu . 1. Initial settings 1.Press MENU button. 2. Note: Do not drop or step on the battery is connected on the remote control. Contrast/Brightness/Sharpness/Tint/Color -Press up or down button to select Contrast/Brightness/Sharpness/Color,then press left or right button to adjust...
... for about 60o of the front of the player(Fig2). Note: Please make sure either the unit is charged to 50. 15 REMOTE CONTROL OPERATION Point the remote control from no morethan about 6 meter from -50 to retain memory. PICTURE SETUP -Press the MENU button the screen will be ... to close the setting menu . 1. Initial settings 1.Press MENU button. 2. Note: Do not drop or step on the battery is connected on the remote control. Contrast/Brightness/Sharpness/Tint/Color -Press up or down button to select Contrast/Brightness/Sharpness/Color,then press left or right button to adjust...
Instruction Manual
Page 13
...twice to access the program guide supplied by the signal provider ( not available in all connections are connected proporly. -Switch the unit to on the remote control to select Auto Scan. Press the V+ or V- Press CH - To watch channel 9, press "9" ,three seconds later, it will start... access future time slots. NOTE: You must scan channel before watching for the part and future: Informatin in the guide, depends on the remote control directly to play previous channel. 3. button to confirm directly. Example: To watch channel 12, press "1" and "2", three seconds later,...
...twice to access the program guide supplied by the signal provider ( not available in all connections are connected proporly. -Switch the unit to on the remote control to select Auto Scan. Press the V+ or V- Press CH - To watch channel 9, press "9" ,three seconds later, it will start... access future time slots. NOTE: You must scan channel before watching for the part and future: Informatin in the guide, depends on the remote control directly to play previous channel. 3. button to confirm directly. Example: To watch channel 12, press "1" and "2", three seconds later,...


