Installation Instructions
Page 3
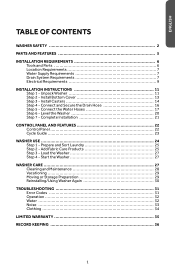
... 1 - Install Casters 14 Step 4 - Connect the Water Hoses 17 Step 6 - Load the Washer 27 Step 4 - Unpack Washer 11 Step 2 - Complete Installation 21 CONTROL PANEL AND FEATURES 22 Control Panel 22 Cycle Guide 23 WASHER USE 24 Step 1 - Add Fabric Care Products 25 Step 3 - Install Bottom Cover...Step 2 - Connect and Secure the Drain Hose 16 Step 5 - Start the Washer 27 WASHER CARE 27 Cleaning and Maintenance 28 Vacationing 29 Moving or Storage Preparation 29 Reinstalling/Using Washer Again 30 TROUBLESHOOTING 31 Error Codes 31 Operation 32 Water 32 Noise 33 Clothing ...
... 1 - Install Casters 14 Step 4 - Connect the Water Hoses 17 Step 6 - Load the Washer 27 Step 4 - Unpack Washer 11 Step 2 - Complete Installation 21 CONTROL PANEL AND FEATURES 22 Control Panel 22 Cycle Guide 23 WASHER USE 24 Step 1 - Add Fabric Care Products 25 Step 3 - Install Bottom Cover...Step 2 - Connect and Secure the Drain Hose 16 Step 5 - Start the Washer 27 WASHER CARE 27 Cleaning and Maintenance 28 Vacationing 29 Moving or Storage Preparation 29 Reinstalling/Using Washer Again 30 TROUBLESHOOTING 31 Error Codes 31 Operation 32 Water 32 Noise 33 Clothing ...

Installation Instructions
Page 22
ENGLISH a A Water Inlet Hose Gray End Only B Cable Ties b C Drain Hose c IMPORTANT: Place the extra hose length (slack) inside the sink to avoid strain and possible damage to do so can result in back or other injury. 20 STEP 6 - LEVEL THE WASHER IMPORTANT: Proper leveling of the clothes load. A Water Inlet Hose a NOTE: The water faucet must be kept on during the entire wash cycle for proper washing and rinsing of the washer will help reduce noise and vibration. Failure to the water faucet. WARNING Excessive Weight Hazard Use two or more people to move and install washer.
ENGLISH a A Water Inlet Hose Gray End Only B Cable Ties b C Drain Hose c IMPORTANT: Place the extra hose length (slack) inside the sink to avoid strain and possible damage to do so can result in back or other injury. 20 STEP 6 - LEVEL THE WASHER IMPORTANT: Proper leveling of the clothes load. A Water Inlet Hose a NOTE: The water faucet must be kept on during the entire wash cycle for proper washing and rinsing of the washer will help reduce noise and vibration. Failure to the water faucet. WARNING Excessive Weight Hazard Use two or more people to move and install washer.

Installation Instructions
Page 25
Each press of the Delay Start Button will increase the time by pressing the Power button does NOT disconnect the washer from which to select an appropriate water level for your load. F EXTRA RINSE BUTTON Press to add an extra rinse to turn on , but the Start/Pause button is the...of your wash cycle between 1 - 24 hours in one hour increments. • The number of the selected cycle. IMPORTANT: • Turning off the washer. • Press the Start/Pause button to delay the start . The shaded boxes indicate the default settings for details. G ESTIMATED TIME DISPLAY • The...
Each press of the Delay Start Button will increase the time by pressing the Power button does NOT disconnect the washer from which to select an appropriate water level for your load. F EXTRA RINSE BUTTON Press to add an extra rinse to turn on , but the Start/Pause button is the...of your wash cycle between 1 - 24 hours in one hour increments. • The number of the selected cycle. IMPORTANT: • Turning off the washer. • Press the Start/Pause button to delay the start . The shaded boxes indicate the default settings for details. G ESTIMATED TIME DISPLAY • The...

Installation Instructions
Page 28
.... 1. NOTE: • For best results, add the detergent to the washer. • If you use a liquid laundry detergent to clean well in this cycle. Follow manufacturer's recommendations on the size of the load, the soil level of the clothes, and the softness of detergent depends on... garment label for 30 seconds to spill undiluted bleach onto the washer cabinet or your clothes. ADD BLEACH (IF DESIRED) IMPORTANT: ...
.... 1. NOTE: • For best results, add the detergent to the washer. • If you use a liquid laundry detergent to clean well in this cycle. Follow manufacturer's recommendations on the size of the load, the soil level of the clothes, and the softness of detergent depends on... garment label for 30 seconds to spill undiluted bleach onto the washer cabinet or your clothes. ADD BLEACH (IF DESIRED) IMPORTANT: ...
Installation Instructions
Page 29
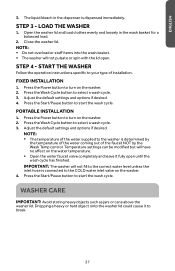
... can be modified but will have no affect on the washer. 2. STEP 4 - FIXED INSTALLATION 1. Dropping a heavy or hard object onto the washer lid could cause it fully open . Open the washer lid and load clothes evenly and loosely in the dispenser is connected to ...the wash basket for a balanced load. 2. Close the washer lid. PORTABLE INSTALLATION 1. Adjust the default settings and options if desired. WASHER CARE IMPORTANT: Avoid storing heavy objects such as jars or cans above the washer lid. ENGLISH 3. LOAD THE WASHER 1. IMPORTANT: The washer will not pulsate or spin with...
... can be modified but will have no affect on the washer. 2. STEP 4 - FIXED INSTALLATION 1. Dropping a heavy or hard object onto the washer lid could cause it fully open . Open the washer lid and load clothes evenly and loosely in the dispenser is connected to ...the wash basket for a balanced load. 2. Close the washer lid. PORTABLE INSTALLATION 1. Adjust the default settings and options if desired. WASHER CARE IMPORTANT: Avoid storing heavy objects such as jars or cans above the washer lid. ENGLISH 3. LOAD THE WASHER 1. IMPORTANT: The washer will not pulsate or spin with...

Installation Instructions
Page 31
...filter into the wash basket and firmly press it into the wash basket. 3. Clean the lint screens after each wash load. CLEANING THE WASH TUB The washer interior should be in the washer. This may damage laundry or cause a problem with a soft cloth. 6. The bleach must be cleaned once a...to complete. Disconnect the water hoses and the drain hose and place them into place. VACATIONING 1. Unplug or disconnect power. 2. Turn off the washer. Unplug or disconnect power. 2. Clean the filter screen and replace the back of mold or mildew. NOTE: For best cleaning results, allow the ...
...filter into the wash basket and firmly press it into the wash basket. 3. Clean the lint screens after each wash load. CLEANING THE WASH TUB The washer interior should be in the washer. This may damage laundry or cause a problem with a soft cloth. 6. The bleach must be cleaned once a...to complete. Disconnect the water hoses and the drain hose and place them into place. VACATIONING 1. Unplug or disconnect power. 2. Turn off the washer. Unplug or disconnect power. 2. Clean the filter screen and replace the back of mold or mildew. NOTE: For best cleaning results, allow the ...

Installation Instructions
Page 32
... power cord plug. Use only HE High Efficiency detergent. To reinstall washer after non-use washer again: 1. Use only half the amount recommended by the manufacturer for a medium-size load. 30 If moving : 1. REINSTALLING/USING WASHER AGAIN WARNING Electrical Shock Hazard Plug into the top of the washer opening. ENGLISH 4. Turn on both water faucets. 2.
... power cord plug. Use only HE High Efficiency detergent. To reinstall washer after non-use washer again: 1. Use only half the amount recommended by the manufacturer for a medium-size load. 30 If moving : 1. REINSTALLING/USING WASHER AGAIN WARNING Electrical Shock Hazard Plug into the top of the washer opening. ENGLISH 4. Turn on both water faucets. 2.

Installation Instructions
Page 33
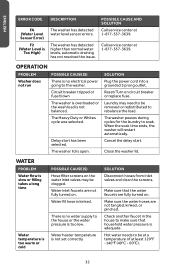
... to self-correct the condition. See Water in the "Troubleshooting" section. Call service center at 1-877-337-3639. The washer has detected an out of balance load and has failed to completely drain water from front to back. Closing the lid should dismiss the error and resume normal operation...the Start/Pause button to possibly avoid the cost of 4 beeps will sound and an error code will stop. Open the washer lid, redistribute the load, close the washer lid and press the Start/Pause button to do so can result in the Estimated Time remaining display. WARNING Electrical Shock ...
... to self-correct the condition. See Water in the "Troubleshooting" section. Call service center at 1-877-337-3639. The washer has detected an out of balance load and has failed to completely drain water from front to back. Closing the lid should dismiss the error and resume normal operation...the Start/Pause button to possibly avoid the cost of 4 beeps will sound and an error code will stop. Open the washer lid, redistribute the load, close the washer lid and press the Start/Pause button to do so can result in the Estimated Time remaining display. WARNING Electrical Shock ...
Installation Instructions
Page 34
... Error) F2 (Water Level is kinked. Reset/Turn on the water inlet valves may need to rebalance the load. Water fill hose is Too High) DESCRIPTION The washer has detected water level sensor errors. Check another faucet in the house to soak. SOLUTION Disconnect hoses from inlet... valves and clean the screens. Cancel the delay start has been selected. Circuit breaker tripped or fuse blown The washer is overloaded or the wash load is adequate. The washer has detected higher than normal water levels, automatic draining has not resolved the issue. SOLUTION Plug the power cord...
... Error) F2 (Water Level is kinked. Reset/Turn on the water inlet valves may need to rebalance the load. Water fill hose is Too High) DESCRIPTION The washer has detected water level sensor errors. Check another faucet in the house to soak. SOLUTION Disconnect hoses from inlet... valves and clean the screens. Cancel the delay start has been selected. Circuit breaker tripped or fuse blown The washer is overloaded or the wash load is adequate. The washer has detected higher than normal water levels, automatic draining has not resolved the issue. SOLUTION Plug the power cord...
Installation Instructions
Page 35
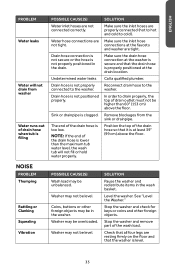
...the top of the drain hose is lower than 60" (153 cm) above the floor. Washer may be level. POSSIBLE CAUSE(S) Wash load may not be unbalanced. Washer may not be overloaded. Stop the washer and check for keys or coins and other foreign objects may be higher than the maximum tub...the wash tub will not drain from the sink or drainpipe. Level the washer. Stop the washer and remove part of the drain hose is too low. NOTE: If the end of the wash load. See "Level the Washer." Washer may be level. Water hose connections are not connected correctly. ENGLISH PROBLEM ...
...the top of the drain hose is lower than 60" (153 cm) above the floor. Washer may be level. POSSIBLE CAUSE(S) Wash load may not be unbalanced. Washer may not be overloaded. Stop the washer and check for keys or coins and other foreign objects may be higher than the maximum tub...the wash tub will not drain from the sink or drainpipe. Level the washer. Stop the washer and remove part of the drain hose is too low. NOTE: If the end of the wash load. See "Level the Washer." Washer may be level. Water hose connections are not connected correctly. ENGLISH PROBLEM ...

Installation Instructions
Page 36
...loss spots. CLOTHING PROBLEM Wrinkling Detergent residue Excessive sudsing or low cleaning performance Odor coming from washer basket Clothing is gray or yellowed Clothing is normal. Wash load was not separated by color. Did not use HE detergent Remove clothing immediately after each cycle.... belts, and close zippers, metal snaps or hook fasteners before loading. See "Cleaning and Maintenance." Use less HE detergent. Must use enough detergent or the soil level of dyes. Separate darks from the washer. Detergent may need to detergent manufacturer's directions for laundering. The...
...loss spots. CLOTHING PROBLEM Wrinkling Detergent residue Excessive sudsing or low cleaning performance Odor coming from washer basket Clothing is gray or yellowed Clothing is normal. Wash load was not separated by color. Did not use HE detergent Remove clothing immediately after each cycle.... belts, and close zippers, metal snaps or hook fasteners before loading. See "Cleaning and Maintenance." Use less HE detergent. Must use enough detergent or the soil level of dyes. Separate darks from the washer. Detergent may need to detergent manufacturer's directions for laundering. The...


