Product Manual
Page 9
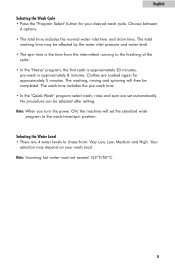
...you turn the power ON, the machine will then be selected after setting. The wash time includes the pre-wash time. • In the "Quick Wash" program select wash, rinse and spin are soaked again for your wash load. Selecting the Water Level &#...Wash Cycle • Press the "Program Select" button for approximately 5 minutes. No procedure can be completed. The total washing time may depend on your desired wash cycle. Note: Incoming hot water must not exceed 122˚F/50˚C. 8 Choose between 6 options. • The total time includes the normal water inlet time and drain...
...you turn the power ON, the machine will then be selected after setting. The wash time includes the pre-wash time. • In the "Quick Wash" program select wash, rinse and spin are soaked again for your wash load. Selecting the Water Level &#...Wash Cycle • Press the "Program Select" button for approximately 5 minutes. No procedure can be completed. The total washing time may depend on your desired wash cycle. Note: Incoming hot water must not exceed 122˚F/50˚C. 8 Choose between 6 options. • The total time includes the normal water inlet time and drain...
Product Manual
Page 11
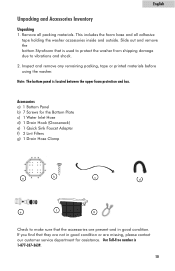
... due to make sure that they are missing, please contact our customer service department for the Bottom Plate c) 1 Water Inlet Hose d) 1 Drain Hook (Gooseneck) e) 1 Quick Sink Faucet Adapter f) 2 Lint Filters g) 1 Drain Hose Clamp a b c d e f g Check to vibrations and shock. 2. Note: The bottom panel is 1-877-337-3639. 10 Inspect and remove any remaining...
... due to make sure that they are missing, please contact our customer service department for the Bottom Plate c) 1 Water Inlet Hose d) 1 Drain Hook (Gooseneck) e) 1 Quick Sink Faucet Adapter f) 2 Lint Filters g) 1 Drain Hose Clamp a b c d e f g Check to vibrations and shock. 2. Note: The bottom panel is 1-877-337-3639. 10 Inspect and remove any remaining...
Product Manual
Page 13
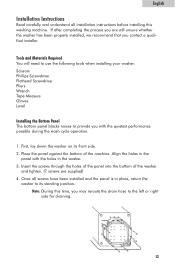
... position. Insert the screws through the holes of the panel into the bottom of the machine. Once all installation instructions before installing this time, you may reroute the drain hose to provide you with the holes in place, return the washer to its front side.... 2. Place the panel against the bottom of the washer and tighten. (7 screws are still unsure whether the washer has been properly installed, we recommend that you contact a qualified installer. Note: During this washing machine...
... position. Insert the screws through the holes of the panel into the bottom of the machine. Once all installation instructions before installing this time, you may reroute the drain hose to provide you with the holes in place, return the washer to its front side.... 2. Place the panel against the bottom of the washer and tighten. (7 screws are still unsure whether the washer has been properly installed, we recommend that you contact a qualified installer. Note: During this washing machine...
Product Manual
Page 14
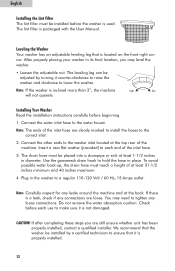
...lint filter is inclined more than 2˚, the machine will not operate. Note: If the washer is packaged with the User Manual. Insert a new flat washer (provided) to each use to tighten any loose connections. To avoid possible water back-up, the drain hose must reach a height of the inlet hose... be placed into a drainpipe or sink at the top rear of the inlet hose. 3. Use the gooseneck drain hook to ensure that is used. Check before each end of the machine. We recommend that the washer be installed by turning it is not damaged. Installing Your Washer Read the installation...
...lint filter is inclined more than 2˚, the machine will not operate. Note: If the washer is packaged with the User Manual. Insert a new flat washer (provided) to each use to tighten any loose connections. To avoid possible water back-up, the drain hose must reach a height of the inlet hose... be placed into a drainpipe or sink at the top rear of the inlet hose. 3. Use the gooseneck drain hook to ensure that is used. Check before each end of the machine. We recommend that the washer be installed by turning it is not damaged. Installing Your Washer Read the installation...
Product Manual
Page 15
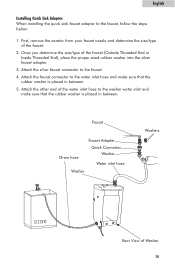
... connector to the faucet, follow the steps below: 1. Attach the other end of Washer 14 Once you determine the size/type of the faucet. 2. Faucet Drain hose Faucet Adapter Quick Connector Washer Water inlet hose Washer Washers SINK Rear View of the water inlet hose to the water inlet hose and...
... connector to the faucet, follow the steps below: 1. Attach the other end of Washer 14 Once you determine the size/type of the faucet. 2. Faucet Drain hose Faucet Adapter Quick Connector Washer Water inlet hose Washer Washers SINK Rear View of the water inlet hose to the water inlet hose and...
Product Manual
Page 17
... scouring pads. This will prevent damage from all hoses. If moving the washer, disconnect the drain hose. • To prevent mold and mildew, leave the door open so that the moisture inside the machine can evaporate. • Reinstall the foam base/Styrofoam at the bottom of these chemicals and ...materials may cause damage to another location. 16 Drain water from water leakage if the hoses are accidentally ruptured or if ...
... scouring pads. This will prevent damage from all hoses. If moving the washer, disconnect the drain hose. • To prevent mold and mildew, leave the door open so that the moisture inside the machine can evaporate. • Reinstall the foam base/Styrofoam at the bottom of these chemicals and ...materials may cause damage to another location. 16 Drain water from water leakage if the hoses are accidentally ruptured or if ...
Product Manual
Page 18
...due to improper installation of the machine - This prevents splashing during water inlet. • The washer may need to be clogged. This is plugged in the OFF position. The drain hose may be reloaded and the clothes may need to see if it in the wash and rinse cycle. This may...position. • Check if the "Start/Pause" button is open. Reload and redistribute the clothing to start the wash process. • The pulsator pauses during the first use of the drain hose. Water hose may need to ensure the best quality. 17 Water may be fully turned ON. Press this button...
...due to improper installation of the machine - This prevents splashing during water inlet. • The washer may need to be clogged. This is plugged in the OFF position. The drain hose may be reloaded and the clothes may need to see if it in the wash and rinse cycle. This may...position. • Check if the "Start/Pause" button is open. Reload and redistribute the clothing to start the wash process. • The pulsator pauses during the first use of the drain hose. Water hose may need to ensure the best quality. 17 Water may be fully turned ON. Press this button...
Product Manual
Page 19
... residue - Do not mix heavy clothes such as work in a few minutes. • During the final spinning, it starts - The wash load is setting the drain time. Clothes have holes - Check the water temperature or add detergent as pins and belt buckles were left in the tub. You must...washtub is recommended. • Clothes are due to an overloaded washtub. • Vibration noises are ripped or have been improperly sorted or the machine has been overloaded. er starts to fill with water (before you are too wrinkled - The laundry needs to be balanced to avoid soap residue...
... residue - Do not mix heavy clothes such as work in a few minutes. • During the final spinning, it starts - The wash load is setting the drain time. Clothes have holes - Check the water temperature or add detergent as pins and belt buckles were left in the tub. You must...washtub is recommended. • Clothes are due to an overloaded washtub. • Vibration noises are ripped or have been improperly sorted or the machine has been overloaded. er starts to fill with water (before you are too wrinkled - The laundry needs to be balanced to avoid soap residue...


