
Use and Care Manual
Page 3
...3 General Safety Precautions 3-4 PARTS AND FEATURES 5-6 Front of the Unit...5 Back of the Unit...6 INSTALLATION INSTRUCTIONS 7-14 Installing Your Combination Washer / Dryer 7 Tools Needed ...7 Parts Supplied ...7 Location Requirements 8 Unit Dimensions and Clearances 8 Unpacking Your Appliance 9 Drain Connections 10 Water ...Connections 11-12 Electrical Requirements 13 Position and Level the Washer 14 CONTROL PANEL AND FEATURES 15-21 Control Panel 15-18 Power-off Memory 18 Cycle Descriptions 19 Cycle Guide...
...3 General Safety Precautions 3-4 PARTS AND FEATURES 5-6 Front of the Unit...5 Back of the Unit...6 INSTALLATION INSTRUCTIONS 7-14 Installing Your Combination Washer / Dryer 7 Tools Needed ...7 Parts Supplied ...7 Location Requirements 8 Unit Dimensions and Clearances 8 Unpacking Your Appliance 9 Drain Connections 10 Water ...Connections 11-12 Electrical Requirements 13 Position and Level the Washer 14 CONTROL PANEL AND FEATURES 15-21 Control Panel 15-18 Power-off Memory 18 Cycle Descriptions 19 Cycle Guide...
Use and Care Manual
Page 9
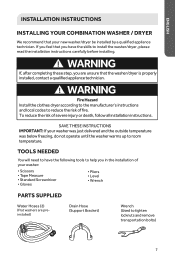
...bolts) 7 WARNING Fire Hazard Install the clothes dryer according to the manufacturer's instructions and local codes to install the washer/dryer, please read the installation instructions carefully before installing. SAVE THESE INSTRUCTIONS IMPORTANT: If your washer: • Scissors • Tape Measure ...reduce the risk of severe injury or death, follow all installation instructions. ENGLISH ENGLISH INSTALLATION INSTRUCTIONS INSTALLING YOUR COMBINATION WASHER / DRYER We recommend that you have the following tools to help you are preinstalled) Drain Hose (Support Bracket) ...
...bolts) 7 WARNING Fire Hazard Install the clothes dryer according to the manufacturer's instructions and local codes to install the washer/dryer, please read the installation instructions carefully before installing. SAVE THESE INSTRUCTIONS IMPORTANT: If your washer: • Scissors • Tape Measure ...reduce the risk of severe injury or death, follow all installation instructions. ENGLISH ENGLISH INSTALLATION INSTRUCTIONS INSTALLING YOUR COMBINATION WASHER / DRYER We recommend that you have the following tools to help you are preinstalled) Drain Hose (Support Bracket) ...
Use and Care Manual
Page 12
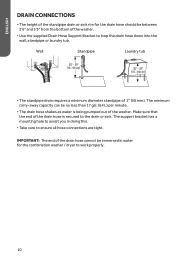
... 30" - 39" (76 - 99 cm) 30" - 39" (76 - 99 cm) • The standpipe drain requires a minimum diameter standpipe of the washer. The support bracket has a mounting hole to assist you in water for the drain hose should be between 2'6" and 3'3" from the bottom of the drain ...(64 L) per minute. ENGLISH DRAIN CONNECTIONS • The height of the standpipe drain or sink rim for the combination washer / dryer to the drain or sink. IMPORTANT: The end of the washer. • Use the supplied Drain Hose Support Bracket to ensure all hose connections are tight. The minimum carry-away ...
... 30" - 39" (76 - 99 cm) 30" - 39" (76 - 99 cm) • The standpipe drain requires a minimum diameter standpipe of the washer. The support bracket has a mounting hole to assist you in water for the drain hose should be between 2'6" and 3'3" from the bottom of the drain ...(64 L) per minute. ENGLISH DRAIN CONNECTIONS • The height of the standpipe drain or sink rim for the combination washer / dryer to the drain or sink. IMPORTANT: The end of the washer. • Use the supplied Drain Hose Support Bracket to ensure all hose connections are tight. The minimum carry-away ...


