Use and Care Manual
Page 3
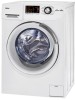
......6 INSTALLATION INSTRUCTIONS 7-14 Installing Your Combination Washer / Dryer 7 Tools Needed ...7 Parts Supplied ...7 Location Requirements 8 Unit Dimensions and Clearances 8 Unpacking Your Appliance 9 Drain Connections 10 Water Connections 11-12 Electrical Requirements 13 Position and Level the Washer 14 CONTROL PANEL AND FEATURES 15-21 Control Panel 15-18 Power-off Memory 18 Cycle Descriptions 19 Cycle Guide ...20-21 OPERATING INSTRUCTIONS 22-25 Getting Started ...22 Washing Methods 23-25 Drying Methods 25 CARE AND CLEANING 26-28 Cleaning and Maintenance...
......6 INSTALLATION INSTRUCTIONS 7-14 Installing Your Combination Washer / Dryer 7 Tools Needed ...7 Parts Supplied ...7 Location Requirements 8 Unit Dimensions and Clearances 8 Unpacking Your Appliance 9 Drain Connections 10 Water Connections 11-12 Electrical Requirements 13 Position and Level the Washer 14 CONTROL PANEL AND FEATURES 15-21 Control Panel 15-18 Power-off Memory 18 Cycle Descriptions 19 Cycle Guide ...20-21 OPERATING INSTRUCTIONS 22-25 Getting Started ...22 Washing Methods 23-25 Drying Methods 25 CARE AND CLEANING 26-28 Cleaning and Maintenance...
Use and Care Manual
Page 5
... connected to proper electrical outlet with the correct electrical supply. • Proper grounding must be properly installed in accordance with the installation instructions before using a washing machine, turn on or in the appliance. This will be exposed to the weather. • Do not operate this appliance unless all hot water faucets and let the water flow from each for use an open flame...
... connected to proper electrical outlet with the correct electrical supply. • Proper grounding must be properly installed in accordance with the installation instructions before using a washing machine, turn on or in the appliance. This will be exposed to the weather. • Do not operate this appliance unless all hot water faucets and let the water flow from each for use an open flame...
Use and Care Manual
Page 6
... this Haier product. For future reference, record the model and serial number located behind the door, and the date of the fabric softener or product. • Never unplug your appliance by the manufacturer of purchase. These substances give off vapours that could ignite or explode. • Do not use fabric softeners or products to the wash water. Items contaminated with controls. • Do not repair or replace any servicing unless...
... this Haier product. For future reference, record the model and serial number located behind the door, and the date of the fabric softener or product. • Never unplug your appliance by the manufacturer of purchase. These substances give off vapours that could ignite or explode. • Do not use fabric softeners or products to the wash water. Items contaminated with controls. • Do not repair or replace any servicing unless...
Use and Care Manual
Page 9
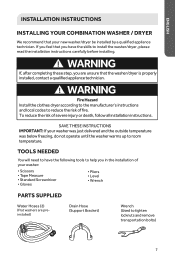
... step, you in the installation of your washer: • Scissors • Tape Measure • Standard Screwdriver • Gloves • Pliers • Level • Wrench PARTS SUPPLIED Water Hoses (2) (Flat washers are unsure that your washer was just delivered and the outside temperature was below freezing, do not operate until the washer warms up to tighten locknuts and remove transportation bolts) 7 To reduce the...
... step, you in the installation of your washer: • Scissors • Tape Measure • Standard Screwdriver • Gloves • Pliers • Level • Wrench PARTS SUPPLIED Water Hoses (2) (Flat washers are unsure that your washer was just delivered and the outside temperature was below freezing, do not operate until the washer warms up to tighten locknuts and remove transportation bolts) 7 To reduce the...
Use and Care Manual
Page 10
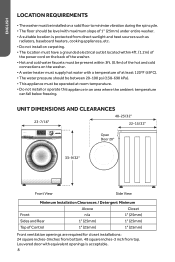
... openings are required for closet installations: 24 square inches-3inches from bottom. 48 square inches-3 inch from direct sunlight and heat sources such as radiators, baseboard heaters, cooking appliances, etc. • Do not install on carpeting. • The location must have a grounded electrical outlet located within 4ft. (1.2m) of the power cord on the back of the washer. • Hot and cold water...
... openings are required for closet installations: 24 square inches-3inches from bottom. 48 square inches-3 inch from direct sunlight and heat sources such as radiators, baseboard heaters, cooking appliances, etc. • Do not install on carpeting. • The location must have a grounded electrical outlet located within 4ft. (1.2m) of the power cord on the back of the washer. • Hot and cold water...

Use and Care Manual
Page 11
... using the washing machine. Replace back cover by the factory to prevent damage to the wash system that hold it in place. 4. This is normal and is not a toy. Four transportation bolts are installed by inserting it in the two gaps at the factory. NOTE: Save all adhesive tape holding the washer accessories inside the washer. Remove the back plate of water tests...
... using the washing machine. Replace back cover by the factory to prevent damage to the wash system that hold it in place. 4. This is normal and is not a toy. Four transportation bolts are installed by inserting it in the two gaps at the factory. NOTE: Save all adhesive tape holding the washer accessories inside the washer. Remove the back plate of water tests...
Use and Care Manual
Page 13
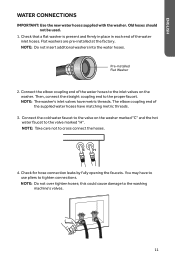
... hose connection leaks by fully opening the faucets. NOTE: Do not over tighten hoses; ENGLISH WATER CONNECTIONS IMPORTANT: Use the new water hoses supplied with the washer. NOTE: Do not insert additional washers into the water hoses. NOTE: The washer's inlet valves have to use pliers to cross connect the hoses. Check that a flat the factory. Connect the cold water faucet to the valve on the washer. Pre-installed Flat Washer 2. NOTE: Take care...
... hose connection leaks by fully opening the faucets. NOTE: Do not over tighten hoses; ENGLISH WATER CONNECTIONS IMPORTANT: Use the new water hoses supplied with the washer. NOTE: Do not insert additional washers into the water hoses. NOTE: The washer's inlet valves have to use pliers to cross connect the hoses. Check that a flat the factory. Connect the cold water faucet to the valve on the washer. Pre-installed Flat Washer 2. NOTE: Take care...
Use and Care Manual
Page 14
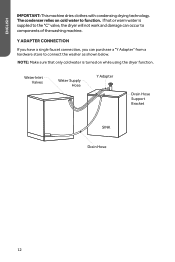
... a hardware store to function. Water Inlet Valves Water Supply Hose Y Adapter Drain Hose Support Bracket SINK Drain Hose 12 Y ADAPTER CONNECTION If you have a single faucet connection, you can occur to components of the washing machine. The condenser relies on while using the dryer function. If hot or warm water is turned on cold water to connect the washer as shown below. ENGLISH IMPORTANT: This machine dries clothes with condensing drying technology.
... a hardware store to function. Water Inlet Valves Water Supply Hose Y Adapter Drain Hose Support Bracket SINK Drain Hose 12 Y ADAPTER CONNECTION If you have a single faucet connection, you can occur to components of the washing machine. The condenser relies on while using the dryer function. If hot or warm water is turned on cold water to connect the washer as shown below. ENGLISH IMPORTANT: This machine dries clothes with condensing drying technology.
Use and Care Manual
Page 16
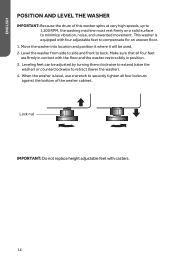
... and front to compensate for an uneven floor. 1. Leveling feet can be used. 2. ENGLISH POSITION AND LEVEL THE WASHER IMPORTANT: Because the drum of the washer cabinet. Make sure that all four locknuts against the bottom of this washer spins at very high speeds, up to 1,200 RPM, the washing machine must rest firmly on a solid surface to retract (lower...
... and front to compensate for an uneven floor. 1. Leveling feet can be used. 2. ENGLISH POSITION AND LEVEL THE WASHER IMPORTANT: Because the drum of the washer cabinet. Make sure that all four locknuts against the bottom of this washer spins at very high speeds, up to 1,200 RPM, the washing machine must rest firmly on a solid surface to retract (lower...

Use and Care Manual
Page 18
... cycle. The desired setting will blink all the time. SOIL LEVEL BUTTON Soil level (wash time) is left on the LED screen. START/PAUSE BUTTON Press this button,the cycle time will increase or decrease in either direction to choose a wash or dry cycle. During a pause, settings and options can be changed. DRY LEVEL BUTTON Use this button to select wash/rinse water temperatures. Press again to turn the washer / dryer ON. Pressing the button a second time will pause the operating cycle and the time display...
... cycle. The desired setting will blink all the time. SOIL LEVEL BUTTON Soil level (wash time) is left on the LED screen. START/PAUSE BUTTON Press this button,the cycle time will increase or decrease in either direction to choose a wash or dry cycle. During a pause, settings and options can be changed. DRY LEVEL BUTTON Use this button to select wash/rinse water temperatures. Press again to turn the washer / dryer ON. Pressing the button a second time will pause the operating cycle and the time display...
Use and Care Manual
Page 20
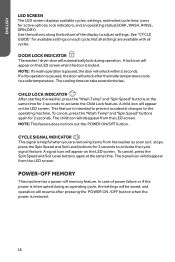
... to activate the cycle signal feature. press the Spin Speed and Soil Level buttons for 2 seconds. In case of the display to adjust settings. Use the buttons along the bottom of power failure or if the power is restored. 18 NOTE: If a wash operation is locked. CHILD LOCK INDICATOR After starting the washer, press the "Wash Temp" and "Spin Speed" buttons at the same time. A signal icon will unlock within 2 seconds...
... to activate the cycle signal feature. press the Spin Speed and Soil Level buttons for 2 seconds. In case of the display to adjust settings. Use the buttons along the bottom of power failure or if the power is restored. 18 NOTE: If a wash operation is locked. CHILD LOCK INDICATOR After starting the washer, press the "Wash Temp" and "Spin Speed" buttons at the same time. A signal icon will unlock within 2 seconds...
Use and Care Manual
Page 21
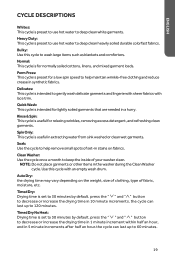
Quick Wash: This cycle is useful in extracting water from sink washed or clean wet garments. Spin Only: This cycle is intended for a low spin speed to help remove small spots of set-in a hurry. the cycle can last up to 120 minutes. Heavy Duty: This cycle is preset for lightly soiled garments that are needed in stains on the weight, size of clothing, type of your washer clean. Perm Press: This...
Quick Wash: This cycle is useful in extracting water from sink washed or clean wet garments. Spin Only: This cycle is intended for a low spin speed to help remove small spots of set-in a hurry. the cycle can last up to 120 minutes. Heavy Duty: This cycle is preset for lightly soiled garments that are needed in stains on the weight, size of clothing, type of your washer clean. Perm Press: This...
Use and Care Manual
Page 23
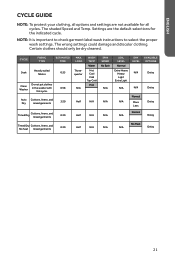
... cleaned. CYCLE FABRIC TYPE ESTIMATED TIME Heavily soiled Soak 0:33 fabrics Do not put clothes Clean in the washer with 0:58 Washer this cycle. Settings are not available for all options and settings are the default selections for the indicated cycle. Auto Cottons, linens, and 3:20 Dry mixed garments MAX. LOAD Threequarter N/A WASH TEMP Warm Hot Cool Cold Tap Cold Hot Half N/A SPIN SPEED No Spin N/A N/A SOIL LEVEL Normal Extra Heavy Heavy Light Extra Light DRY LEVEL...
... cleaned. CYCLE FABRIC TYPE ESTIMATED TIME Heavily soiled Soak 0:33 fabrics Do not put clothes Clean in the washer with 0:58 Washer this cycle. Settings are not available for all options and settings are the default selections for the indicated cycle. Auto Cottons, linens, and 3:20 Dry mixed garments MAX. LOAD Threequarter N/A WASH TEMP Warm Hot Cool Cold Tap Cold Hot Half N/A SPIN SPEED No Spin N/A N/A SOIL LEVEL Normal Extra Heavy Heavy Light Extra Light DRY LEVEL...

Use and Care Manual
Page 24
ENGLISH OPERATING INSTRUCTIONS WARNING To reduce the risk of fire, electric shock, or injury to modify the settings. 4. Preset wash/rinse temperatures,spin speed and dry level will blink on the LED screen. Press once Power ON/OFF button and active the LED screen. 2. Select from the available options: Presoak, Prewash, Ex Rinse, Water +, and Delay. 5. The selected cycle will also blink on the LED screen...
ENGLISH OPERATING INSTRUCTIONS WARNING To reduce the risk of fire, electric shock, or injury to modify the settings. 4. Preset wash/rinse temperatures,spin speed and dry level will blink on the LED screen. Press once Power ON/OFF button and active the LED screen. 2. Select from the available options: Presoak, Prewash, Ex Rinse, Water +, and Delay. 5. The selected cycle will also blink on the LED screen...
Use and Care Manual
Page 26
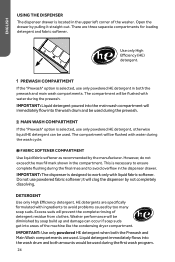
... if soap suds get into the wash drum and be flushed with water during the wash cycle. Do not use only powdered HE detergent in the dispenser drawer. DETERGENT Use only High Efficiency detergent. Excess suds will immediately flow into areas of the machine like the condensing dryer compartment. Washer performance will be used during the final rinse and to work only with liquid fabric softener. ENGLISH USING THE DISPENSER The dispenser drawer is located...
... if soap suds get into the wash drum and be flushed with water during the wash cycle. Do not use only powdered HE detergent in the dispenser drawer. DETERGENT Use only High Efficiency detergent. Excess suds will immediately flow into areas of the machine like the condensing dryer compartment. Washer performance will be used during the final rinse and to work only with liquid fabric softener. ENGLISH USING THE DISPENSER The dispenser drawer is located...

Use and Care Manual
Page 29
... loose. • Dry the wash drum and leave the door open . 2. Replace the plug in a pan or bucket to catch the water. This will drain from the trap. Remove the plug from the trap and rinse clean. Remove debris from the drain hose and allow the water to drain completely. 4. VACATIONING PRECAUTIONS • Unplug the electrical cord from damaging your machine. 1. a b c a Drain Hose b Plug c Trap 3. CLEANING THE BUTTON TRAP The Button Trap is designed to capture...
... loose. • Dry the wash drum and leave the door open . 2. Replace the plug in a pan or bucket to catch the water. This will drain from the trap. Remove the plug from the trap and rinse clean. Remove debris from the drain hose and allow the water to drain completely. 4. VACATIONING PRECAUTIONS • Unplug the electrical cord from damaging your machine. 1. a b c a Drain Hose b Plug c Trap 3. CLEANING THE BUTTON TRAP The Button Trap is designed to capture...

Use and Care Manual
Page 31
... sound. • Drain pump operational sound, when dirty water is clean and dust free. 29 A. Open the water tap. Check another faucet in the house to the tap. You may be full A. C. The wash/dry cycle does not start A. C. A. C. B. Check to use HE (High Efficiency) detergent only. ENGLISH TROUBLESHOOTING NORMAL OPERATING SOUNDS The following sounds are normally heard during the operation of the hose is too low. B. Button trap may have used incorrect or too much detergent A. B. The water...
... sound. • Drain pump operational sound, when dirty water is clean and dust free. 29 A. Open the water tap. Check another faucet in the house to the tap. You may be full A. C. The wash/dry cycle does not start A. C. A. C. B. Check to use HE (High Efficiency) detergent only. ENGLISH TROUBLESHOOTING NORMAL OPERATING SOUNDS The following sounds are normally heard during the operation of the hose is too low. B. Button trap may have used incorrect or too much detergent A. B. The water...
Use and Care Manual
Page 32
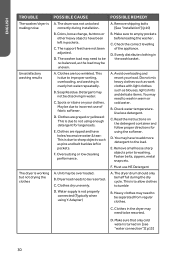
... installation. Detergent may have not been adjusted. Clothes dry unevenly. C. A. D. Check the correct levelling of fabric softener. C. The dryer drum should only be dissolving in pockets. Unit may need to incorrect use HE Detergent A. B. F. D. Clothes are too wrinkled. Read the instructions on your load. C. Spots or stains on the detergent container and follow proper directions for large loads. D. Check water temperature. Clothes in overly hot water repeatedly. ENGLISH TROUBLE The washer/dryer is making noise Unsatisfactory washing results The dryer...
... installation. Detergent may have not been adjusted. Clothes dry unevenly. C. A. D. Check the correct levelling of fabric softener. C. The dryer drum should only be dissolving in pockets. Unit may need to incorrect use HE Detergent A. B. F. D. Clothes are too wrinkled. Read the instructions on your load. C. Spots or stains on the detergent container and follow proper directions for large loads. D. Check water temperature. Clothes in overly hot water repeatedly. ENGLISH TROUBLE The washer/dryer is making noise Unsatisfactory washing results The dryer...
Use and Care Manual
Page 33
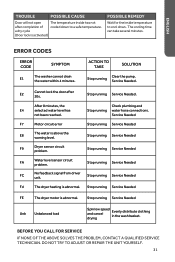
... safe temperature. E2 Cannot lock the door after completion of cooled down to cool down. Stop running Service Needed Unb Unbalanced load Spin low speed and cancel Evenly distribute clothing drying in the wash basket. F9 Dryer sensor circuit problem. Stop running Check plumbing and water hose connections. a dry cycle (Door lock is abnormal. Stop running Service Needed E8 The water is abnormal. Service Needed F7 Motor circuit error Stop running Service Needed. Stop running Service Needed FC No feedback signal from driver Stop running Service Needed...
... safe temperature. E2 Cannot lock the door after completion of cooled down to cool down. Stop running Service Needed Unb Unbalanced load Spin low speed and cancel Evenly distribute clothing drying in the wash basket. F9 Dryer sensor circuit problem. Stop running Check plumbing and water hose connections. a dry cycle (Door lock is abnormal. Stop running Service Needed E8 The water is abnormal. Service Needed F7 Motor circuit error Stop running Service Needed. Stop running Service Needed FC No feedback signal from driver Stop running Service Needed...
Use and Care Manual
Page 35
... responsible for the removal and replacement of household fuses, circuit breakers, wiring or plumbing. Damage from other than normal household use. ENGLISH LIMITED WARRANTY IN HOME SERVICE FULL ONE YEAR WARRANTY For 12 months from the date of original retail purchase, Haier will repair or replace any product modification, alteration or adjustment not authorized by improper installation or maintenance. LIMITED WARRANTY After one year from the...
... responsible for the removal and replacement of household fuses, circuit breakers, wiring or plumbing. Damage from other than normal household use. ENGLISH LIMITED WARRANTY IN HOME SERVICE FULL ONE YEAR WARRANTY For 12 months from the date of original retail purchase, Haier will repair or replace any product modification, alteration or adjustment not authorized by improper installation or maintenance. LIMITED WARRANTY After one year from the...


