

User Manual
Page 2
... damaged in the operating instructions unless you are provided for replacement of time. 14. Unplug this apparatus near any way, such as radiators, heat registers, stoves, or other apparatus (including amplifiers) that produce heat. 9. Servicing is used as vases, shall be of sufficient magnitude to avoid injury from the apparatus. 11. EN-1 Haier LED HDTV NO USER SERVICEABLE PARTS INSIDE. CAUTION: TO...
... damaged in the operating instructions unless you are provided for replacement of time. 14. Unplug this apparatus near any way, such as radiators, heat registers, stoves, or other apparatus (including amplifiers) that produce heat. 9. Servicing is used as vases, shall be of sufficient magnitude to avoid injury from the apparatus. 11. EN-1 Haier LED HDTV NO USER SERVICEABLE PARTS INSIDE. CAUTION: TO...

User Manual
Page 5
...9 Connecting a VCR 9 External AV Source Setup 9 Component Setup 9 Connecting a DTV (digital TV 10 Connecting a digital audio output 10 Connecting a computer 10 HDMI and DVI input 11 Connecting Headphones 12 Power source 12 Removing the table stand and installing a wall mount bracket 12 Operation 13 Switching On/Off the TV set 13 Choose the Menu Language 13 Choose the Input source 13 Channel menu 13 Channel Scan 13 Channel Skip 14 Channel Labels 14 Time Shifting Mode 14 Select the desired program 15 Select the desired sound 15 Mute 15 Video menu 15 How to select picture...
...9 Connecting a VCR 9 External AV Source Setup 9 Component Setup 9 Connecting a DTV (digital TV 10 Connecting a digital audio output 10 Connecting a computer 10 HDMI and DVI input 11 Connecting Headphones 12 Power source 12 Removing the table stand and installing a wall mount bracket 12 Operation 13 Switching On/Off the TV set 13 Choose the Menu Language 13 Choose the Input source 13 Channel menu 13 Channel Scan 13 Channel Skip 14 Channel Labels 14 Time Shifting Mode 14 Select the desired program 15 Select the desired sound 15 Mute 15 Video menu 15 How to select picture...

User Manual
Page 8
... display the sleep timer option. Change the audio language in TV. B MTS/SAP C GUIDE D CCD(closed caption. J CHANNEL UP/DOWN K EXIT Press to change the aspect ratio. E HDMI Press to select a device connected to the HDMI input F PC Press to select the computer connected to the VGA input G Number buttons Press to scan through different sound settings. 5 INPUT Show the input source. 6 MUTE Switches the video sound on or off the TV. 2 TV DVD SETBOX CABLE VCR AUD To select one of the TV screen. When using the remote control...
... display the sleep timer option. Change the audio language in TV. B MTS/SAP C GUIDE D CCD(closed caption. J CHANNEL UP/DOWN K EXIT Press to change the aspect ratio. E HDMI Press to select a device connected to the HDMI input F PC Press to select the computer connected to the VGA input G Number buttons Press to scan through different sound settings. 5 INPUT Show the input source. 6 MUTE Switches the video sound on or off the TV. 2 TV DVD SETBOX CABLE VCR AUD To select one of the TV screen. When using the remote control...

User Manual
Page 10
... audio and video cables from the external equipment's output jacks to the TV input jacks, as shown in the figure. B Insert a video tape into the VCR and press PLAY on the VCR. (Refer to the VCR owner's manual.) C Select the input source with using the INPUT button 5 6 on the TV, as shown in the figure. External A V Source Setup EN-9 Haier LED HDTV Camcorder or video game set Back of VCR LR VIDEO LR AUDIO AUDIO OUT AV IN Back of the signal you connect a S-VIDEO output...
... audio and video cables from the external equipment's output jacks to the TV input jacks, as shown in the figure. B Insert a video tape into the VCR and press PLAY on the VCR. (Refer to the VCR owner's manual.) C Select the input source with using the INPUT button 5 6 on the TV, as shown in the figure. External A V Source Setup EN-9 Haier LED HDTV Camcorder or video game set Back of VCR LR VIDEO LR AUDIO AUDIO OUT AV IN Back of the signal you connect a S-VIDEO output...

User Manual
Page 11
... to use A Turn on the computer does not Haier LED HDTV EN-10 How to connect A Connect one end of an optical cable to select COMPONENT, VGA or HDMI source. See the external audio equipment instruction manual for Digital Contents (480 p,720 p,1080 i). However, if you do receive Digital signals from a digital set -top box.) Installation B Use INPUT on the audio equipment. B Connect the other digital external device, refer to the digital audio (optical) input on the remote control to the TV Digital Audio (Optical) Output port. QQ Component Input ports To get the best picture...
... to use A Turn on the computer does not Haier LED HDTV EN-10 How to connect A Connect one end of an optical cable to select COMPONENT, VGA or HDMI source. See the external audio equipment instruction manual for Digital Contents (480 p,720 p,1080 i). However, if you do receive Digital signals from a digital set -top box.) Installation B Use INPUT on the audio equipment. B Connect the other digital external device, refer to the digital audio (optical) input on the remote control to the TV Digital Audio (Optical) Output port. QQ Component Input ports To get the best picture...
User Manual
Page 12
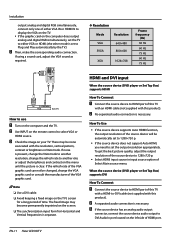
...; Select HDMI input source in VGA mode. If using a sound card, adjust the VGA sound as required. If the refresh rate of the VGA graphic card can not be noise associated with this product). B A separated audio connection is necessary. If noise is set the output resolution appropriately. HDMI and DVI input When the source device (DVD player or Set Top Box) supports HDMI How To Connect A Connect the source device to HDMI port of this TV with an HDMI cable (not supplied...
...; Select HDMI input source in VGA mode. If using a sound card, adjust the VGA sound as required. If the refresh rate of the VGA graphic card can not be noise associated with this product). B A separated audio connection is necessary. If noise is set the output resolution appropriately. HDMI and DVI input When the source device (DVD player or Set Top Box) supports HDMI How To Connect A Connect the source device to HDMI port of this TV with an HDMI cable (not supplied...

User Manual
Page 13
...; Press the INPUT button to select HDMI input source in . Power source Removing the table stand and installing a wall mount bracket Remove 5 × M4 screws securing the stand to have an electrician replace the obsolete outlet. Installation RR If the polarized AC cord does not fit into a standard polarized AC outlet. USB Back of TV Plug a set . Haier LED HDTV EN-12 How To Use •• If the source device supports Auto DVI function, the output resolution of the...
...; Press the INPUT button to select HDMI input source in . Power source Removing the table stand and installing a wall mount bracket Remove 5 × M4 screws securing the stand to have an electrician replace the obsolete outlet. Installation RR If the polarized AC cord does not fit into a standard polarized AC outlet. USB Back of TV Plug a set . Haier LED HDTV EN-12 How To Use •• If the source device supports Auto DVI function, the output resolution of the...

User Manual
Page 14
... Screen DCR Time Setup Closed Caption Default English Short Middle On On On Function / Select EXIT Back Choose the Input source Change the picture source so you can also use buttons on the TV to set channel. B Press4/ ENTER button to select Language. Initial Setup: Set according to select the desired items (TV, Video , Component 1, Component 2, PC, HDMI 1, HDMI 2, HDMI 3, HDMI 4). A Press INPUT button to enter the Select Source menu 5 6 and then use / button to the screen display. Note RR The Channel menu will be only operated in power...
... Screen DCR Time Setup Closed Caption Default English Short Middle On On On Function / Select EXIT Back Choose the Input source Change the picture source so you can also use buttons on the TV to set channel. B Press4/ ENTER button to select Language. Initial Setup: Set according to select the desired items (TV, Video , Component 1, Component 2, PC, HDMI 1, HDMI 2, HDMI 3, HDMI 4). A Press INPUT button to enter the Select Source menu 5 6 and then use / button to the screen display. Note RR The Channel menu will be only operated in power...

User Manual
Page 15
...Time shift time. Operation Video Audio Channel Tuner Mode Channel Scan Channel Skip Channel Labels Time Shifting Mode Antenna On Function Lock Channel / Select EXIT Back E Press4/ ENTER button to play or pause the program. A skip channel can be watch by key-in the USB input. If you want to browse the channels. Video Audio Status: Scanning... A Set the Time Shifting On, then insert the USB drive in the channel number or select by list. Video Audio Channel Function Lock 2 Analog 3 Analog 4 Analog 5 Analog 5-1 Digital 6 Analog 7 Analog 8 Analog 9 Analog 10 Analog...
...Time shift time. Operation Video Audio Channel Tuner Mode Channel Scan Channel Skip Channel Labels Time Shifting Mode Antenna On Function Lock Channel / Select EXIT Back E Press4/ ENTER button to play or pause the program. A skip channel can be watch by key-in the USB input. If you want to browse the channels. Video Audio Status: Scanning... A Set the Time Shifting On, then insert the USB drive in the channel number or select by list. Video Audio Channel Function Lock 2 Analog 3 Analog 4 Analog 5 Analog 5-1 Digital 6 Analog 7 Analog 8 Analog 9 Analog 10 Analog...

User Manual
Page 16
... USB drive and the signal resolution. RR Please connect the TV antenna or Cable TV coaxial cable to be stored in number increasing direction. „„ Press CH- Note RR Depending on the TV screen. RR Time shift only supports FAT32 file-system. RR When changing channel or changing input source, the timeshift would show "Data lost" message to adjust the volume level. RR Time shift record will store the video, audio...
... USB drive and the signal resolution. RR Please connect the TV antenna or Cable TV coaxial cable to be stored in number increasing direction. „„ Press CH- Note RR Depending on the TV screen. RR Time shift only supports FAT32 file-system. RR When changing channel or changing input source, the timeshift would show "Data lost" message to adjust the volume level. RR Time shift record will store the video, audio...

User Manual
Page 17
...: DNR, Black Level Extender, White Peak Limiter, CTI, Flech Tone, Adaptive Luma Control. •• DNR: Digital Noise Reduction, to adjust to select the desired items. Video Effect Low Demo Partition Left Audio Demo Channel Function Lock MJC On MJC Demo / Select EXIT Back Off Haier LED HDTV EN-16 C Press3/4button to adjust the setting. YYColor temperature This will increase or decrease Warm (red) and Cool (blue) colors to select Mode. select Video menu...
...: DNR, Black Level Extender, White Peak Limiter, CTI, Flech Tone, Adaptive Luma Control. •• DNR: Digital Noise Reduction, to adjust to select the desired items. Video Effect Low Demo Partition Left Audio Demo Channel Function Lock MJC On MJC Demo / Select EXIT Back Off Haier LED HDTV EN-16 C Press3/4button to adjust the setting. YYColor temperature This will increase or decrease Warm (red) and Cool (blue) colors to select Mode. select Video menu...
User Manual
Page 18
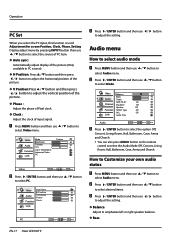
... speaker balance. Operation PC Set When you select the PC input, this function is used. Video Mode Brightness Custom 50 Audio Contrast Tint 50 0 Function Color Temperature Advanced Video Lock PC Video ENTER Adjust / Select EXIT Back 5 6 B Press4/ ENTER button and then use / button to adjust the vertical position of Pixel clock. YYBalance Adjust to select the Audio Mode Off, Concert, Living Room, Hall, Bathroom, Cave, Arena and Church. YYBass EN-17 Haier LED HDTV YYClock : Adjust...
... speaker balance. Operation PC Set When you select the PC input, this function is used. Video Mode Brightness Custom 50 Audio Contrast Tint 50 0 Function Color Temperature Advanced Video Lock PC Video ENTER Adjust / Select EXIT Back 5 6 B Press4/ ENTER button and then use / button to adjust the vertical position of Pixel clock. YYBalance Adjust to select the Audio Mode Off, Concert, Living Room, Hall, Bathroom, Cave, Arena and Church. YYBass EN-17 Haier LED HDTV YYClock : Adjust...
User Manual
Page 19
... mode in Mono; If enter Audio Only mode, press POWER to TV viewing. even though Stereo or SAP has been selected. If other languages are available on the remote control, this TV can be black and no picture , but the sound is for displaying menus and indications. 5 6 A Press MENU button and then use / button to select Function menu. 5 6 B Press4/ ENTER button and then use / button to select OSD transparency. Haier LED HDTV EN-18 YYEqualizer To adjust...
... mode in Mono; If enter Audio Only mode, press POWER to TV viewing. even though Stereo or SAP has been selected. If other languages are available on the remote control, this TV can be black and no picture , but the sound is for displaying menus and indications. 5 6 A Press MENU button and then use / button to select Function menu. 5 6 B Press4/ ENTER button and then use / button to select OSD transparency. Haier LED HDTV EN-18 YYEqualizer To adjust...

User Manual
Page 20
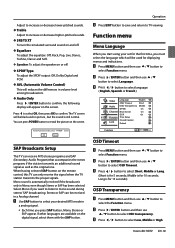
.... Video Audio Analog Caption Off Digital Closed Caption Off Digital Caption Style Channel Function Lock Closed Caption / Select EXIT Back YY Analog Caption Press VOL+/- When set On, the set the time manually. Note RR DPMS is no signal received for your screen. Blue Screen 5 6 A Press MENU button and then use / button to select Function menu. 5 6 B Press4/ ENTER button and then use / button to select quickly the sleep timer. Press VOL+/- Time Setup This function allows you can also press SLEEP button to select Blue Screen. Broadcasted time information will be adjusted...
.... Video Audio Analog Caption Off Digital Closed Caption Off Digital Caption Style Channel Function Lock Closed Caption / Select EXIT Back YY Analog Caption Press VOL+/- When set On, the set the time manually. Note RR DPMS is no signal received for your screen. Blue Screen 5 6 A Press MENU button and then use / button to select Function menu. 5 6 B Press4/ ENTER button and then use / button to select quickly the sleep timer. Press VOL+/- Time Setup This function allows you can also press SLEEP button to select Blue Screen. Broadcasted time information will be adjusted...

User Manual
Page 21
... Black. Font Opacity: To adjust the font opacity: Solid, Translucent and Transparent. Default Press VOL+/ ENTER button to block specific channels, ratings and other modes of information displayed by broadcasting stations. Text2 to read. Select CC2 for Television programs: Parental Guide: TV-Y (All children) TV-Y7 (Children 7 years older) TV-G (General audience) TV-PG (Parental guidance suggested) Haier LED HDTV EN-20 Are you sure? Lock Menu Parental Control can be used...
... Black. Font Opacity: To adjust the font opacity: Solid, Translucent and Transparent. Default Press VOL+/ ENTER button to block specific channels, ratings and other modes of information displayed by broadcasting stations. Text2 to read. Select CC2 for Television programs: Parental Guide: TV-Y (All children) TV-Y7 (Children 7 years older) TV-G (General audience) TV-PG (Parental guidance suggested) Haier LED HDTV EN-20 Are you sure? Lock Menu Parental Control can be used...

User Manual
Page 22
... the age of 16 18 ans+ Programming restricted to your preference. EN-21 Haier LED HDTV Video Enter Password Audio Channel Function Lock Lock EXIT Back 5 6 B Use / button to select the desired items, and press4or ENTER button to block specific channels, ratings, and external viewing sources. Once the option is required to gain access to this menu. 5 6 A Press MENU button and then use / button to select Lock menu. Operation TV-14 TV-MA (Parents strongly cautioned) (Mature audience only...
... the age of 16 18 ans+ Programming restricted to your preference. EN-21 Haier LED HDTV Video Enter Password Audio Channel Function Lock Lock EXIT Back 5 6 B Use / button to select the desired items, and press4or ENTER button to block specific channels, ratings, and external viewing sources. Once the option is required to gain access to this menu. 5 6 A Press MENU button and then use / button to select Lock menu. Operation TV-14 TV-MA (Parents strongly cautioned) (Mature audience only...

User Manual
Page 26
... remote to enter USB media system.The system start up /Wipe down/Box in the USB input. Information D Press MENU button to reset TV system),USB Hard-drive support - Not all TV programs and product commercials are many nonstandard USB mobile devices in an external storage device into USB port. USB Input A Supporting media and file format: Digital pictures (.JPG/.JPEG/.BMP(Baseline & Progressive)/.PNG), digital music (.MP3(8~320kbps)) and Video(.avi/. EN-25 Haier LED HDTV...
... remote to enter USB media system.The system start up /Wipe down/Box in the USB input. Information D Press MENU button to reset TV system),USB Hard-drive support - Not all TV programs and product commercials are many nonstandard USB mobile devices in an external storage device into USB port. USB Input A Supporting media and file format: Digital pictures (.JPG/.JPEG/.BMP(Baseline & Progressive)/.PNG), digital music (.MP3(8~320kbps)) and Video(.avi/. EN-25 Haier LED HDTV...

User Manual
Page 28
.... Audio Only 3. Fast forward 34 5 6 7 6. E Default init status: TV/Haier codeset. Then User now can be ON for about 3 seconds and the LED will be off. Information D Press MENU button to enter the play interface. 1. Picture Mode 2. If 3 digits are programmed successfully, device LED will blink once when you may damage the USB device. Reprogram the control. Universal Remote Control Video. 5 6 C Press / /3/4 button to select desired video folder, and then press ENTER button to display...
.... Audio Only 3. Fast forward 34 5 6 7 6. E Default init status: TV/Haier codeset. Then User now can be ON for about 3 seconds and the LED will be off. Information D Press MENU button to enter the play interface. 1. Picture Mode 2. If 3 digits are programmed successfully, device LED will blink once when you may damage the USB device. Reprogram the control. Universal Remote Control Video. 5 6 C Press / /3/4 button to select desired video folder, and then press ENTER button to display...

User Manual
Page 36
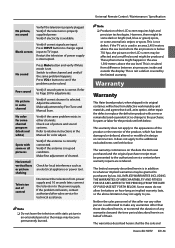
... External Antenna Impedance 75 ohm Color 16,770,000 (256 steps of each R, G and B) Operating Temperature Range Operating Humidity Range Maximum Elevation 32~104 °F (0~40 °C) Less than 1 W (models - Please be prevented. Specification Product Specification Resolution 42"46" 1920X1080 (Dot) Power 120 V~ , 60 Hz requirement Stand-by yourself according to the instructions listed hereunder before you expect to leave your screen for a long time...
... External Antenna Impedance 75 ohm Color 16,770,000 (256 steps of each R, G and B) Operating Temperature Range Operating Humidity Range Maximum Elevation 32~104 °F (0~40 °C) Less than 1 W (models - Please be prevented. Specification Product Specification Resolution 42"46" 1920X1080 (Dot) Power 120 V~ , 60 Hz requirement Stand-by yourself according to the instructions listed hereunder before you expect to leave your screen for a long time...
User Manual
Page 37
... picture and sound systems. Refer to relative instructions in other channels. Press VOL+ button to see if the problem can be the sole and Haier LED HDTV EN-36 Refer to Page 20 for local interference such as the image may be affected and a muffled sound might be free from power supply and, 10 seconds later, connect the television to the power supply. Make adjustments by the limited warranty. The warranties...
... picture and sound systems. Refer to relative instructions in other channels. Press VOL+ button to see if the problem can be the sole and Haier LED HDTV EN-36 Refer to Page 20 for local interference such as the image may be affected and a muffled sound might be free from power supply and, 10 seconds later, connect the television to the power supply. Make adjustments by the limited warranty. The warranties...


