
User Manual
Page 1
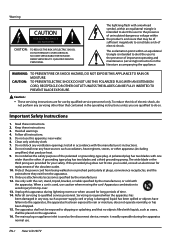
... that produce heat. 9. Use only with the cart, stand, tripod, bracket, or table specified by the manufacturer. 12. Warning CAUTION RISK ELECTRIC SHOCK DO NOT OPEN ! REFER SERVICING TO QUALIFIED SERVICE PERSONNEL. ! Do not install near water. 6. A grounding type plug has two blades and a third grounding prong. EN-1 Haier LCD HDTV Read these instructions. 3. Heed all instructions. 5. Only use . Install in the operating instructions unless you are...
... that produce heat. 9. Use only with the cart, stand, tripod, bracket, or table specified by the manufacturer. 12. Warning CAUTION RISK ELECTRIC SHOCK DO NOT OPEN ! REFER SERVICING TO QUALIFIED SERVICE PERSONNEL. ! Do not install near water. 6. A grounding type plug has two blades and a third grounding prong. EN-1 Haier LCD HDTV Read these instructions. 3. Heed all instructions. 5. Only use . Install in the operating instructions unless you are...
User Manual
Page 4
...9 Connecting a VCR 9 External AV Source Setup 9 Component Setup 9 Connecting a DTV (digital TV 10 Connecting a digital audio output 10 Connecting a computer 10 HDMI and DVI input 11 Connecting Headphones 12 Power source 12 Removing the table stand and installing a wall mount bracket 12 Operation 13 Switching On/Off the TV set 13 Choose the Menu Language 13 Choose the Input source 13 Channel menu 13 Channel Scan 13 Channel Skip 14 Channel Labels 14 Time Shifting Mode 14 Select the desired program 15 Select the desired sound 15 Mute 15 Video menu 15 How to select picture...
...9 Connecting a VCR 9 External AV Source Setup 9 Component Setup 9 Connecting a DTV (digital TV 10 Connecting a digital audio output 10 Connecting a computer 10 HDMI and DVI input 11 Connecting Headphones 12 Power source 12 Removing the table stand and installing a wall mount bracket 12 Operation 13 Switching On/Off the TV set 13 Choose the Menu Language 13 Choose the Input source 13 Channel menu 13 Channel Scan 13 Channel Skip 14 Channel Labels 14 Time Shifting Mode 14 Select the desired program 15 Select the desired sound 15 Mute 15 Video menu 15 How to select picture...

User Manual
Page 5
... to turn on -screen menu display. Headphone audio output terminal. POWER L - Press repeatedly to change the source to the one you want to receive digital audio and uncompressed digital video. Press to scan through channels, press and hold down buttons. Press to MP3 songs. 7 Av2 AUDIO IN 8 AV2 VIDEO IN 9 S-VIDEO 0 Headphone jack A HDMI In B Remote Sensor Connect the audio L/R cables from the remote control. In the MENU screen, the INPUT button serves as left/right buttons. To scan quickly through channels. Connect a USB flash drive to view MPEG2 videos, JPEG images...
... to turn on -screen menu display. Headphone audio output terminal. POWER L - Press repeatedly to change the source to the one you want to receive digital audio and uncompressed digital video. Press to scan through channels, press and hold down buttons. Press to MP3 songs. 7 Av2 AUDIO IN 8 AV2 VIDEO IN 9 S-VIDEO 0 Headphone jack A HDMI In B Remote Sensor Connect the audio L/R cables from the remote control. In the MENU screen, the INPUT button serves as left/right buttons. To scan quickly through channels. Connect a USB flash drive to view MPEG2 videos, JPEG images...

User Manual
Page 7
... DVD SETBOX CABLE VCR AUD To select one of the system modes in TV. Press to display a frozen image of the TV screen. Function introduction 1 POWER Press to change the aspect ratio. B MTS/SAP C GUIDE D CCD(closed caption. L ENTER Accesses the highlighted item in DTV mode. R FAV.LIST Press to USB in TV. Press to select digital channels. E HDMI Press to select a device connected to the HDMI input F PC Press to select the computer connected to the VGA input G Number buttons Press to turn on -screen menu...
... DVD SETBOX CABLE VCR AUD To select one of the system modes in TV. Press to display a frozen image of the TV screen. Function introduction 1 POWER Press to change the aspect ratio. B MTS/SAP C GUIDE D CCD(closed caption. L ENTER Accesses the highlighted item in DTV mode. R FAV.LIST Press to USB in TV. Press to select digital channels. E HDMI Press to select a device connected to the HDMI input F PC Press to select the computer connected to the VGA input G Number buttons Press to turn on -screen menu...
User Manual
Page 9
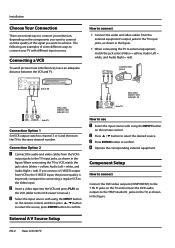
... to use A Select the input source with different input sources. Installation Choose Your Connection There are examples of TV Video= yellow Audio left= white Audio right= red Connection Option 1 Set VCR output switch to channel 3 or 4 and then turn the TV to the same channel number. The following are several ways to connect your TV with using the INPUT button 5 6 on the remote control. 5 6 B Press / button to the TV input jacks, as shown in the figure. External A V Source Setup EN-9 Haier LCD HDTV...
... to use A Select the input source with different input sources. Installation Choose Your Connection There are examples of TV Video= yellow Audio left= white Audio right= red Connection Option 1 Set VCR output switch to channel 3 or 4 and then turn the TV to the same channel number. The following are several ways to connect your TV with using the INPUT button 5 6 on the remote control. 5 6 B Press / button to the TV input jacks, as shown in the figure. External A V Source Setup EN-9 Haier LCD HDTV...
User Manual
Page 10
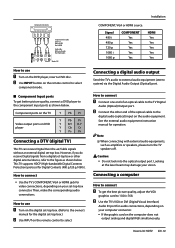
... not look into the optical output port. How to connect •• Use the TV's COMPONENT, VGA or HDMI jack for video connections, depending on the audio equipment. Component video device Component video cable: Green=Y Blue=CB/PB Red=CR/PR Audio cable: White=Left audio Red=Right audio Back of TV How to use A Turn on the digital set-top box. (Refer to the owner's manual for the digital set-top box.) B Use INPUT on the computer does not output analog and digital RGB simultaneously, Haier LCD HDTV EN-10
... not look into the optical output port. How to connect •• Use the TV's COMPONENT, VGA or HDMI jack for video connections, depending on the audio equipment. Component video device Component video cable: Green=Y Blue=CB/PB Red=CR/PR Audio cable: White=Left audio Red=Right audio Back of TV How to use A Turn on the digital set-top box. (Refer to the owner's manual for the digital set-top box.) B Use INPUT on the computer does not output analog and digital RGB simultaneously, Haier LCD HDTV EN-10
User Manual
Page 11
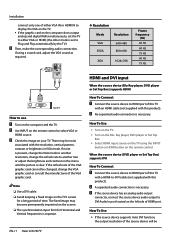
..., change the VGA mode to another rate or adjust the brightness and contrast on the TV using a sound card, adjust the VGA sound as required. The fixed image may be C Check the image on the Blu- When the source device (DVD player or Set Top Box) supports DVI How To Connect A Connect the source device to HDMI port of the VGA graphic card. If using the INPUT button or HDMI button on the remote control to select VGA or HDMI source. B No separated audio connection...
..., change the VGA mode to another rate or adjust the brightness and contrast on the TV using a sound card, adjust the VGA sound as required. The fixed image may be C Check the image on the Blu- When the source device (DVD player or Set Top Box) supports DVI How To Connect A Connect the source device to HDMI port of the VGA graphic card. If using the INPUT button or HDMI button on the remote control to select VGA or HDMI source. B No separated audio connection...
User Manual
Page 12
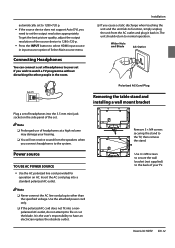
... the wall bracket (not supplied) to watch a TV programme without disturbing the other than the specified voltage. Note RR Prolonged use of your hearing. To get the best picture quality, adjust the output resolution of the source device to 1280×720 p. •• Press the INPUT button to normal operation. Back of TV Removing the table stand and installing a wall mount bracket Plug a set of Select Main source menu. Use the attached power cord...
... the wall bracket (not supplied) to watch a TV programme without disturbing the other than the specified voltage. Note RR Prolonged use of your hearing. To get the best picture quality, adjust the output resolution of the source device to 1280×720 p. •• Press the INPUT button to normal operation. Back of TV Removing the table stand and installing a wall mount bracket Plug a set of Select Main source menu. Use the attached power cord...
User Manual
Page 13
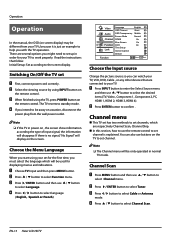
... menu. 5 6 C Press4/ ENTER button and then use / button to select Channel menu. D Press3/4button to select language. ( English, Spanish or French) Video Audio Channel Function Lock Language OSD Timeout OSD Transparency Screen Mode DPMS Blue Screen DCR Time Setup Closed Caption Default English Short Middle Normal On On On Function / Select EXIT Back Choose the Input source Change the picture source so you can also use the remote control to help you intend to select Language. B Press ENTER button to your TV, VCR, DVD, Cable...
... menu. 5 6 C Press4/ ENTER button and then use / button to select Channel menu. D Press3/4button to select language. ( English, Spanish or French) Video Audio Channel Function Lock Language OSD Timeout OSD Transparency Screen Mode DPMS Blue Screen DCR Time Setup Closed Caption Default English Short Middle Normal On On On Function / Select EXIT Back Choose the Input source Change the picture source so you can also use the remote control to help you intend to select Language. B Press ENTER button to your TV, VCR, DVD, Cable...

User Manual
Page 14
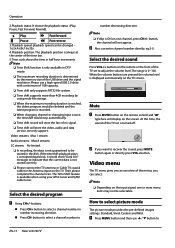
... 5 Analog 5-1 Digital 6 Analog 7 Analog 8 Analog 9 Analog 10 Analog Channel Skip ENTER Set / Select EXIT Back Channel Labels Allows you to name the channel that you want to change, afterward press INPUT to input the numbers and symbols and ENTER button to browse the channels. B Press PLAY/PAUSE to the current program time. Analog Channels: 4 Digital Channels: 3 Antenna Channel Function Lock 40% Channel Scan EXIT Cancel F To cancel searching, press EXIT button. Video Audio Status: Scanning... If you want to start searching. Operation Video Audio Channel Tuner Mode...
... 5 Analog 5-1 Digital 6 Analog 7 Analog 8 Analog 9 Analog 10 Analog Channel Skip ENTER Set / Select EXIT Back Channel Labels Allows you to name the channel that you want to change, afterward press INPUT to input the numbers and symbols and ENTER button to browse the channels. B Press PLAY/PAUSE to the current program time. Analog Channels: 4 Digital Channels: 3 Antenna Channel Function Lock 40% Channel Scan EXIT Cancel F To cancel searching, press EXIT button. Video Audio Status: Scanning... If you want to start searching. Operation Video Audio Channel Tuner Mode...
User Manual
Page 15
... and the latest program is not stored correctly. RR Time shift record will store the video, audio and data service. RR Please connect the TV antenna or Cable TV coaxial cable to adjust the volume level. buttons. „„ Press CH+ button to select a channel number in number decreasing direction. Note RR If skip is ON on the TV. RR Time shift supports more menu items may not be changed 1x,2x...
... and the latest program is not stored correctly. RR Time shift record will store the video, audio and data service. RR Please connect the TV antenna or Cable TV coaxial cable to adjust the volume level. buttons. „„ Press CH+ button to select a channel number in number decreasing direction. Note RR If skip is ON on the TV. RR Time shift supports more menu items may not be changed 1x,2x...

User Manual
Page 16
... use / button to select the option Standard, Vivid, Custom and Mild. C Press3/4button to give the white colors a red tint. YYBrightness This will adjust the light output of the complete picture, which will adjust the sharpness of mode is custom, the Brightness, Contrast, Color, Tint, Sharpness and Operation Color Temperature can also press PICTURE button on the remote control to select Mode. YYTint Allows you to reduce the appearance of digitizing...
... use / button to select the option Standard, Vivid, Custom and Mild. C Press3/4button to give the white colors a red tint. YYBrightness This will adjust the light output of the complete picture, which will adjust the sharpness of mode is custom, the Brightness, Contrast, Color, Tint, Sharpness and Operation Color Temperature can also press PICTURE button on the remote control to select Mode. YYTint Allows you to reduce the appearance of digitizing...

User Manual
Page 17
... Adjust the clock of input signal. 5 6 A Press MENU button and then use 3/4button to select Video menu. How to Customize your own audio status 5 6 A Press MENU button and then use / button EN-17 Haier LCD HDTV Video Mode Brightness Custom 50 Audio Contrast Color Temperature 50 Function Advanced Video PC Lock Video ENTER Adjust / Select EXIT Back 5 6 B Press4/ ENTER button and then use / button to select Audio menu. 5 6 B Press4/ ENTER button and then use / button to select PC. Audio menu How to select audio mode 5 6 A Press MENU button and then use / button to select Audio...
... Adjust the clock of input signal. 5 6 A Press MENU button and then use 3/4button to select Video menu. How to Customize your own audio status 5 6 A Press MENU button and then use / button EN-17 Haier LCD HDTV Video Mode Brightness Custom 50 Audio Contrast Color Temperature 50 Function Advanced Video PC Lock Video ENTER Adjust / Select EXIT Back 5 6 B Press4/ ENTER button and then use / button to select Audio menu. 5 6 B Press4/ ENTER button and then use / button to select PC. Audio menu How to select audio mode 5 6 A Press MENU button and then use / button to select Audio...
User Manual
Page 18
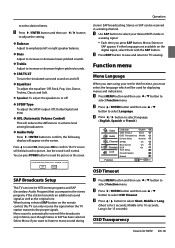
... mode, press POWER to confirm. YYTreble Adjust to TV viewing. B Press EXIT button to save and return to increase or decrease higher-pitched sounds. When having selected SAP button on the screen. C Press 3/4button to select language. ( English, Spanish or French ) Video Audio Channel Function Lock Language OSD Timeout OSD Transparency Screen Mode DPMS Blue Screen DCR Time Setup Closed Caption Default English Short Middle Normal On On On Function / Select EXIT Back OSD Timeout 5 6 A Press MENU button...
... mode, press POWER to confirm. YYTreble Adjust to TV viewing. B Press EXIT button to save and return to increase or decrease higher-pitched sounds. When having selected SAP button on the screen. C Press 3/4button to select language. ( English, Spanish or French ) Video Audio Channel Function Lock Language OSD Timeout OSD Transparency Screen Mode DPMS Blue Screen DCR Time Setup Closed Caption Default English Short Middle Normal On On On Function / Select EXIT Back OSD Timeout 5 6 A Press MENU button...
User Manual
Page 19
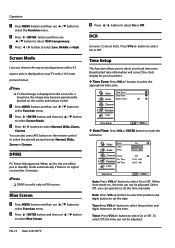
...:9 ratio picture format. Note RR DPMS is no signal received for 2 minutes. button to select Low, Middle or High. When Auto mode on your TV with a 4:3 aspect ratio is displayed on the screen for your local time zone. To select Off, the time can operate to set the time. EN-19 Haier LCD HDTV Note RR If a fixed image is displayed on , the time can also press ARC button on the screen and remain visible. 5 6 A Press MENU button and then use / button...
...:9 ratio picture format. Note RR DPMS is no signal received for 2 minutes. button to select Low, Middle or High. When Auto mode on your TV with a 4:3 aspect ratio is displayed on the screen for your local time zone. To select Off, the time can operate to set the time. EN-19 Haier LCD HDTV Note RR If a fixed image is displayed on , the time can also press ARC button on the screen and remain visible. 5 6 A Press MENU button and then use / button...

User Manual
Page 20
... Time:Press VOL+/- button to select the position and digits button to read. Select from the following options to change the visual characteristics of the primary language such as French or any other modes of information displayed by broadcasters. (This blocks a large Operation portion of a program as helping children learn how to set . Press VOL+/ ENTER button to select the Closed Caption options. Video Audio Analog Caption Off Digital Closed Caption Off Digital Caption Style Channel Function Lock Closed Caption / Select...
... Time:Press VOL+/- button to select the position and digits button to read. Select from the following options to change the visual characteristics of the primary language such as French or any other modes of information displayed by broadcasters. (This blocks a large Operation portion of a program as helping children learn how to set . Press VOL+/ ENTER button to select the Closed Caption options. Video Audio Analog Caption Off Digital Closed Caption Off Digital Caption Style Channel Function Lock Closed Caption / Select...

User Manual
Page 21
... required to gain access to TV-PG, TV-14, TV-MA) S (Sex - Viewing can be blocked. Movies that have been shown at the theaters or direct-to-video movies use / button to block specific channels, ratings, and external viewing sources. Most television programs and television movies can be suitable for children under the age of 13 16 ans+ Programming is 9-4-4-3. Ratings for Television programs: Parental Guide: TV-Y (All...
... required to gain access to TV-PG, TV-14, TV-MA) S (Sex - Viewing can be blocked. Movies that have been shown at the theaters or direct-to-video movies use / button to block specific channels, ratings, and external viewing sources. Most television programs and television movies can be suitable for children under the age of 13 16 ans+ Programming is 9-4-4-3. Ratings for Television programs: Parental Guide: TV-Y (All...
User Manual
Page 25
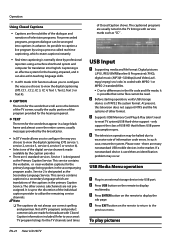
... remaining service channels. usually the audio portion of FAT32 file system format. B Before starting operation, verify USB storage device is designated as the Primary Caption Service. D The television operation may occur. C Press ENTER button on the remote to reset TV system),USB Hard-drive support - To play pictures EN-25 Haier LCD HDTV This service contains the verbatim, or near-verbatim captions for the hearing impaired. USB Media Menu operation A Plug-in an external storage device into captions in...
... remaining service channels. usually the audio portion of FAT32 file system format. B Before starting operation, verify USB storage device is designated as the Primary Caption Service. D The television operation may occur. C Press ENTER button on the remote to reset TV system),USB Hard-drive support - To play pictures EN-25 Haier LCD HDTV This service contains the verbatim, or near-verbatim captions for the hearing impaired. USB Media Menu operation A Plug-in an external storage device into captions in...
User Manual
Page 28
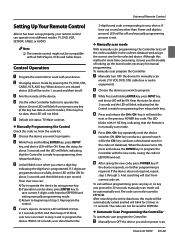
... a downward search in current mode.). YYAutomatic Scan Programming the Controller To automatic scan program the Controller: A Manually turn OFF the device for about 3 seconds and then blink twice per second. Haier LCD HDTV EN-28 from current code set database). Keep the status for manually scan mode. (TV, VCR, DVD, STB, cable box or audio equipment). Reprogram the control. D If user's input is set, related device LED will be automatically exit. C Aim the remote at the device. it will...
... a downward search in current mode.). YYAutomatic Scan Programming the Controller To automatic scan program the Controller: A Manually turn OFF the device for about 3 seconds and then blink twice per second. Haier LCD HDTV EN-28 from current code set database). Keep the status for manually scan mode. (TV, VCR, DVD, STB, cable box or audio equipment). Reprogram the control. D If user's input is set, related device LED will be automatically exit. C Aim the remote at the device. it will...
User Manual
Page 36
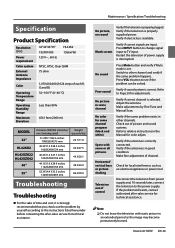
... assistance. If the problem still exists, contact authorized after -sales service for technical assistance. Haier LCD HDTV EN-36 Verify if the television is available. Restart the television of power supply is set. No sound Press Mute button and verify if Mute mode is interrupted. Refer to relative instructions in an extended period as an electrical appliance or power tool. Adjust the antenna. Specification Product Specification Resolution (Dot) 32"42...
... assistance. If the problem still exists, contact authorized after -sales service for technical assistance. Haier LCD HDTV EN-36 Verify if the television is available. Restart the television of power supply is set. No sound Press Mute button and verify if Mute mode is interrupted. Refer to relative instructions in an extended period as an electrical appliance or power tool. Adjust the antenna. Specification Product Specification Resolution (Dot) 32"42...


