User Manual
Page 2
Contents Safety and warnings 2-4 Introduction 5 Installation 6-9 Remote Control 10 Operation...11-14 Trouble Shooting 15 Warranty...16 -1-
Contents Safety and warnings 2-4 Introduction 5 Installation 6-9 Remote Control 10 Operation...11-14 Trouble Shooting 15 Warranty...16 -1-
User Manual
Page 3
... unit. REFER SERVICING TO QUALIFIED SERVICE PERSONNEL. Install in accordance with dry cloth. 7.Do not block any way, such as radiators , stoves, or other apparatus (including amplifiers)that there are present within this apparatus near water. 6.Clean only with the manufacturers instructions. 8.Do not install near any heat sources such as the power-supply cord or plug is required...
... unit. REFER SERVICING TO QUALIFIED SERVICE PERSONNEL. Install in accordance with dry cloth. 7.Do not block any way, such as radiators , stoves, or other apparatus (including amplifiers)that there are present within this apparatus near water. 6.Clean only with the manufacturers instructions. 8.Do not install near any heat sources such as the power-supply cord or plug is required...

User Manual
Page 4
... such as lighted candles on an unstable cart, stand, shelf or table. Dim:515*320mm( ) If the television is essential to direct sunlight and other products which give off heat, e.g. You should pay special attention to disconnect the AC power cord from the AC... power supply cord under the television receiver. Do not place your television, and can reduce the service life of this television receiver. Do not open the back cabinet. Never stand on, lean on other sources of electrical components. Never spill any kind of time, it falls. video cassette players and audio ...
... such as lighted candles on an unstable cart, stand, shelf or table. Dim:515*320mm( ) If the television is essential to direct sunlight and other products which give off heat, e.g. You should pay special attention to disconnect the AC power cord from the AC... power supply cord under the television receiver. Do not place your television, and can reduce the service life of this television receiver. Do not open the back cabinet. Never stand on, lean on other sources of electrical components. Never spill any kind of time, it falls. video cassette players and audio ...
User Manual
Page 5
... on the picture screen can be connected to rain or cords. -4- This TV can cause eyestrain. Earthing connection--- Reorient or relocate the receiving antenna. - This symbol indicates that to the cabinet or premature component failure. CAUTION Never tamper with the instructions, may cause harmful interference will not occur in the room where light does not strike the screen directly. All LCD-TVs...
... on the picture screen can be connected to rain or cords. -4- This TV can cause eyestrain. Earthing connection--- Reorient or relocate the receiving antenna. - This symbol indicates that to the cabinet or premature component failure. CAUTION Never tamper with the instructions, may cause harmful interference will not occur in the room where light does not strike the screen directly. All LCD-TVs...
User Manual
Page 6
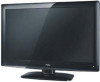
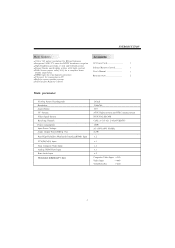
... connection ■ VGA port for connection to PC Battery(AAA 2 ■ Built-in stereo speaker system ■ Full-function Remote Control Main parameter Viewing Picture Size(diagonal) Resolution: Aspect Ratio: TV System: Video Signal System: Receiving Channel: Power consumption: Input Power Voltage: Audio Output Power(THD 7%): Rear High-Definition Multimedia Interface(HDMI) Input YCb(Pb)Cr(Pr) Input Rear Composte Video Input Analog RGB(VGA) Input Rear Audio Input Horizontal definition(TV line) 26 inch 1366x768 16:9 ATSC Digital system and NTSC Analog system NTSC/PAL/SECAM Cable...
... connection ■ VGA port for connection to PC Battery(AAA 2 ■ Built-in stereo speaker system ■ Full-function Remote Control Main parameter Viewing Picture Size(diagonal) Resolution: Aspect Ratio: TV System: Video Signal System: Receiving Channel: Power consumption: Input Power Voltage: Audio Output Power(THD 7%): Rear High-Definition Multimedia Interface(HDMI) Input YCb(Pb)Cr(Pr) Input Rear Composte Video Input Analog RGB(VGA) Input Rear Audio Input Horizontal definition(TV line) 26 inch 1366x768 16:9 ATSC Digital system and NTSC Analog system NTSC/PAL/SECAM Cable...
User Manual
Page 7
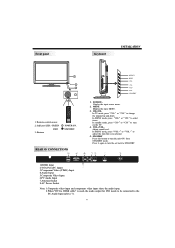
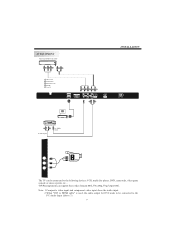
...Input 6.PC Audio Input 7.Antenna Socket 8.AC Power Socket Note: 1.Composite video input and component video input share the audio input. 2.When "DVI to HDMI cable" is used, the audio output for DVI needs to be connected to adjust the item that you selected. 5. STANDBY 30 30 1 2 3 4 5 6 7 8 9 0 + + VOL CH _ _ 1: Remote control sensor. 2: Indicator LED: GREEN RED 3: Buttons POWER ON. In MENU mode, press"VOL+"or"VOL-"to the PC Audio Input (above 7). -6- Front panel Keyboard INSTALLATION SOURCE 3 MENU CH+ 1 CH- 2 VOL+ VOL- STANDBY Press this button to turn...
...Input 6.PC Audio Input 7.Antenna Socket 8.AC Power Socket Note: 1.Composite video input and component video input share the audio input. 2.When "DVI to HDMI cable" is used, the audio output for DVI needs to be connected to adjust the item that you selected. 5. STANDBY 30 30 1 2 3 4 5 6 7 8 9 0 + + VOL CH _ _ 1: Remote control sensor. 2: Indicator LED: GREEN RED 3: Buttons POWER ON. In MENU mode, press"VOL+"or"VOL-"to the PC Audio Input (above 7). -6- Front panel Keyboard INSTALLATION SOURCE 3 MENU CH+ 1 CH- 2 VOL+ VOL- STANDBY Press this button to turn...
User Manual
Page 8
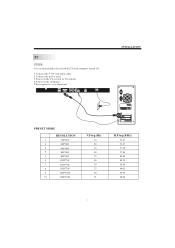
HDMI2 INPUT HDMI1 INPUT Pr Pb AV1 Y L PC AUDIO INPUT R RF INPUT INSTALLATION PRESET MODE RESOLUTION 1 720*400 2 640*480 3 640*480 4 800*600 5 800*600 6 1024*768 7 1024*768 8 1024*768 9 1280*1024 10 1280*1024 V.Freq.(Hz) 70 60 75 60 75 60 70 75 60 75 H.Freq.(KHz) 31.47 31.47 37.50 37.88 46.88 48.36 56.48 60.02 63.98 80.00 -7- This sequence is recommended to have both the TV and computer turned off. 1.Connect the VGA and audio cable. 2.Connect the power cord. 3.Power on the TV, switch to VGA mode. 4.Power on the computer. PC STEPS: It is very important.
HDMI2 INPUT HDMI1 INPUT Pr Pb AV1 Y L PC AUDIO INPUT R RF INPUT INSTALLATION PRESET MODE RESOLUTION 1 720*400 2 640*480 3 640*480 4 800*600 5 800*600 6 1024*768 7 1024*768 8 1024*768 9 1280*1024 10 1280*1024 V.Freq.(Hz) 70 60 75 60 75 60 70 75 60 75 H.Freq.(KHz) 31.47 31.47 37.50 37.88 46.88 48.36 56.48 60.02 63.98 80.00 -7- This sequence is recommended to have both the TV and computer turned off. 1.Connect the VGA and audio cable. 2.Connect the power cord. 3.Power on the TV, switch to VGA mode. 4.Power on the computer. PC STEPS: It is very important.
User Manual
Page 9
ANTENNA INSTALLATION Note: Aerial connections:IEC(female). Input impendance:75 unbalanced. -8-
ANTENNA INSTALLATION Note: Aerial connections:IEC(female). Input impendance:75 unbalanced. -8-
User Manual
Page 10
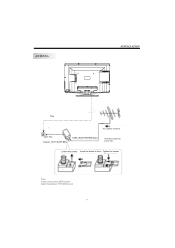
... DVD, camcorder, video game console or stereo system, etc... Note: 1.Composite video input and component video input share the audio input. 2.When "DVI to HDMI cable" is used, the audio output for DVI needs to be connected to the PC Audio Input (above 7). -9- AV EQUIPMENT VIDEO EQUIPMENT with YPbPr GBR WR Y Yellow (video) W White(audio L) R Red(audio R or Pr) B Blue(Pb) G Green(Y) HDMI2 INPUT HDMI1 INPUT HDMI VIDEO EQUIPMENT W R TO VIDEO output To audio outputs G B R W R Pr AV1 Pb L PC AUDIO INPUT Y R W R RF INPUT INSTALLATION AV2 VIDEO L R The TV can support...
... DVD, camcorder, video game console or stereo system, etc... Note: 1.Composite video input and component video input share the audio input. 2.When "DVI to HDMI cable" is used, the audio output for DVI needs to be connected to the PC Audio Input (above 7). -9- AV EQUIPMENT VIDEO EQUIPMENT with YPbPr GBR WR Y Yellow (video) W White(audio L) R Red(audio R or Pr) B Blue(Pb) G Green(Y) HDMI2 INPUT HDMI1 INPUT HDMI VIDEO EQUIPMENT W R TO VIDEO output To audio outputs G B R W R Pr AV1 Pb L PC AUDIO INPUT Y R W R RF INPUT INSTALLATION AV2 VIDEO L R The TV can support...
User Manual
Page 11
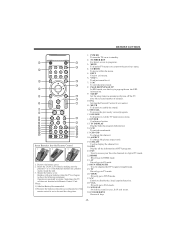
.... 9: SLEEP Set the sleep timer to automatically turn off the TV after the selected number of minutes. 10: P.G Setting the Parental Control level control. 11: MUTE To disable or enable the sound. 12: RECALL To access the previously viewed program. 13: SOURCE To display or exit the TV input source menu. 14: ENTER Confirms selection. 15: TV DISPLAY Display/hide the program Information 16: S.M To switch sound mode. 17: CH+/CHTo change the channel. 18: ASPECT To change the picture aspect ratio...
.... 9: SLEEP Set the sleep timer to automatically turn off the TV after the selected number of minutes. 10: P.G Setting the Parental Control level control. 11: MUTE To disable or enable the sound. 12: RECALL To access the previously viewed program. 13: SOURCE To display or exit the TV input source menu. 14: ENTER Confirms selection. 15: TV DISPLAY Display/hide the program Information 16: S.M To switch sound mode. 17: CH+/CHTo change the channel. 18: ASPECT To change the picture aspect ratio...
User Manual
Page 12
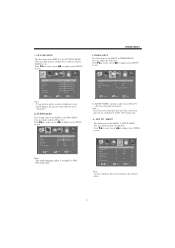
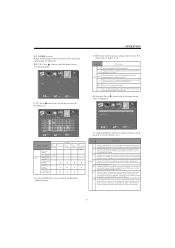
... select, press to adjust, press MENU to exit. SETUP MENU The forth item of the MENU is available in ATSC (TV) mode only. 4. Picture Audio Menu language Transparency Aspect Noise Reduction Advanced Closed caption XVS Restore Default Select Timer Setup V-CHIP English On 16:9 Weak Channel Off Adjust Menu Exit Note: Restore Default: Reset all settings to exit. You can adjust system settings here. 1. Picture Audio Picture mode Contrast Brightness Color Tint Sharpness Color Temp. Press to select, press to adjust, press MENU to the default...
... select, press to adjust, press MENU to exit. SETUP MENU The forth item of the MENU is available in ATSC (TV) mode only. 4. Picture Audio Menu language Transparency Aspect Noise Reduction Advanced Closed caption XVS Restore Default Select Timer Setup V-CHIP English On 16:9 Weak Channel Off Adjust Menu Exit Note: Restore Default: Reset all settings to exit. You can adjust system settings here. 1. Picture Audio Picture mode Contrast Brightness Color Tint Sharpness Color Temp. Press to select, press to adjust, press MENU to the default...
User Manual
Page 13
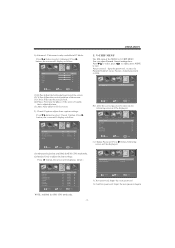
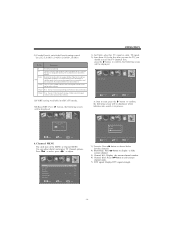
... password: Input the new password again -12- Closed Caption: adjust close caption settings. You can adjust Parental Control settings here. Press to select, press to adjust, press MENU to enter the Parental Control menu. Channel Select Adjust Menu Exit 5.1 After the correct password is 6666. OPERATION 1). Press button to fit the screen. 2). Channel Picture Audio Mode Font style Font size Font Edge style Font Edge color FG color BG color FG opacity BG opacity Select Timer Setup V-CHIP Custom Default Default Default Default Default Default Default Default...
... password: Input the new password again -12- Closed Caption: adjust close caption settings. You can adjust Parental Control settings here. Press to select, press to adjust, press MENU to enter the Parental Control menu. Channel Select Adjust Menu Exit 5.1 After the correct password is 6666. OPERATION 1). Press button to fit the screen. 2). Channel Picture Audio Mode Font style Font size Font Edge style Font Edge color FG color BG color FG opacity BG opacity Select Timer Setup V-CHIP Custom Default Default Default Default Default Default Default Default...
User Manual
Page 14
... character. nor encourage children to imitate dangerous acts which while related to lock/ unlock the Parental Control feature. N/A, G,PG, PG-13,R,NC-17,X. OPERATION 5.2 V-CHIP switch: When the Parental Control switch is ON, the below options can be adjusted. 5.3 US: Press button, the following screen will be displayed Picture Audio TV MPAA Timer Setup V-CHIP Channel X 2).MPAA:switch the movie-rating control level; Rating Description G General audiences, All Ages admitted...
... character. nor encourage children to imitate dangerous acts which while related to lock/ unlock the Parental Control feature. N/A, G,PG, PG-13,R,NC-17,X. OPERATION 5.2 V-CHIP switch: When the Parental Control switch is ON, the below options can be adjusted. 5.3 US: Press button, the following screen will be displayed Picture Audio TV MPAA Timer Setup V-CHIP Channel X 2).MPAA:switch the movie-rating control level; Rating Description G General audiences, All Ages admitted...
User Manual
Page 15
... :May be displayed. Channel label: Press button to display or hide current channel. 5). Auto Scan: If it's the first time you use the TV, you sure? Picture Audio Timer Air/cable Auto Scan Favorite Show/Hide Channel NO. DTV signal : Setup V-CHIP Channel Cable 2-1 Select Adjust Menu Exit Select Adjust Menu Exit 3). Channel NO.: Display the current channel number. 6). DTV signal: Display DTV signal strength. -14- A: Start to scan: press the button to scan Timer Setup V-CHIP Channel Select Adjust Menu Exit 5.5 RRT setting: Available in a humorous...
... :May be displayed. Channel label: Press button to display or hide current channel. 5). Auto Scan: If it's the first time you use the TV, you sure? Picture Audio Timer Air/cable Auto Scan Favorite Show/Hide Channel NO. DTV signal : Setup V-CHIP Channel Cable 2-1 Select Adjust Menu Exit Select Adjust Menu Exit 3). Channel NO.: Display the current channel number. 6). DTV signal: Display DTV signal strength. -14- A: Start to scan: press the button to scan Timer Setup V-CHIP Channel Select Adjust Menu Exit 5.5 RRT setting: Available in a humorous...
User Manual
Page 16
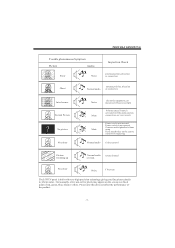
... the audio system connections are not correct) Power cord is not inserted Power switch is not opened Contrast and brightness/volume setup Press standby key on the screen as a fixed point of the product. -15- Occasionally, a few non-active pixels may appear on the remote control for inspecting Normal audio Colour control Picture breaking up Normal audio or weak retune channel No colour Noise TVsystem The LCDTV panel...
... the audio system connections are not correct) Power cord is not inserted Power switch is not opened Contrast and brightness/volume setup Press standby key on the screen as a fixed point of the product. -15- Occasionally, a few non-active pixels may appear on the remote control for inspecting Normal audio Colour control Picture breaking up Normal audio or weak retune channel No colour Noise TVsystem The LCDTV panel...


