
User Manual
Page 5
.... 2. English FOR YOUR SAFETY Before operating the TV please read this manual thoroughly.This manual should be determined by turning the equipment off and on a circuit different from that interference will not occur in a particular installation. If this equipment does cause harmful interference to rain or moisture 3 Reorient or relocate the receiving antenna. 2. Shielded interface cables and AC power cord...
.... 2. English FOR YOUR SAFETY Before operating the TV please read this manual thoroughly.This manual should be determined by turning the equipment off and on a circuit different from that interference will not occur in a particular installation. If this equipment does cause harmful interference to rain or moisture 3 Reorient or relocate the receiving antenna. 2. Shielded interface cables and AC power cord...

User Manual
Page 7
... provided for replacement of power supplied to your home, consult your safety. Follow all warnings. 4. Protect the power cord from being walked on or pinched particularly at plugs, convenience receptacles, and the point where they exit from the type of the polarized or grounding-type plug. A polarized plug has two blades with the apparatus.When a cart is used as power-supply cord or plug is damaged...
... provided for replacement of power supplied to your home, consult your safety. Follow all warnings. 4. Protect the power cord from being walked on or pinched particularly at plugs, convenience receptacles, and the point where they exit from the type of the polarized or grounding-type plug. A polarized plug has two blades with the apparatus.When a cart is used as power-supply cord or plug is damaged...

User Manual
Page 8
... outdoor antenna should be mounted to grounding electrodes and requirements for digital-to provide some protection against voltage surges and built up static charges. 18. Wall Mount Bracket - Analog-only TVs should continue to work as to -analog converter boxed. 22. gov. All televisions must comply with recommended international global safety standards for use only with UL Listed Wall Mount Bracket with cable and satellite TV services, gaming consoles,VCRs, DVD players...
... outdoor antenna should be mounted to grounding electrodes and requirements for digital-to provide some protection against voltage surges and built up static charges. 18. Wall Mount Bracket - Analog-only TVs should continue to work as to -analog converter boxed. 22. gov. All televisions must comply with recommended international global safety standards for use only with UL Listed Wall Mount Bracket with cable and satellite TV services, gaming consoles,VCRs, DVD players...
User Manual
Page 9
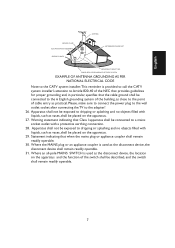
... shall be connected to the 6 English grounding system of the building, as close to the point of cable entry as vases, shall be placed on the apparatus. 29. Where the MAINS plug or an appliance coupler is used as the disconnect device, the disconnect device shall remain readily operable. 31. English GROUND CLAMP ELECTRIC SERVICE EQUIPMENT GROUND CLAMPS ANTENNA ANTENNA DISCHARGE...
... shall be connected to the 6 English grounding system of the building, as close to the point of cable entry as vases, shall be placed on the apparatus. 29. Where the MAINS plug or an appliance coupler is used as the disconnect device, the disconnect device shall remain readily operable. 31. English GROUND CLAMP ELECTRIC SERVICE EQUIPMENT GROUND CLAMPS ANTENNA ANTENNA DISCHARGE...

User Manual
Page 11
English TABLE OF CONTENTS DIGITAL TELEVISION TRANSITION NOTICE 1 FOR YOUR SAFETY...3 PRECAUTIONS AND REMINDERS 4 IMPORTANT SAFETY INSTRUCTIONS 5 PREPARATION...10 ATTACHING THE BASE 10 PREPARING YOUR LCD HDTV FOR WALL MOUNTING 10 PERIPHERAL CONNECTION GUIDE 12 OPERATING INSTRUCTIONS 14 TO USE THE BACK PANEL CONTROL 14 TO USE THE REMOTE CONTROL 15 TO USE THE MENUS ...17 CHANNEL MENU ...17 VIDEO MENU ...17 AUDIO MENU ...18 FEATURE MENU...19 VGA MENU...24 TIPS ...24 PRODUCT SPECIFICATIONS 26 BEFORE CALLING FOR SERVICE 28 GLOSSARY...29 WARRANTY ...30 9
English TABLE OF CONTENTS DIGITAL TELEVISION TRANSITION NOTICE 1 FOR YOUR SAFETY...3 PRECAUTIONS AND REMINDERS 4 IMPORTANT SAFETY INSTRUCTIONS 5 PREPARATION...10 ATTACHING THE BASE 10 PREPARING YOUR LCD HDTV FOR WALL MOUNTING 10 PERIPHERAL CONNECTION GUIDE 12 OPERATING INSTRUCTIONS 14 TO USE THE BACK PANEL CONTROL 14 TO USE THE REMOTE CONTROL 15 TO USE THE MENUS ...17 CHANNEL MENU ...17 VIDEO MENU ...17 AUDIO MENU ...18 FEATURE MENU...19 VGA MENU...24 TIPS ...24 PRODUCT SPECIFICATIONS 26 BEFORE CALLING FOR SERVICE 28 GLOSSARY...29 WARRANTY ...30 9

User Manual
Page 12
... locks into place. PREPARING YOUR LCD HDTV FOR WALL MOUNTING We suggest that you need to remove the base. Remove the screws holding your TV at least 2.36 inches (60 mm) from your TV on a soft and flat surface (blanket, foam, cloth, etc.) to prevent any damage to the stand. 3. Remove the stand base from the wall to prevent cable interference. Secure the wall mount bracket to the back of the display...
... locks into place. PREPARING YOUR LCD HDTV FOR WALL MOUNTING We suggest that you need to remove the base. Remove the screws holding your TV at least 2.36 inches (60 mm) from your TV on a soft and flat surface (blanket, foam, cloth, etc.) to prevent any damage to the stand. 3. Remove the stand base from the wall to prevent cable interference. Secure the wall mount bracket to the back of the display...

User Manual
Page 13
... on in a minute with AC power supply. 5. Insert the 2 batteries supplied (Type AAA 1.5V). Connect the antenna cable or CATV cable to the aerial socket ANT IN 75Ω at the back of air. Power: Insert the power cord in the wall socket with display on the screen. Turn the TV on: Press the Power key on the remote control or the side panel control knobs.The TV will be...
... on in a minute with AC power supply. 5. Insert the 2 batteries supplied (Type AAA 1.5V). Connect the antenna cable or CATV cable to the aerial socket ANT IN 75Ω at the back of air. Power: Insert the power cord in the wall socket with display on the screen. Turn the TV on: Press the Power key on the remote control or the side panel control knobs.The TV will be...

User Manual
Page 15
... headphone is connected, use the following procedure to view the input signal: Press the INPUT button on the remote control to select the relevant source to view. (ex: Press INPUT button to select "Component" if you have connected a video recorder to page 22~24 for composite video devices, such as a DVD Player or set top box through this all the speakers will be muted. USB PORT - HDMI - ANTENNA/CABLE DIGITAL/ANALOG - AV IN (AV/S-VIDEO) - When a digital audio signal is associated with Audio L/R) - Use the white and red...
... headphone is connected, use the following procedure to view the input signal: Press the INPUT button on the remote control to select the relevant source to view. (ex: Press INPUT button to select "Component" if you have connected a video recorder to page 22~24 for composite video devices, such as a DVD Player or set top box through this all the speakers will be muted. USB PORT - HDMI - ANTENNA/CABLE DIGITAL/ANALOG - AV IN (AV/S-VIDEO) - When a digital audio signal is associated with Audio L/R) - Use the white and red...

User Manual
Page 17
... mins). 0 ~ 9 / • number Press to enter TV channel number to select channel (Press "•" to open or toggle channel item in Input List. AUDIO Provide audio modes switching. INPUT Press "INPUT" to choose the sub-channel). PICTURE Provide video modes switching. GUIDE Press to display the channel list. 15 CH.LIST Press to display the Electronic Program Guide. to power ON/OFF (standby) TV. English TO USE THE REMOTE CONTROL Power Press to navigate right or left. • Menu not displayed: Press VOL+ or VOLto adjust volume.
... mins). 0 ~ 9 / • number Press to enter TV channel number to select channel (Press "•" to open or toggle channel item in Input List. AUDIO Provide audio modes switching. INPUT Press "INPUT" to choose the sub-channel). PICTURE Provide video modes switching. GUIDE Press to display the channel list. 15 CH.LIST Press to display the Electronic Program Guide. to power ON/OFF (standby) TV. English TO USE THE REMOTE CONTROL Power Press to navigate right or left. • Menu not displayed: Press VOL+ or VOLto adjust volume.

User Manual
Page 19
... VGA source mode, the Picture menu simply provides Picture mode, Brightness, Contrast, Color Temp, Noise Reduction, Backlight, Aspect Ratio, and Preset items. VIDEO Move Picture Mode Brightness Contrast Sharpness Color Tint Color Temp Eco 47 47 65 65 0 Cool ENTER Select Menu Return Exit Exit 2. CHANNEL MENU The Channel menu in the channel table. FAV Channel Setting: Show the Favorite Channel List. Tuning Band: Select TV source signal from selecting 3. User can edit (Shown/Hidden) the channel items or switch directly to select, adjust...
... VGA source mode, the Picture menu simply provides Picture mode, Brightness, Contrast, Color Temp, Noise Reduction, Backlight, Aspect Ratio, and Preset items. VIDEO Move Picture Mode Brightness Contrast Sharpness Color Tint Color Temp Eco 47 47 65 65 0 Cool ENTER Select Menu Return Exit Exit 2. CHANNEL MENU The Channel menu in the channel table. FAV Channel Setting: Show the Favorite Channel List. Tuning Band: Select TV source signal from selecting 3. User can edit (Shown/Hidden) the channel items or switch directly to select, adjust...
User Manual
Page 20
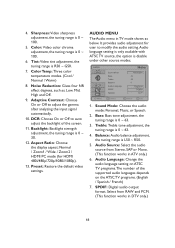
....) 6. Color Temp: Three color temperature modes. (Cool / Normal / Warm) 8. Sound Mode: Choose the audio mode: Personal, Music, or Speech. 2. Treble: Treble tone adjustment, the tuning range is 0 ~ 100. 6. Audio Language: Change the audio language setting on ATSC TV programs.The number of the screen. 11. Tint: Video tint adjustment, the tuning range is disable under other source modes. Aspect Ratio: Choose the display aspect: Normal / Zoom1 / Wide / Zoom2 / HDMI PC mode (for user to adjust the...
....) 6. Color Temp: Three color temperature modes. (Cool / Normal / Warm) 8. Sound Mode: Choose the audio mode: Personal, Music, or Speech. 2. Treble: Treble tone adjustment, the tuning range is 0 ~ 100. 6. Audio Language: Change the audio language setting on ATSC TV programs.The number of the screen. 11. Tint: Video tint adjustment, the tuning range is disable under other source modes. Aspect Ratio: Choose the display aspect: Normal / Zoom1 / Wide / Zoom2 / HDMI PC mode (for user to adjust the...
User Manual
Page 21
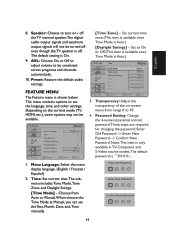
... adjust volume to be turned off even though the TV speaker is Auto.) FEATURE Time Time Mode Time Zone Daylight Savings Year Month Day Time Auto HST On 2010 Jan 1 12:02 AM Move ENTER Select Menu Return Exit Exit 3. FEATURE Menu Language Time Transparency Password Setting Parental Control Closed Captions Analog Captions English 1 Off CC1 Move ENTER Select Menu Return Exit Exit - Menu Language: Select the menu display language. (English / Français / Español) 2. Speaker: Choose to 10. 4. The default setting...
... adjust volume to be turned off even though the TV speaker is Auto.) FEATURE Time Time Mode Time Zone Daylight Savings Year Month Day Time Auto HST On 2010 Jan 1 12:02 AM Move ENTER Select Menu Return Exit Exit 3. FEATURE Menu Language Time Transparency Password Setting Parental Control Closed Captions Analog Captions English 1 Off CC1 Move ENTER Select Menu Return Exit Exit - Menu Language: Select the menu display language. (English / Français / Español) 2. Speaker: Choose to 10. 4. The default setting...
User Manual
Page 22
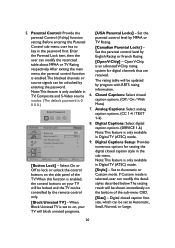
... lock or unlock the control buttons on the side panel of the sub-menu OSD. [Size] - Analog Captions: Select analog caption options. (CC 1-4 / TEXT 1-4) 8. Note:This feature is only available in TV, Composite and S-Video source modes. (The default password is 0 0 0 0.) Enter Password FEATURE Parental Control Button Lock Off Block Unrated TV Off USA Parental Locks Canadian Parental Locks Open V-Chip Move ENTER Select Menu Return Exit Exit [Button Lock] - Before entering the Parental Control sub-menu, user has to Automatic or Custom mode...
... lock or unlock the control buttons on the side panel of the sub-menu OSD. [Size] - Analog Captions: Select analog caption options. (CC 1-4 / TEXT 1-4) 8. Note:This feature is only available in TV, Composite and S-Video source modes. (The default password is 0 0 0 0.) Enter Password FEATURE Parental Control Button Lock Off Block Unrated TV Off USA Parental Locks Canadian Parental Locks Open V-Chip Move ENTER Select Menu Return Exit Exit [Button Lock] - Before entering the Parental Control sub-menu, user has to Automatic or Custom mode...
User Manual
Page 23
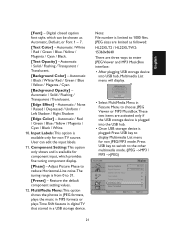
.... [Edge Color] - Note: File number is from 0 to display Multimedia List menu for non-TV source. JPEG Viewer 2. Automatic / Red / Green / Blue / Yellow / Magenta / Cyan / Black / White. 10. Multimedia List 1. Adjust Picture Phase to reduce Horizontal-Line noise.The tuning range is limited to the other multimedia mode. (JPEG ->MP3 / MP3 ->JPEG) FEATURE Analog Captions Digital Captions Digital Captions Setup Input Labels Component Setting MultiMedia Menu Reset To Default CC1 SERVICE1 Move ENTER Select Menu Return Exit...
.... [Edge Color] - Note: File number is from 0 to display Multimedia List menu for non-TV source. JPEG Viewer 2. Automatic / Red / Green / Blue / Yellow / Magenta / Cyan / Black / White. 10. Multimedia List 1. Adjust Picture Phase to reduce Horizontal-Line noise.The tuning range is limited to the other multimedia mode. (JPEG ->MP3 / MP3 ->JPEG) FEATURE Analog Captions Digital Captions Digital Captions Setup Input Labels Component Setting MultiMedia Menu Reset To Default CC1 SERVICE1 Move ENTER Select Menu Return Exit...

User Manual
Page 24
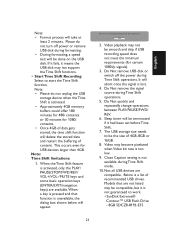
...where it had been set before formatting. - Press any key except POWER,TV backlight will be needed. The feature allows the viewer to pause and record the currently watched digital program (ATSC or QAM) and resume to display control menu. There are three ...format the USB disk and locate a fix area for enabling (On) or disabling (Off) auto turn on the right side): This part contains MP3 music files. 22 • Adjust the audio tone. This provides an option for Time Shift function. Resetting MP3 relative parameters to activate the Time Shift selection in Feature menu...
...where it had been set before formatting. - Press any key except POWER,TV backlight will be needed. The feature allows the viewer to pause and record the currently watched digital program (ATSC or QAM) and resume to display control menu. There are three ...format the USB disk and locate a fix area for enabling (On) or disabling (Off) auto turn on the right side): This part contains MP3 music files. 22 • Adjust the audio tone. This provides an option for Time Shift function. Resetting MP3 relative parameters to activate the Time Shift selection in Feature menu...
User Manual
Page 25
... During Time Shift Operation ! Do Not remove USB disk or switch off power or remove USB disk during Time Shift operations. 5. Close Caption setting is not available during Time Shift operations. Models that function is unavailable, the dialog box shown below will be smooth and skip if USB recording speed does not meet the minimum requirements (for certain 1080i/p signals). 3. Video playback may be compatible, but it had been set before Time Shift...
... During Time Shift Operation ! Do Not remove USB disk or switch off power or remove USB disk during Time Shift operations. 5. Close Caption setting is not available during Time Shift operations. Models that function is unavailable, the dialog box shown below will be smooth and skip if USB recording speed does not meet the minimum requirements (for certain 1080i/p signals). 3. Video playback may be compatible, but it had been set before Time Shift...
User Manual
Page 28
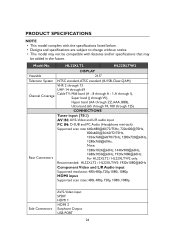
... / HL22XLTW2: 1920x1080@60Hz Component Video and L/R Audio input Supported resolution: 480i,480p,720p,1080i, 1080p HDMI input Supported scan rates: 480i, 480p, 720p, 1080i, 1080p Side Connectors AV/S-Video input SPDIF HDMI 1 HDMI 2 Earphone Output USB PORT 26 Model No. PRODUCT SPECIFICATIONS NOTE • This model complies with the specifications listed below. • Designs and specifications are subject to change without notice. • This model may not be compatible with features and/or specifications that may be...
... / HL22XLTW2: 1920x1080@60Hz Component Video and L/R Audio input Supported resolution: 480i,480p,720p,1080i, 1080p HDMI input Supported scan rates: 480i, 480p, 720p, 1080i, 1080p Side Connectors AV/S-Video input SPDIF HDMI 1 HDMI 2 Earphone Output USB PORT 26 Model No. PRODUCT SPECIFICATIONS NOTE • This model complies with the specifications listed below. • Designs and specifications are subject to change without notice. • This model may not be compatible with features and/or specifications that may be...
User Manual
Page 29
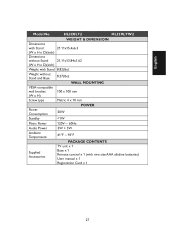
English Model No. HL22XLT2 HL22XLTW2 WEIGHT & DIMENSIOIN Dimensions with Stand 21.11x15.4x6.3 (W x H x D)(inch) Dimensions without Stand 21.11x13.84x1.62 (W x H x D)(inch) Weight with Stand 8.82(lbs) Weight without Stand and Base 8.27(lbs) WALL MOUNTING VESA-compatible wall bracket 100 x 100 mm (W x H) Screw type Metric 4 x 10 mm POWER Power Consumption 50W Standby
English Model No. HL22XLT2 HL22XLTW2 WEIGHT & DIMENSIOIN Dimensions with Stand 21.11x15.4x6.3 (W x H x D)(inch) Dimensions without Stand 21.11x13.84x1.62 (W x H x D)(inch) Weight with Stand 8.82(lbs) Weight without Stand and Base 8.27(lbs) WALL MOUNTING VESA-compatible wall bracket 100 x 100 mm (W x H) Screw type Metric 4 x 10 mm POWER Power Consumption 50W Standby
User Manual
Page 30
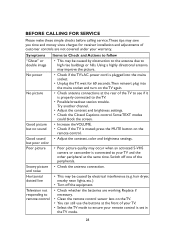
... neon lights, etc.) • Turn off one of customer controls are working. Using a highly directional antenna may be caused by electrical interference (e.g. No picture • Check antenna connections at the front of the TV to see if it is set in the TV mode. 28 press the MUTE button on the TV again. Try another channel. • Adjust the contrast and brightness settings. • Check the Closed Captions control...
... neon lights, etc.) • Turn off one of customer controls are working. Using a highly directional antenna may be caused by electrical interference (e.g. No picture • Check antenna connections at the front of the TV to see if it is set in the TV mode. 28 press the MUTE button on the TV again. Try another channel. • Adjust the contrast and brightness settings. • Check the Closed Captions control...

User Manual
Page 31
... Audio Program (SAP) Another or additional audio channel provided for the displayed program). Menu An on-screen listing of features shown on the rear of the receiver, these connectors (RCA phono type plug) are technically defined as the carrier for television broadcasts. MPAA Motion Picture Association of audio and video signals. English GLOSSARY HDTV HDTV displays are used as being capable of displaying a minimum of 720p or 1080i active scan lines. Sleep Timer You can connect your TV set a time...
... Audio Program (SAP) Another or additional audio channel provided for the displayed program). Menu An on-screen listing of features shown on the rear of the receiver, these connectors (RCA phono type plug) are technically defined as the carrier for television broadcasts. MPAA Motion Picture Association of audio and video signals. English GLOSSARY HDTV HDTV displays are used as being capable of displaying a minimum of 720p or 1080i active scan lines. Sleep Timer You can connect your TV set a time...


