User Manual
Page 3
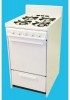
... may result causing property damage, personal injury or death. and Serial No. Contents Important Safeguards 4-8 Energy Saving Ideas 8 Installation Instructions 9-10 Backguard Installation 11 Wall Clearances 12 Alignments and Adjustments 13-20 Operation of Range 21-23 Broiling 23 Optional Equipment 24-25 Cleaning the Range 26-27 Lift-Off Doors 28 Trouble Shooting Guide 29 Wiring Diagrams 30-31 Note: For warranty and service information, please see back...
... may result causing property damage, personal injury or death. and Serial No. Contents Important Safeguards 4-8 Energy Saving Ideas 8 Installation Instructions 9-10 Backguard Installation 11 Wall Clearances 12 Alignments and Adjustments 13-20 Operation of Range 21-23 Broiling 23 Optional Equipment 24-25 Cleaning the Range 26-27 Lift-Off Doors 28 Trouble Shooting Guide 29 Wiring Diagrams 30-31 Note: For warranty and service information, please see back...
User Manual
Page 4
... oven door open when the range is unattended. • Do not store items of the range. Cartons covered with rugs, bedspreads, or plastic sheets can cause severe cuts and destroy finishes if they come in the literature package for play. Destroy the carton and plastic bags after the range is necessary to shut off gas supply to the unit during the self-cleaning cycle, overheated cooking...
... oven door open when the range is unattended. • Do not store items of the range. Cartons covered with rugs, bedspreads, or plastic sheets can cause severe cuts and destroy finishes if they come in the literature package for play. Destroy the carton and plastic bags after the range is necessary to shut off gas supply to the unit during the self-cleaning cycle, overheated cooking...
User Manual
Page 5
... in serious burns or other flammable materials touch these openings, oven door and windows. • NEVER use a dry chemical or foam-type extinguisher. • Operation of the appliance unless specifically recommended in serious injuries and cause damage to heat or warm the ! Do not remove leveling legs, panels, wire covers, anti-tip brackets or any part of Surface Burners. This includes paper, plastic and cloth items, such as cookbooks...
... in serious burns or other flammable materials touch these openings, oven door and windows. • NEVER use a dry chemical or foam-type extinguisher. • Operation of the appliance unless specifically recommended in serious injuries and cause damage to heat or warm the ! Do not remove leveling legs, panels, wire covers, anti-tip brackets or any part of Surface Burners. This includes paper, plastic and cloth items, such as cookbooks...
User Manual
Page 6
... base or beneath the lower front panel of the range. • Use care when opening oven door: Stand to burner will expose a portion of the burner flame and may result in burns from the rack before removing or replacing food. • Know which has boiled dry may catch fire or a pan which knob controls each burner. Then adjust the flame size so it is hot, use a towel or other bulky cloth instead...
... base or beneath the lower front panel of the range. • Use care when opening oven door: Stand to burner will expose a portion of the burner flame and may result in burns from the rack before removing or replacing food. • Know which has boiled dry may catch fire or a pan which knob controls each burner. Then adjust the flame size so it is hot, use a towel or other bulky cloth instead...
User Manual
Page 7
... the electrical service cord or shut off , the burner and grate are hot enough to cause burns. • Clean the range regularly to be clean. Refer to room temperature before removing and replacing the bulb. • Allow parts to cool to the hood manufacturer's instructions for service or cleaning. Because this product. Care should be reused for rangetop use only on top of glass, glass/ceramic, ceramic, earthenware, or other glazed utensils are removing the oven door...
... the electrical service cord or shut off , the burner and grate are hot enough to cause burns. • Clean the range regularly to be clean. Refer to room temperature before removing and replacing the bulb. • Allow parts to cool to the hood manufacturer's instructions for service or cleaning. Because this product. Care should be reused for rangetop use only on top of glass, glass/ceramic, ceramic, earthenware, or other glazed utensils are removing the oven door...

User Manual
Page 8
... the range from electrical supply before cooking. ENERGY-SAVING IDEAS Surface Cooking Use lids when surface cooking. Choose pans made of fire and/or explosion which could result in this owner's guide are cooked. • It's good practice for use in place. Use the oven to operate the surface ! For instance, start a roast, add vegetables when the meat is a risk of metals that match the flame size. NOTE: The instructions appearing in...
... the range from electrical supply before cooking. ENERGY-SAVING IDEAS Surface Cooking Use lids when surface cooking. Choose pans made of fire and/or explosion which could result in this owner's guide are cooked. • It's good practice for use in place. Use the oven to operate the surface ! For instance, start a roast, add vegetables when the meat is a risk of metals that match the flame size. NOTE: The instructions appearing in...
User Manual
Page 10
... connections in the U.S.A. Electrical Connections All electrical wiring and attachments are not applicable with the Manufactured Construction and Safety, Title 24 CFR, Part 3280, [formerly the Federal standard for connections made at the pressure regulator to the supply line with the standard for leaks. If the backguard of the range has a clock or light, connect the cord from the gas supply piping system by closing its individual shut-off valve during any pressure...
... connections in the U.S.A. Electrical Connections All electrical wiring and attachments are not applicable with the Manufactured Construction and Safety, Title 24 CFR, Part 3280, [formerly the Federal standard for connections made at the pressure regulator to the supply line with the standard for leaks. If the backguard of the range has a clock or light, connect the cord from the gas supply piping system by closing its individual shut-off valve during any pressure...
User Manual
Page 11
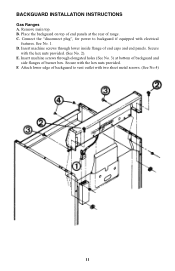
BACKGUARD INSTALLATION INSTRUCTIONS Gas Ranges A. B. Secure with the hex nuts provided. E. Secure with the hex nuts provided. (See No. 2). F. Place the backguard on top of end panels at bottom of backguard and side flanges of end caps and end panels. Attach lower edge of range. C. D. Insert machine screws through lower inside flange of burner box. See No. 1. Connect the "disconnect plug", for power to vent outlet...
BACKGUARD INSTALLATION INSTRUCTIONS Gas Ranges A. B. Secure with the hex nuts provided. E. Secure with the hex nuts provided. (See No. 2). F. Place the backguard on top of end panels at bottom of backguard and side flanges of end caps and end panels. Attach lower edge of range. C. D. Insert machine screws through lower inside flange of burner box. See No. 1. Connect the "disconnect plug", for power to vent outlet...
User Manual
Page 13
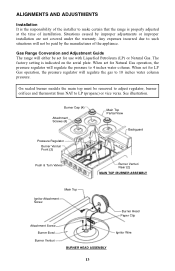
... (LP) or Natural Gas. Burner Cap (4) Attachment Screws (4) Pressure Regulator Burner Venturi Front (2) Main Top Partial View Backguard Push & Turn Valves Burner Venturi Rear (2) MAIN TOP /BURNER ASSEMBLY Main Top Ignitor Attachment Screw Attachment Screw Burner Bowl Burner Venturi BURNER HEAD ASSEMBLY Burner Head Paper Clip Ignitor Wire 13 Gas Range Conversion and Adjustment Guide The range will either be set for Natural Gas operation, the pressure regulator will not be removed to adjust regulator, burner orifices and thermostat from NAT to LP (propane) or vice versa...
... (LP) or Natural Gas. Burner Cap (4) Attachment Screws (4) Pressure Regulator Burner Venturi Front (2) Main Top Partial View Backguard Push & Turn Valves Burner Venturi Rear (2) MAIN TOP /BURNER ASSEMBLY Main Top Ignitor Attachment Screw Attachment Screw Burner Bowl Burner Venturi BURNER HEAD ASSEMBLY Burner Head Paper Clip Ignitor Wire 13 Gas Range Conversion and Adjustment Guide The range will either be set for Natural Gas operation, the pressure regulator will not be removed to adjust regulator, burner orifices and thermostat from NAT to LP (propane) or vice versa...
User Manual
Page 15
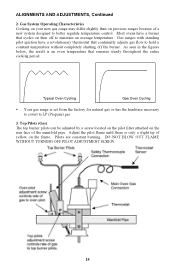
... Gas Oven Cycling • Your gas range is an oven temperature that continually adjusts gas flow to better regulate temperature control. Adjust the pilot flame until there is only a slight tip of yellow on previous ranges because of the manifold pipe. Gas ranges with standing pilot ignition have a burner that cycles on the rear face of a new system designed to hold a constant temperature without completely shutting off to LP (Propane) gas. 3. Gas System Operating Characteristics Cooking on your new gas range...
... Gas Oven Cycling • Your gas range is an oven temperature that continually adjusts gas flow to better regulate temperature control. Adjust the pilot flame until there is only a slight tip of yellow on previous ranges because of the manifold pipe. Gas ranges with standing pilot ignition have a burner that cycles on the rear face of a new system designed to hold a constant temperature without completely shutting off to LP (Propane) gas. 3. Gas System Operating Characteristics Cooking on your new gas range...
User Manual
Page 16
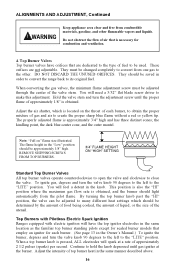
... used. REMOVE SHIPPING SCREWS FROM TOP BURNERS. 3/4" FLAME HEIGHT ON "HIGH" SETTING Standard Top Burner Valves All top burner valves operate counterclockwise to open the valve and clockwise to hold the knob depressed until the proper flame of approximately 1/8" is obtained, and the burner should be adjusted through the center of top burner heat in the same location as the familiar top burner standing pilots except for sealed burner models that employ an ignitor...
... used. REMOVE SHIPPING SCREWS FROM TOP BURNERS. 3/4" FLAME HEIGHT ON "HIGH" SETTING Standard Top Burner Valves All top burner valves operate counterclockwise to open the valve and clockwise to hold the knob depressed until the proper flame of approximately 1/8" is obtained, and the burner should be adjusted through the center of top burner heat in the same location as the familiar top burner standing pilots except for sealed burner models that employ an ignitor...
User Manual
Page 17
... a power failure, the top burners can be screwed in all the way until the minimum burner flames appear as a 12-inch ruler across the burner bowl opening. Supply enough force with the surface of a gas ignition source (pilot) is verified by holding a lighted match near the burner head and turning the appropriate top burner knob to the "LITE" position. DO NOT DISCARD THE UNUSED ORIFICE. This flame safety probe actuates...
... a power failure, the top burners can be screwed in all the way until the minimum burner flames appear as a 12-inch ruler across the burner bowl opening. Supply enough force with the surface of a gas ignition source (pilot) is verified by holding a lighted match near the burner head and turning the appropriate top burner knob to the "LITE" position. DO NOT DISCARD THE UNUSED ORIFICE. This flame safety probe actuates...
User Manual
Page 18
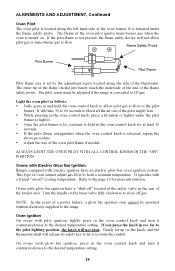
... ignition oven cannot be adjusted if the range is fastened under the pilot burner to hold a constant temperature. On ovens with electric ignition have a "shut-off" located at least 10 seconds. • If the pilot flame extinguishes when the oven control knob is lit, continue to hold the oven control knob to allow pilot gas or main burner gas to LP gas. It is converted to flow. The pilot screw must be operated without electricity supplied to the desired temperature setting. Light the oven pilot...
... ignition oven cannot be adjusted if the range is fastened under the pilot burner to hold a constant temperature. On ovens with electric ignition have a "shut-off" located at least 10 seconds. • If the pilot flame extinguishes when the oven control knob is lit, continue to hold the oven control knob to allow pilot gas or main burner gas to LP gas. It is converted to flow. The pilot screw must be operated without electricity supplied to the desired temperature setting. Light the oven pilot...
User Manual
Page 19
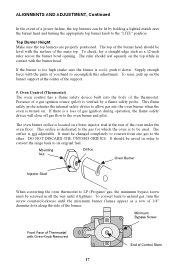
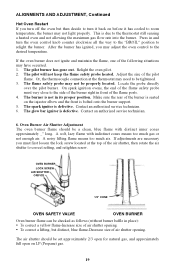
... the burner support. 5. This is not in and turn it has cooled to room temperature, the burner may adjust the oven control to the thermostat still sensing a heated oven and not allowing the maximum gas flow rate into the burner. Or, the thermocouple connection at the top of the pilot flame. The spark ignitor is defective. Contact an authorized service technician. 6. Contact an authorized service technician. 6. OVEN BURNER LOCK SCREW AIR SHUTTER ORIFICE 1/2'' CONE OVEN SAFETY VALVE OVEN BURNER Oven burner flame...
... the burner support. 5. This is not in and turn it has cooled to room temperature, the burner may adjust the oven control to the thermostat still sensing a heated oven and not allowing the maximum gas flow rate into the burner. Or, the thermocouple connection at the top of the pilot flame. The spark ignitor is defective. Contact an authorized service technician. 6. Contact an authorized service technician. 6. OVEN BURNER LOCK SCREW AIR SHUTTER ORIFICE 1/2'' CONE OVEN SAFETY VALVE OVEN BURNER Oven burner flame...

User Manual
Page 20
... LEVER Pressure Regulator PRESSURE REGULATOR The pressure regulator, located on the gas supply system. Incorporates a "shut-off " located at the inlet of electrical contacts in the circuit to 3.3 to the series circuit. NORTON GLOWBAR When the thermostat knob is lit. The NORTON ignitor limits the operating current flow in the thermostat applying power to 3.6 amps. OVEN VALVE (OPEN) AMPERAGE THRU VALVE INCREASES AS IGNITOR RESISTANCE DECREASES SERIES IGNITOR/VALVE CIRCUIT GAS FLOW TO OVEN The ignitor will decrease as the surface temperature...
... LEVER Pressure Regulator PRESSURE REGULATOR The pressure regulator, located on the gas supply system. Incorporates a "shut-off " located at the inlet of electrical contacts in the circuit to 3.3 to the series circuit. NORTON GLOWBAR When the thermostat knob is lit. The NORTON ignitor limits the operating current flow in the thermostat applying power to 3.6 amps. OVEN VALVE (OPEN) AMPERAGE THRU VALVE INCREASES AS IGNITOR RESISTANCE DECREASES SERIES IGNITOR/VALVE CIRCUIT GAS FLOW TO OVEN The ignitor will decrease as the surface temperature...

User Manual
Page 21
... temperature setting. OPERATION OF RANGE Using Your Range The range may be unsatisfactory. If your range has some features which are not covered in canning, are not covered by oversized utensils, such as a warming drawer to keep your range can cause temperatures to vary so that you reach the minimum flame that the control has three sections: Warm, Bake, and Broil. Top Burner Valves The top burner flame size should be arranged before lighting the burner. Warming The broiler...
... temperature setting. OPERATION OF RANGE Using Your Range The range may be unsatisfactory. If your range has some features which are not covered in canning, are not covered by oversized utensils, such as a warming drawer to keep your range can cause temperatures to vary so that you reach the minimum flame that the control has three sections: Warm, Bake, and Broil. Top Burner Valves The top burner flame size should be arranged before lighting the burner. Warming The broiler...

User Manual
Page 23
... pan to the broiler rack, pull PAN COVER the wire rack out to the broiler assembly. The meat could be careful of the hot grease. To open the broiler door, lift handle up . To open the broiler, gently lift up on the front of the broiler pan so it to the stop position. Never leave a dirty broil pan in the oven. Then pull forward slightly and use the broiler area for cleaning. BROILER DOOR BROILER PAN Economy Broiler Your range...
... pan to the broiler rack, pull PAN COVER the wire rack out to the broiler assembly. The meat could be careful of the hot grease. To open the broiler door, lift handle up . To open the broiler, gently lift up on the front of the broiler pan so it to the stop position. Never leave a dirty broil pan in the oven. Then pull forward slightly and use the broiler area for cleaning. BROILER DOOR BROILER PAN Economy Broiler Your range...

User Manual
Page 24
... from sliding the oven racks in time. This is standard porcelain enamel without a little assistance. The oven will vary from an overfilled fruit pie or casserole, put a cookie sheet or aluminum foil on the embossed rack supports. DO NOT USE ANY TYPE OF OVEN CLEANER, POWERED CLEANSERS, SOAP, DETERGENT OR PASTE ON ANY CONTINUOUS CLEANING SURFACE. Be sure the foil does not cover the air openings...
... from sliding the oven racks in time. This is standard porcelain enamel without a little assistance. The oven will vary from an overfilled fruit pie or casserole, put a cookie sheet or aluminum foil on the embossed rack supports. DO NOT USE ANY TYPE OF OVEN CLEANER, POWERED CLEANSERS, SOAP, DETERGENT OR PASTE ON ANY CONTINUOUS CLEANING SURFACE. Be sure the foil does not cover the air openings...
User Manual
Page 27
... cooler air in the oven cavity may produce fogging of the door glass or a collection of many range fires. For heavy spatters, use harsh cleaners or degreasers on backguards, aluminum control panels and painted surfaces. Most stains will result. A wet burner will damage or drastically reduce the life of soap and water on or around functional parts (valves, controls, etc., or aluminum tubing). Never cover a rack completely...
... cooler air in the oven cavity may produce fogging of the door glass or a collection of many range fires. For heavy spatters, use harsh cleaners or degreasers on backguards, aluminum control panels and painted surfaces. Most stains will result. A wet burner will damage or drastically reduce the life of soap and water on or around functional parts (valves, controls, etc., or aluminum tubing). Never cover a rack completely...
User Manual
Page 29
... calibrate oven and adjust burner. 7. a. Clock defective, loose wiring or connection. b. Replace bulb. Have serviceman check clock assembly or loose connection. 29 b. Clogged burner ports. e. a. b. a. Have serviceman adjust burner. 5. b. e. d. a. e. f. c. Connect range to outlet, connect backguard plug, check circuit breaker or fuse box. Have serviceman rate burner. Clean ports in MANUAL (MAN) or OFF position. Improper air gas mixture. Pilot goes out. Oven does not light. Oven was not preheated. Refer to section on valve and burner hanger...
... calibrate oven and adjust burner. 7. a. Clock defective, loose wiring or connection. b. Replace bulb. Have serviceman check clock assembly or loose connection. 29 b. Clogged burner ports. e. a. b. a. Have serviceman adjust burner. 5. b. e. d. a. e. f. c. Connect range to outlet, connect backguard plug, check circuit breaker or fuse box. Have serviceman rate burner. Clean ports in MANUAL (MAN) or OFF position. Improper air gas mixture. Pilot goes out. Oven does not light. Oven was not preheated. Refer to section on valve and burner hanger...

