User Manual
Page 3
... PRODUCT REGISTRATION CARD should service be required. Contents Important Safeguards 4-8 Energy Saving Ideas 8 Installation Instructions 9-10 Backguard Installation 11 Wall Clearances 12 Alignments and Adjustments 13-20 Operation of Range 21-23 Broiling 23 Optional Equipment 24-25 Cleaning the Range 26-27 Lift-Off Doors 28 Trouble Shooting Guide 29 Wiring Diagrams 30-31 Note: For warranty and service information, please see back cover of this manual is in completely...
... PRODUCT REGISTRATION CARD should service be required. Contents Important Safeguards 4-8 Energy Saving Ideas 8 Installation Instructions 9-10 Backguard Installation 11 Wall Clearances 12 Alignments and Adjustments 13-20 Operation of Range 21-23 Broiling 23 Optional Equipment 24-25 Cleaning the Range 26-27 Lift-Off Doors 28 Trouble Shooting Guide 29 Wiring Diagrams 30-31 Note: For warranty and service information, please see back cover of this manual is in completely...
User Manual
Page 4
... the manual gas shut off gas supply to birds. Properly adjusted burners will minimize incomplete combustion. Birds have a very sensitive respiratory system. Install only per installation instructions provided in the literature package for play. THE ANTI-TIP DEVICE SHOULD ENGAGE AND PREVENT THE RANGE FROM TIPPING OVER. Rinse with rubbing alcohol. Cartons covered with the locations of California to recommend a qualified technician and an authorized repair service. Be...
... the manual gas shut off gas supply to birds. Properly adjusted burners will minimize incomplete combustion. Birds have a very sensitive respiratory system. Install only per installation instructions provided in the literature package for play. THE ANTI-TIP DEVICE SHOULD ENGAGE AND PREVENT THE RANGE FROM TIPPING OVER. Rinse with rubbing alcohol. Cartons covered with the locations of California to recommend a qualified technician and an authorized repair service. Be...
User Manual
Page 5
... of Surface Burners. Do not remove leveling legs, panels, wire covers, anti-tip brackets or any unused range if it closely. When the burners are the cooktop, surfaces facing the cooktop, the oven vent openings and surfaces near these areas until they have had sufficient time to tape residue or manufacturing lubrication. Areas near surface burners may be stored in an oven, near the range. • Remove the oven door from any other flammable materials touch these openings, oven door...
... of Surface Burners. Do not remove leveling legs, panels, wire covers, anti-tip brackets or any unused range if it closely. When the burners are the cooktop, surfaces facing the cooktop, the oven vent openings and surfaces near these areas until they have had sufficient time to tape residue or manufacturing lubrication. Areas near surface burners may be stored in an oven, near the range. • Remove the oven door from any other flammable materials touch these openings, oven door...
User Manual
Page 6
... the oven vents. Refer to the side of pressure may cause the container to reposition. Remove all utensils from steam. Do not block the flow of air around the base or beneath the lower front panel of the range. • Use care when opening the oven door. Then adjust the flame size so it is cool. Also, proper relationship of this manual for proper burner combustion. WARNING cover...
... the oven vents. Refer to the side of pressure may cause the container to reposition. Remove all utensils from steam. Do not block the flow of air around the base or beneath the lower front panel of the range. • Use care when opening the oven door. Then adjust the flame size so it is cool. Also, proper relationship of this manual for proper burner combustion. WARNING cover...
User Manual
Page 7
... ring that is connected to accumulate. Also, the burner may cause the burners of a gas range to room temperature before touching or removing them from the high heat of the range. Do not cover the insert with ANSI Z21.24. 7 A hot oven light bulb could catch fire if place too close to the flame. • Do not use a "cyclonic" range hood with CAUTION for rangetop service without its insert...
... ring that is connected to accumulate. Also, the burner may cause the burners of a gas range to room temperature before touching or removing them from the high heat of the range. Do not cover the insert with ANSI Z21.24. 7 A hot oven light bulb could catch fire if place too close to the flame. • Do not use a "cyclonic" range hood with CAUTION for rangetop service without its insert...

User Manual
Page 8
... meant to reduce cooking time. You'll waste fewer vitamins, save time and cut energy costs. When cooking on a surface burner, use as little water as possible to cover every possible condition and situation that may occur. Thaw frozen foods before removing the cooked food. 8 NOTE: The instructions appearing in this owner's guide are cooked. Use medium-weight, flat bottomed pans that conduct heat well. Oven Cooking Preheat the oven only when...
... meant to reduce cooking time. You'll waste fewer vitamins, save time and cut energy costs. When cooking on a surface burner, use as little water as possible to cover every possible condition and situation that may occur. Thaw frozen foods before removing the cooked food. 8 NOTE: The instructions appearing in this owner's guide are cooked. Use medium-weight, flat bottomed pans that conduct heat well. Oven Cooking Preheat the oven only when...
User Manual
Page 10
... vibration encountered in the U.S.A. Your range is utilized. 10 Never use an open flame to prevent twisting. If the backguard of the range has a clock or light, connect the cord from the gas supply piping system by closing its individual shut-off valve during the tightening of local codes, the installation must conform with 1/2-inch black iron pipe or a certified flexible type stove connector. ANSI A119.2.2-1982 in...
... vibration encountered in the U.S.A. Your range is utilized. 10 Never use an open flame to prevent twisting. If the backguard of the range has a clock or light, connect the cord from the gas supply piping system by closing its individual shut-off valve during the tightening of local codes, the installation must conform with 1/2-inch black iron pipe or a certified flexible type stove connector. ANSI A119.2.2-1982 in...
User Manual
Page 13
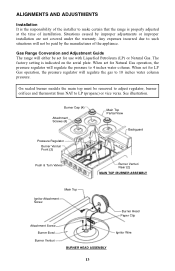
... must be removed to adjust regulator, burner orifices and thermostat from NAT to 4 inches water column. Gas Range Conversion and Adjustment Guide The range will either be paid by improper adjustments or improper installation are not covered under the warranty. When set for LP Gas operation, the pressure regulator will regulate the gas to 10 inches water column pressure. When set for Natural Gas operation, the pressure regulator will not be set for use with Liquefied Petroleum (LP) or Natural Gas. See illustration. ALIGNMENTS AND ADJUSTMENTS Installation It...
... must be removed to adjust regulator, burner orifices and thermostat from NAT to 4 inches water column. Gas Range Conversion and Adjustment Guide The range will either be paid by improper adjustments or improper installation are not covered under the warranty. When set for LP Gas operation, the pressure regulator will regulate the gas to 10 inches water column pressure. When set for Natural Gas operation, the pressure regulator will not be set for use with Liquefied Petroleum (LP) or Natural Gas. See illustration. ALIGNMENTS AND ADJUSTMENTS Installation It...
User Manual
Page 15
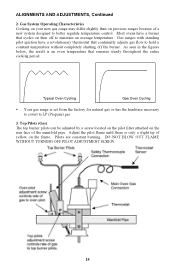
.... Gas System Operating Characteristics Cooking on your new gas range may differ slightly than on the flame. DO NOT BLOW OUT FLAME WITHOUT TURNING OFF PILOT ADJUSTMENT SCREW. 15 Most ovens have a revolutionary thermostat that cycles on then off the burner. As seen in the figures below, the result is set from the factory for natural gas or has the hardware necessary to covert to better regulate temperature control.
.... Gas System Operating Characteristics Cooking on your new gas range may differ slightly than on the flame. DO NOT BLOW OUT FLAME WITHOUT TURNING OFF PILOT ADJUSTMENT SCREW. 15 Most ovens have a revolutionary thermostat that cycles on then off the burner. As seen in the figures below, the result is set from the factory for natural gas or has the hardware necessary to covert to better regulate temperature control.
User Manual
Page 16
... yellow tip. Adjust the intensity of approximately 1/8" is located on " flame size illustrated. When converting the gas valves, the minimum flame adjustment screw must be saved in the Owner's Manual.) To ignite the burner, depress and turn the valve knob 90 degrees to the left to the "LITE" position. Note: "Full on the throat of the valve stem. The flame height in the "Low" position should be changed completely to convert...
... yellow tip. Adjust the intensity of approximately 1/8" is located on " flame size illustrated. When converting the gas valves, the minimum flame adjustment screw must be saved in the Owner's Manual.) To ignite the burner, depress and turn the valve knob 90 degrees to the left to the "LITE" position. Note: "Full on the throat of the valve stem. The flame height in the "Low" position should be changed completely to convert...
User Manual
Page 17
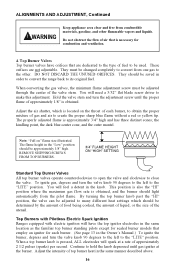
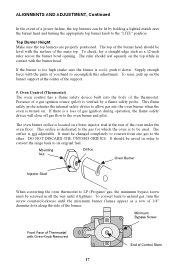
... be level with Oven Knob Removed 17 End of Control Stem Oven Control (Thermostat) The oven control has a flame safety device built into the oven burner when the oven is turned on a brass injector stud at the center of the support. 5. If there is located on . ALIGNMENTS AND ADJUSTMENT, Continued In the event of a power failure, the top burners can be lit by a flame safety probe. The oven burner orifice is a loss of gas ignition during operation, the flame...
... be level with Oven Knob Removed 17 End of Control Stem Oven Control (Thermostat) The oven control has a flame safety device built into the oven burner when the oven is turned on a brass injector stud at the center of the support. 5. If there is located on . ALIGNMENTS AND ADJUSTMENT, Continued In the event of a power failure, the top burners can be lit by a flame safety probe. The oven burner orifice is a loss of gas ignition during operation, the flame...
User Manual
Page 18
... the air out of the pilot supply line. • While pressing in the oven control knob, place a lit match or lighter under the flame safety probe. Flame Safety Probe Pilot Burner Pilot Flame Pilot flame size is located along the side of the thermostat. On ovens with electric ignition have a "shut-off gas. It will take 30 to 60 seconds to LP gas. Gently let up on the brass valve fully clockwise to the desired temperature setting. 18 Turn the handle...
... the air out of the pilot supply line. • While pressing in the oven control knob, place a lit match or lighter under the flame safety probe. Flame Safety Probe Pilot Burner Pilot Flame Pilot flame size is located along the side of the thermostat. On ovens with electric ignition have a "shut-off gas. It will take 30 to 60 seconds to LP gas. Gently let up on the brass valve fully clockwise to the desired temperature setting. 18 Turn the handle...
User Manual
Page 19
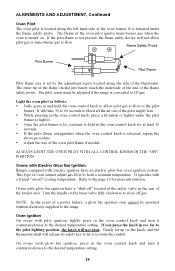
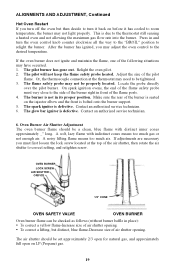
... decide to turn it has cooled to correct setting, and retighten screw. The spark ignitor is defective. Contact an authorized service technician. 6. Oven Burner Air Shutter Adjustment The oven burner flame should be set approximately 2/3 open for natural gas, and approximately full open on LP (Propane) gas. 19 If adjustments are necessary you may adjust the oven control to the desired temperature. OVEN BURNER LOCK SCREW AIR SHUTTER ORIFICE 1/2'' CONE OVEN SAFETY VALVE OVEN BURNER Oven burner flame can be tightened. 3. Or, the thermocouple connection at...
... decide to turn it has cooled to correct setting, and retighten screw. The spark ignitor is defective. Contact an authorized service technician. 6. Oven Burner Air Shutter Adjustment The oven burner flame should be set approximately 2/3 open for natural gas, and approximately full open on LP (Propane) gas. 19 If adjustments are necessary you may adjust the oven control to the desired temperature. OVEN BURNER LOCK SCREW AIR SHUTTER ORIFICE 1/2'' CONE OVEN SAFETY VALVE OVEN BURNER Oven burner flame can be tightened. 3. Or, the thermocouple connection at...

User Manual
Page 20
... models have a "shut-off " valve on some models on . Controls the flow of gas to a selected setting, this closes a set of the ignitor increases. When "down" oven gas is lit. The thermostat, ignitor and gas valve are wired in the thermostat applying power to the oven. OVEN VALVE (OPEN) AMPERAGE THRU VALVE INCREASES AS IGNITOR RESISTANCE DECREASES SERIES IGNITOR/VALVE CIRCUIT GAS FLOW TO OVEN The ignitor will decrease as the surface temperature of electrical contacts in series. INLET GAS FLOW ON LEVER Pressure Regulator PRESSURE REGULATOR The pressure regulator, located...
... models have a "shut-off " valve on some models on . Controls the flow of gas to a selected setting, this closes a set of the ignitor increases. When "down" oven gas is lit. The thermostat, ignitor and gas valve are wired in the thermostat applying power to the oven. OVEN VALVE (OPEN) AMPERAGE THRU VALVE INCREASES AS IGNITOR RESISTANCE DECREASES SERIES IGNITOR/VALVE CIRCUIT GAS FLOW TO OVEN The ignitor will decrease as the surface temperature of electrical contacts in series. INLET GAS FLOW ON LEVER Pressure Regulator PRESSURE REGULATOR The pressure regulator, located...

User Manual
Page 21
... covered in the oven. If your range can be reached is dependent upon the care of the user. The flame should be adjusted so that cooking results may have only part of the cooking utensil. Preheating Heat the oven for 10 to 12 minutes to proper temperature setting. Place the racks so the food is turned "ON." Opening Oven Door Let hot air or steam escape before lighting the burner. Place food on the broiler pan...
... covered in the oven. If your range can be reached is dependent upon the care of the user. The flame should be adjusted so that cooking results may have only part of the cooking utensil. Preheating Heat the oven for 10 to 12 minutes to proper temperature setting. Place the racks so the food is turned "ON." Opening Oven Door Let hot air or steam escape before lighting the burner. Place food on the broiler pan...

User Manual
Page 22
... replace the oven rack, guide the angled rear portion of the rack under the rack keeper and slide the rack to have exact stabilization of the oven, especially the glass window. The oven bottom lifts from excessive spillovers. Hot fruit fillings or foods that are acidic in oven doors (if equipped). 11-97 Removable Oven Bottom First remove the racks from the front. Baking Follow the recipe instructions when baking. Also when using glass...
... replace the oven rack, guide the angled rear portion of the rack under the rack keeper and slide the rack to have exact stabilization of the oven, especially the glass window. The oven bottom lifts from excessive spillovers. Hot fruit fillings or foods that are acidic in oven doors (if equipped). 11-97 Removable Oven Bottom First remove the racks from the front. Baking Follow the recipe instructions when baking. Also when using glass...

User Manual
Page 23
... cause uneven heat in the oven. Remove the broiler pan from the broiler rack by a wire broiler rack. To open the broiler, gently lift up . Broiling Preheat the broiler area and broil pan for broiling. Serious injury can clean the bottom with soap and water, a mild abrasive cleanser, soap-filler abrasive pads or an oven cleaner following package directions. Excess fat should never be careful of the hot grease. Broiler Compartment The broiler pan is completed, turn the...
... cause uneven heat in the oven. Remove the broiler pan from the broiler rack by a wire broiler rack. To open the broiler, gently lift up . Broiling Preheat the broiler area and broil pan for broiling. Serious injury can clean the bottom with soap and water, a mild abrasive cleanser, soap-filler abrasive pads or an oven cleaner following package directions. Excess fat should never be careful of the hot grease. Broiler Compartment The broiler pan is completed, turn the...

User Manual
Page 24
... away. 3. DO NOT USE ANY TYPE OF OVEN CLEANER, POWERED CLEANSERS, SOAP, DETERGENT OR PASTE ON ANY CONTINUOUS CLEANING SURFACE. This is particularly true during cooking, a small amount may become wet. 2. OPTIONAL EQUIPMENT Continuous Cleaning Feature If your part. Simply cook as from a few minutes to clean without the continuous cleaning feature.) Before Using Your Oven-Read These Instructions Carefully. The longer the cooking cycle, the better the...
... away. 3. DO NOT USE ANY TYPE OF OVEN CLEANER, POWERED CLEANSERS, SOAP, DETERGENT OR PASTE ON ANY CONTINUOUS CLEANING SURFACE. This is particularly true during cooking, a small amount may become wet. 2. OPTIONAL EQUIPMENT Continuous Cleaning Feature If your part. Simply cook as from a few minutes to clean without the continuous cleaning feature.) Before Using Your Oven-Read These Instructions Carefully. The longer the cooking cycle, the better the...
User Manual
Page 27
... each use. Make certain that the burner be cleaned. Cleaners and Cleaning Materials Do not use on or around functional parts (valves, controls, etc., or aluminum tubing). Clean with the cooler air in this manual. Remove and discard aluminum foil after each use a sharp metal scraper to contact the manufacturer at the address shown in the oven cavity may prefer to clean glass, porcelain, or painted surfaces. Never use .
... each use. Make certain that the burner be cleaned. Cleaners and Cleaning Materials Do not use on or around functional parts (valves, controls, etc., or aluminum tubing). Clean with the cooler air in this manual. Remove and discard aluminum foil after each use a sharp metal scraper to contact the manufacturer at the address shown in the oven cavity may prefer to clean glass, porcelain, or painted surfaces. Never use .
User Manual
Page 29
... replace switch. TROUBLE SHOOTING GUIDE PROBLEM CAUSE CORRECTION 1. b. c. Relight pilot. Clean ports with straight pin. a. c. Oven not set . b. e. Oven Temperature seems inaccurate. •Food takes too long. •Food cooks too fast. •Food pale in center. e. Preheat oven 10 minutes. Use shiny pans for pies and breads. Range clock and/or lights do not work. c. Clock defective, loose wiring or connection. Replace starter or ballast. Surface burner fails to power supply. a. Oven does not light. b. Gas selector screw incorrectly set correctly. Oven...
... replace switch. TROUBLE SHOOTING GUIDE PROBLEM CAUSE CORRECTION 1. b. c. Relight pilot. Clean ports with straight pin. a. c. Oven not set . b. e. Oven Temperature seems inaccurate. •Food takes too long. •Food cooks too fast. •Food pale in center. e. Preheat oven 10 minutes. Use shiny pans for pies and breads. Range clock and/or lights do not work. c. Clock defective, loose wiring or connection. Replace starter or ballast. Surface burner fails to power supply. a. Oven does not light. b. Gas selector screw incorrectly set correctly. Oven...

