

User Manual
Page 4
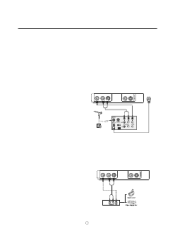
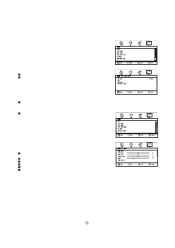
... turn on and off the TV. 2.MENU: Menu display. 3.INPUT: Press to access the input source mode.In the MENU/INPUT screen, these buttons serve as OK buttons. 4.VOL+/- : Press to adjust the volume .In the MENU screen, these jacks. 10.PC Audio In:Connect the audio L/R cables from a computer to this jack. 11.AUDIO OUT:Connect the audio L/R cables to your cable box. 1 T V component s Front and side panels MENU INPUT VOL+ VOL- To scan quickly through your audio equipment. 12.PC Video In:Connect a video cable from the remote control. R PC/DVI AUDIO...
... turn on and off the TV. 2.MENU: Menu display. 3.INPUT: Press to access the input source mode.In the MENU/INPUT screen, these buttons serve as OK buttons. 4.VOL+/- : Press to adjust the volume .In the MENU screen, these jacks. 10.PC Audio In:Connect the audio L/R cables from a computer to this jack. 11.AUDIO OUT:Connect the audio L/R cables to your cable box. 1 T V component s Front and side panels MENU INPUT VOL+ VOL- To scan quickly through your audio equipment. 12.PC Video In:Connect a video cable from the remote control. R PC/DVI AUDIO...
User Manual
Page 7
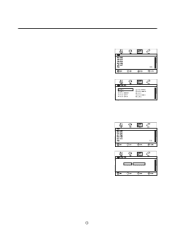
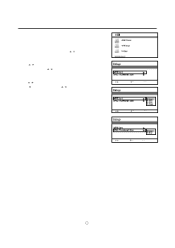
... ways to confirm. Connection Option 1 Set VCR output switch to channel 3 or 4 and then tune the TV to the TV input jacks, as shown in the figure. Connect the audio and video cables from the VCR's output jacks to the same channel number. Insert a video tape into the VCR and press PLAY on the remote control, and then press CH+/- R L R ANT IN VCR External A/V Source Setup VIDEO AV IN L -AUDIO- button to the VCR owner`s manual.) 3. VCR connection To avoid picture noise (interference), leave...
... ways to confirm. Connection Option 1 Set VCR output switch to channel 3 or 4 and then tune the TV to the TV input jacks, as shown in the figure. Connect the audio and video cables from the VCR's output jacks to the same channel number. Insert a video tape into the VCR and press PLAY on the remote control, and then press CH+/- R L R ANT IN VCR External A/V Source Setup VIDEO AV IN L -AUDIO- button to the VCR owner`s manual.) 3. VCR connection To avoid picture noise (interference), leave...
User Manual
Page 8
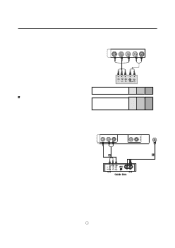
... DVD only has an S-VIDEO output jack, connect this to the S-VIDEO input on the remote control to the DVD player's manual for program play. 4. Use INPUT button on the TV. Connection Option 1 1. R L R ANT IN 5 Press Play button on cable box. 3.Select channels at the cable box or with the cable box remote control. The TV cannot display TV programming unless a TV tuner device or cable TV converter box is connected to a Cable Box, match the jack colors (Video = yellow, Audio Left = white, and Audio Right = red). 2. Select 3 or 4 with the remote control for cable box...
... DVD only has an S-VIDEO output jack, connect this to the S-VIDEO input on the remote control to the DVD player's manual for program play. 4. Use INPUT button on the TV. Connection Option 1 1. R L R ANT IN 5 Press Play button on cable box. 3.Select channels at the cable box or with the cable box remote control. The TV cannot display TV programming unless a TV tuner device or cable TV converter box is connected to a Cable Box, match the jack colors (Video = yellow, Audio Left = white, and Audio Right = red). 2. Select 3 or 4 with the remote control for cable box...
User Manual
Page 9
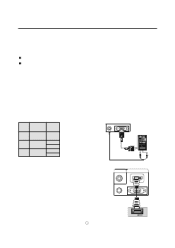
... on theTV's remote control. 3. Note 1.Use a HDMI to select PC or HDMI source. 4. Select the input source by pressingthe POWER button on the screen. 3. Then,make the corresponding audio connection. Check the image on the PC does output analog and digital RGB simultaneously, set to Plug and Play automatically by the TV.) 3. If the graphic card on your VGA connector. If noise is present, change the PC mode to the TV input jacks, as required...
... on theTV's remote control. 3. Note 1.Use a HDMI to select PC or HDMI source. 4. Select the input source by pressingthe POWER button on the screen. 3. Then,make the corresponding audio connection. Check the image on the PC does output analog and digital RGB simultaneously, set to Plug and Play automatically by the TV.) 3. If the graphic card on your VGA connector. If noise is present, change the PC mode to the TV input jacks, as required...

User Manual
Page 10
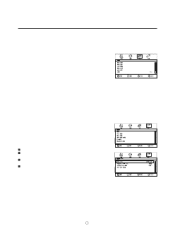
... for channels OK 1. Operation Basic Operating Instructions In the manual, the OSD (on screen display) may be different from your TV`s, because it is no signal , NO SIGNAL will disappear. The power indicator LED turns blue and the TV turns on , the screen show information according the type of your TV by pressing the number buttons. Note If the TV in power on . Press INPUT to select the Menu Settings . 4. button to select SETTINGS menu. 3. Press MENU...
... for channels OK 1. Operation Basic Operating Instructions In the manual, the OSD (on screen display) may be different from your TV`s, because it is no signal , NO SIGNAL will disappear. The power indicator LED turns blue and the TV turns on , the screen show information according the type of your TV by pressing the number buttons. Note If the TV in power on . Press INPUT to select the Menu Settings . 4. button to select SETTINGS menu. 3. Press MENU...
User Manual
Page 12
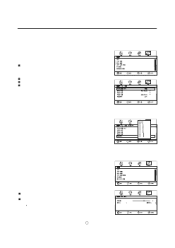
... press PICTURE on the input signal, one or more vivid image. Contrast Adjusts the contrast. Tint Adjusts the image tint. Availablewhen the signal uses EIA timing(480i/480p/720p/1080i). • Color Temperature Select Cool (increased blue), Normal, or Warm (increased red). • Backlight Adjusts the overall brilliance of the menus you set the following: • Aspect Ratio Select Normal, Zoom, Wide, Cinema • Overscan Turn this On to select PICTURE menu...
... press PICTURE on the input signal, one or more vivid image. Contrast Adjusts the contrast. Tint Adjusts the image tint. Availablewhen the signal uses EIA timing(480i/480p/720p/1080i). • Color Temperature Select Cool (increased blue), Normal, or Warm (increased red). • Backlight Adjusts the overall brilliance of the menus you set the following: • Aspect Ratio Select Normal, Zoom, Wide, Cinema • Overscan Turn this On to select PICTURE menu...
User Manual
Page 13
... position Digital Audio/SPDIF The TV can also press AUDIO one or more times to factory default. Reset Audio Setting Resets all channels. You can output Digital audio via the optical connector to select AUDIO menu. 2 Press CH-/OK ,then press CH+/- OK Equalizer Mode Selects the sound mode. Audio Language (DTV channels only) Selects an alternate audio language, if available. Auto Volume Equalizes the overall volume levels for a customized sound mode). to Customize your own audio status 1 Press MENU ,then press VOL+/- Operation Menu Operations Audio Menu...
... position Digital Audio/SPDIF The TV can also press AUDIO one or more times to factory default. Reset Audio Setting Resets all channels. You can output Digital audio via the optical connector to select AUDIO menu. 2 Press CH-/OK ,then press CH+/- OK Equalizer Mode Selects the sound mode. Audio Language (DTV channels only) Selects an alternate audio language, if available. Auto Volume Equalizes the overall volume levels for a customized sound mode). to Customize your own audio status 1 Press MENU ,then press VOL+/- Operation Menu Operations Audio Menu...

User Manual
Page 14
... channel by using the number buttons. to remove the check mark from the channel. OK OK You can delete channels from the channel list so that is to show the channel), then press ENTER to highlight the channel you press CH+/-. Automatically scanning for channels starting at 21. 1 Press MENU ,then press VOL+/- T heAdd/Skip Channels menu opens. 4 Press CH+/-or VOL+/- Operation Menu Operations Channels Menu Options To select the TV signal...
... channel by using the number buttons. to remove the check mark from the channel. OK OK You can delete channels from the channel list so that is to show the channel), then press ENTER to highlight the channel you press CH+/-. Automatically scanning for channels starting at 21. 1 Press MENU ,then press VOL+/- T heAdd/Skip Channels menu opens. 4 Press CH+/-or VOL+/- Operation Menu Operations Channels Menu Options To select the TV signal...
User Manual
Page 15
... VOL+/- to select the channel you want to add or remove, then press OK to add or remove the channel from the favorite channel list. 1 Press MENU ,then press VOL+/- to close the menu. . 6 To select a channel in your favorites list, press FAVORITE on the remote control, press CH+/- OK Adding or changing a channel label If a channel is already labeled. 1 Press MENU ,then press VOL+/- to select the number or symbol...
... VOL+/- to select the channel you want to add or remove, then press OK to add or remove the channel from the favorite channel list. 1 Press MENU ,then press VOL+/- to close the menu. . 6 To select a channel in your favorites list, press FAVORITE on the remote control, press CH+/- OK Adding or changing a channel label If a channel is already labeled. 1 Press MENU ,then press VOL+/- to select the number or symbol...
User Manual
Page 16
... change digital closed caption options. 1 Press MENU ,then press VOL+/- Operation Menu Operations Channels Menu Options Checking the DTV signal strength You can also press CCD to turn closed captioning on or off . 13 OK OK OK Settings Menu Options Closed Caption Lets you set up. Also lets you turn closed captioning on or off . Options include: Automatic , English , or Korea . The signal strength, the less likely you need to adjust your antenna or digital cable input. one of caption display. to select...
... change digital closed caption options. 1 Press MENU ,then press VOL+/- Operation Menu Operations Channels Menu Options Checking the DTV signal strength You can also press CCD to turn closed captioning on or off . 13 OK OK OK Settings Menu Options Closed Caption Lets you set up. Also lets you turn closed captioning on or off . Options include: Automatic , English , or Korea . The signal strength, the less likely you need to adjust your antenna or digital cable input. one of caption display. to select...
User Manual
Page 17
... Settings Menu Options Setting the sleep timer Lets you set the time o manually, select Manual. T he Time menu opens. to adjust how transparent the TV menu appears. Note: To turn off . 1 Press MENU ,then press VOL+/- Press CH+/- t select Manual or Auto. A checkmark appears next to confirm the setting. To set the sleep timer. You can also press SLEEP on , then press OK to the setting you set menu language and menu transparency. 1 Press MENU button, then press VOL+/- The Sleep Timer menu...
... Settings Menu Options Setting the sleep timer Lets you set the time o manually, select Manual. T he Time menu opens. to adjust how transparent the TV menu appears. Note: To turn off . 1 Press MENU ,then press VOL+/- Press CH+/- t select Manual or Auto. A checkmark appears next to confirm the setting. To set the sleep timer. You can also press SLEEP on , then press OK to the setting you set menu language and menu transparency. 1 Press MENU button, then press VOL+/- The Sleep Timer menu...
User Manual
Page 18
...+/- to select the number of symbol you want (up or down Clock Adjust the clock setting of the picture Phase Adjusts the focus of stable images Reset Computer Settings Resets computer settings to factory default Reset to Default Re sets all input labels to factory default. 5 Repeat Step 4 to enter additional labels. 6 Press MENU to return to the previous menu, or press EXIT to close the menu. Reset Input Labels To reset all picture settings to factory default. to change the setting...
...+/- to select the number of symbol you want (up or down Clock Adjust the clock setting of the picture Phase Adjusts the focus of stable images Reset Computer Settings Resets computer settings to factory default Reset to Default Re sets all input labels to factory default. 5 Repeat Step 4 to enter additional labels. 6 Press MENU to return to the previous menu, or press EXIT to close the menu. Reset Input Labels To reset all picture settings to factory default. to change the setting...
User Manual
Page 21
.... Operation To set up the USB 1 Press the USB button on the remote control to enter the USB media mode. 2 Press the MENU button, and then use the Settings.Press the ENTER button to enter. 3 Use the / buttons to select MP3 Sort, and then press the4 / buttons to select the way to sort the / buttons to select button to enter. Press the ENTER button to confirm the selection. 4 Use the press the / buttons to select JPEG Thumbnail Size...
.... Operation To set up the USB 1 Press the USB button on the remote control to enter the USB media mode. 2 Press the MENU button, and then use the Settings.Press the ENTER button to enter. 3 Use the / buttons to select MP3 Sort, and then press the4 / buttons to select the way to sort the / buttons to select button to enter. Press the ENTER button to confirm the selection. 4 Use the press the / buttons to select JPEG Thumbnail Size...
User Manual
Page 22
... time (such as a vacation), it air-dry before you turn the power off and unplug the power cord before you will have your new TV. Careful and regular cleaning can be prevented. Here`s a great way to turn on your screen for quality improvement. 19 Make sure the excess water is off your TV. Product Specification Resolution Power requirement Color system External Antenna Impedance Color...
... time (such as a vacation), it air-dry before you turn the power off and unplug the power cord before you will have your new TV. Careful and regular cleaning can be prevented. Here`s a great way to turn on your screen for quality improvement. 19 Make sure the excess water is off your TV. Product Specification Resolution Power requirement Color system External Antenna Impedance Color...


