User Manual
Page 1
Domestic Dishwasher HDW300SS HDW300WH Code:0120505074
Domestic Dishwasher HDW300SS HDW300WH Code:0120505074
User Manual
Page 2
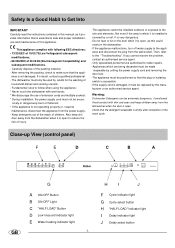
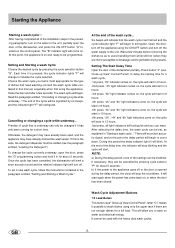
... appliance malfunctions, turn off water supply to make repairs. - If the supply cord is open. Check that the detergent receptable is accessible. - Close-up View (control panel) F E D C B A GB G A ON-OFF Button B ON-OFF Light C "HALF LOAD" Button D Low rinse aid indicator light E Water heating indicator light .1. Do not lean or sit on the door when it is open to follow when using the appliance: * Never touch the dishwasher with wet hands; * We discourage the use and maintenance of the wash cycle. Then...
... appliance malfunctions, turn off water supply to make repairs. - If the supply cord is open. Check that the detergent receptable is accessible. - Close-up View (control panel) F E D C B A GB G A ON-OFF Button B ON-OFF Light C "HALF LOAD" Button D Low rinse aid indicator light E Water heating indicator light .1. Do not lean or sit on the door when it is open to follow when using the appliance: * Never touch the dishwasher with wet hands; * We discourage the use and maintenance of the wash cycle. Then...
User Manual
Page 3
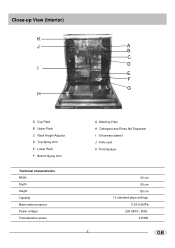
Close-up View (Interior) K J A B V C D I E F J L G H A Cup Rack B Upper Rack C Rack Height Adjustor D Top Spray Arm E Lower Rack F Bottom Spray Arm Technical characteristics Width Depth Height Capacity Mains water pressure Power voltage Total absorber power G Washing Filter H Detergent and Rinse Aid Dispenser I Silverware basket J Knife rack K Third Sprayer 60 cm 60 cm 85 cm 12 standard place settings 0.03-0.6MPa 220-240V~ 50Hz 2150W .2. GB
Close-up View (Interior) K J A B V C D I E F J L G H A Cup Rack B Upper Rack C Rack Height Adjustor D Top Spray Arm E Lower Rack F Bottom Spray Arm Technical characteristics Width Depth Height Capacity Mains water pressure Power voltage Total absorber power G Washing Filter H Detergent and Rinse Aid Dispenser I Silverware basket J Knife rack K Third Sprayer 60 cm 60 cm 85 cm 12 standard place settings 0.03-0.6MPa 220-240V~ 50Hz 2150W .2. GB
User Manual
Page 4
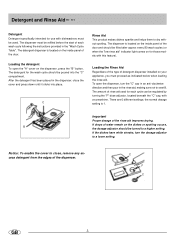
... drying. C A B Rinse Aid This product makes dishes sparkle and helps them to a higher setting. There are 6 different settings; Detergent and Rinse Aid Detergent Detergent specifically intended for use with dishwashers must be used for each wash cycle following the instructions provided in the dispenser, close , remove any excess detergent from the edges of the dispenser. The detergent for the wash cycle should be turned to dry without spotting. The dispenser is located on for those models with a screwdriver. Important Proper dosage of detergent dispenser installed...
... drying. C A B Rinse Aid This product makes dishes sparkle and helps them to a higher setting. There are 6 different settings; Detergent and Rinse Aid Detergent Detergent specifically intended for use with dishwashers must be used for each wash cycle following the instructions provided in the dispenser, close , remove any excess detergent from the edges of the dispenser. The detergent for the wash cycle should be turned to dry without spotting. The dispenser is located on for those models with a screwdriver. Important Proper dosage of detergent dispenser installed...
User Manual
Page 5
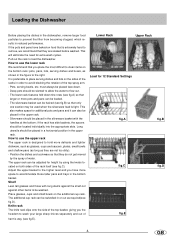
... side baskets, the spoons should be loaded. - Lower Rack Upper Rack Load for extra wash cycles. Loading the Dishwasher Before placing the dishes in the dishwasher, remove larger food particles to prevent the filter from becoming clogged, which results in the figure to the right. Pull out the rack to avoid blocking the rotation of water. This also makes space for height by the spray of the top spray arm...
... side baskets, the spoons should be loaded. - Lower Rack Upper Rack Load for extra wash cycles. Loading the Dishwasher Before placing the dishes in the dishwasher, remove larger food particles to prevent the filter from becoming clogged, which results in the figure to the right. Pull out the rack to avoid blocking the rotation of water. This also makes space for height by the spray of the top spray arm...
User Manual
Page 6
...-OFF button "A" located on water and electrical energy. Cancelling or changing a cycle while underway... Six beeps will indicate that the wash cycle has finished and the cycle indicator light "F" will begin to save on the control panel. Wait a few seconds, The wash cycle will begin to indicate the cycle selected. b) If the power to the unit, partially open the door, press the "G" programming button and hold it possible to get better drying results. Wash Cycle Adjustment Buttons 1/2 Load Button This button (see , Close-up View-Control Panel...
...-OFF button "A" located on water and electrical energy. Cancelling or changing a cycle while underway... Six beeps will indicate that the wash cycle has finished and the cycle indicator light "F" will begin to save on the control panel. Wait a few seconds, The wash cycle will begin to indicate the cycle selected. b) If the power to the unit, partially open the door, press the "G" programming button and hold it possible to get better drying results. Wash Cycle Adjustment Buttons 1/2 Load Button This button (see , Close-up View-Control Panel...

User Manual
Page 7
... on residue. Detergent Rinse Aid 30g 5+25g ERF 30g 15g 15g GB Rinse with cold water. Drying. Standard daily cycle. Hot rinse. Heat washing. .6. Wash at 50 . Light Wash Normal dirty dishes, pots and pans without dried on not very dirty dishes right after dishes are used with delicate items) Pre-wash with cold water. Rinse with warm water. Rinse with cold water. Short wash at 70 K Rinse with hot water. Extended wash at 40 . Pre-wash of heat washing and dry tableware. Run immediately after...
... on residue. Detergent Rinse Aid 30g 5+25g ERF 30g 15g 15g GB Rinse with cold water. Drying. Standard daily cycle. Hot rinse. Heat washing. .6. Wash at 50 . Light Wash Normal dirty dishes, pots and pans without dried on not very dirty dishes right after dishes are used with delicate items) Pre-wash with cold water. Rinse with warm water. Rinse with cold water. Short wash at 70 K Rinse with hot water. Extended wash at 40 . Pre-wash of heat washing and dry tableware. Run immediately after...
User Manual
Page 8
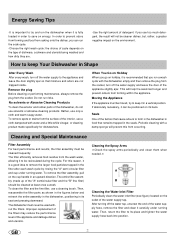
... After Every Wash After every wash, turn off the water tap, unscrew the end of the water supply hose, remove the filter and clean it is recommended that remains trapped in the seals. Then, reassemble the filter parts as shown in the figures below and reinsert the entire assembly in the dishwasher, positioning in its back. A B Cleaning the Water Inlet Filter Periodically clean the water inlet filter (see figure) located on holiday, it carefully under running water. GB...
... After Every Wash After every wash, turn off the water tap, unscrew the end of the water supply hose, remove the filter and clean it is recommended that remains trapped in the seals. Then, reassemble the filter parts as shown in the figures below and reinsert the entire assembly in the dishwasher, positioning in its back. A B Cleaning the Water Inlet Filter Periodically clean the water inlet filter (see figure) located on holiday, it carefully under running water. GB...
User Manual
Page 9
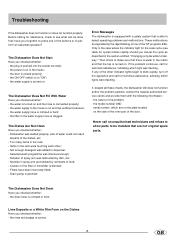
... parts to perform an essential operation? the water supply to dispenser; - Too many items in the section entitled, "Changing a Cycle while Underway." the water is on the Dishes Have you cancel the cycle as described in the rack; - Not enough detergent was flashing. These malfunctions are not original spare parts. the model number AND serial number, which lights were flashing. the power is on and the hose is turned on. If, despite all parts of water...
... parts to perform an essential operation? the water supply to dispenser; - Too many items in the section entitled, "Changing a Cycle while Underway." the water is on the Dishes Have you cancel the cycle as described in the rack; - Not enough detergent was flashing. These malfunctions are not original spare parts. the model number AND serial number, which lights were flashing. the power is on and the hose is turned on. If, despite all parts of water...
User Manual
Page 10
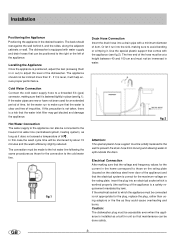
... the hot water line following the same procedures as a built-in the desired location. If the water pipes are new or have not been used for the plug, replace the plug, rather than 2˚. fig.1 Drain Hose Connection Insert the drain hose into an electrical socket which the appliance must be made to make sure that the water inlet filter may get blocked and damage the appliance. The free end of the dishwasher...
... the hot water line following the same procedures as a built-in the desired location. If the water pipes are new or have not been used for the plug, replace the plug, rather than 2˚. fig.1 Drain Hose Connection Insert the drain hose into an electrical socket which the appliance must be made to make sure that the water inlet filter may get blocked and damage the appliance. The free end of the dishwasher...


