
User Manual
Page 1
Dishwasher HDW101SST HDW101WHT Instructions for Use 0120504052
Dishwasher HDW101SST HDW101WHT Instructions for Use 0120504052
User Manual
Page 2
in the dishwasher 9 Programme overview 10 Washing dishes 11 How to keep your dishwasher 6 How to know your dishwasher in shape 13 Care and maintenance 14 Fault finding 15 Technical data 18 Important information 18 1 Index Safety information 2 Installation 4 Getting to fill the rinse aid and the detergent dispenser 7 Not suitable for the dishwasher 8 Arranging crockery, glasses, etc.
in the dishwasher 9 Programme overview 10 Washing dishes 11 How to keep your dishwasher 6 How to know your dishwasher in shape 13 Care and maintenance 14 Fault finding 15 Technical data 18 Important information 18 1 Index Safety information 2 Installation 4 Getting to fill the rinse aid and the detergent dispenser 7 Not suitable for the dishwasher 8 Arranging crockery, glasses, etc.
User Manual
Page 3
... or customer service without supervision. During normal use solvents of household dishes and cooking utensils. Do not touch the heating element during or after a wash cycle. Attention The appliance is being carried out. Ensure that they do not put it is damaged, do not play with the appliance. 2 During installation, the power supply cord must conform to the electricity supply while installation is not for use of...
... or customer service without supervision. During normal use solvents of household dishes and cooking utensils. Do not touch the heating element during or after a wash cycle. Attention The appliance is being carried out. Ensure that they do not put it is damaged, do not play with the appliance. 2 During installation, the power supply cord must conform to the electricity supply while installation is not for use of...
User Manual
Page 4
... by cutting the power supply cord and removing the door lock. Take the appliance to the appliance and disconnect the plug from the wall socket. always use original Spare Parts. Damage the door lock so that the door can no longer being used must be closed. 3 Then, consult the section entitled, "Finding fault" .If you cannot solve the problem, contact a service center. Therefore: Remove the mains plug, cut the mains wire and set...
... by cutting the power supply cord and removing the door lock. Take the appliance to the appliance and disconnect the plug from the wall socket. always use original Spare Parts. Damage the door lock so that the door can no longer being used must be closed. 3 Then, consult the section entitled, "Finding fault" .If you cannot solve the problem, contact a service center. Therefore: Remove the mains plug, cut the mains wire and set...
User Manual
Page 5
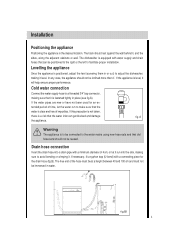
...;. If the appliance is to be connected to adjust the dishwasher, making sure that the water inlet can be immersed in the desired location. If this precaution is not taken, there is equipped with water supply and drain hoses that the water is fastened tightly in or out) to the water mains using new hose-sets and that old hose-sets should not be reused. tended period of...
...;. If the appliance is to be connected to adjust the dishwasher, making sure that the water inlet can be immersed in the desired location. If this precaution is not taken, there is equipped with water supply and drain hoses that the water is fastened tightly in or out) to the water mains using new hose-sets and that old hose-sets should not be reused. tended period of...
User Manual
Page 6
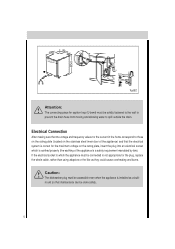
If the electrical socket to those on the rating plate (located on the stainless steel inner door of the appliance is a safety requirement mandated by law). Caution: The dishwasher plug must be accessible even when the appliance is not appropriate for the plug, replace the whole cable, rather than using adaptors or the like as a builtin unit so that the voltage and...
If the electrical socket to those on the rating plate (located on the stainless steel inner door of the appliance is a safety requirement mandated by law). Caution: The dishwasher plug must be accessible even when the appliance is not appropriate for the plug, replace the whole cable, rather than using adaptors or the like as a builtin unit so that the voltage and...
User Manual
Page 7
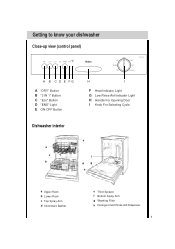
Getting to know your dishwasher Close-up view (control panel) A B C D E FG A "DRY" Button B "3 IN 1" Button C "Eco" Button D "END" Light E ON-OFF Button H I F Heat Indicator Light G Low Rinse Aid Indicator Light H Handle For Opening Door I Knob For Selecting Cycle Dishwasher interior a c b e f dg h a Upper Rack b Lower Rack c Top Spray Arm d Silverware Basket e Third Sprayer f Bottom Spray Arm g Washing Filter h Detergent and Rinse Aid Dispenser 6
Getting to know your dishwasher Close-up view (control panel) A B C D E FG A "DRY" Button B "3 IN 1" Button C "Eco" Button D "END" Light E ON-OFF Button H I F Heat Indicator Light G Low Rinse Aid Indicator Light H Handle For Opening Door I Knob For Selecting Cycle Dishwasher interior a c b e f dg h a Upper Rack b Lower Rack c Top Spray Arm d Silverware Basket e Third Sprayer f Bottom Spray Arm g Washing Filter h Detergent and Rinse Aid Dispenser 6
User Manual
Page 8
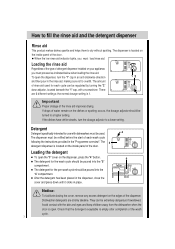
... dishwasher when the door is located on the inside panel of each cycle can be used. Detergent Detergent specifically intended for the wash cycle should be refilled before the start of the door. The 3 detergent dispenser is open the dispenser, turn the dosage adjustor to dry without spotting. The detergent for each wash cycle following the instructions provided in the "Programme overview". The amount of the dispenser. How to fill the rinse aid and the detergent dispenser Rinse aid This product makes dishes...
... dishwasher when the door is located on the inside panel of each cycle can be used. Detergent Detergent specifically intended for the wash cycle should be refilled before the start of the door. The 3 detergent dispenser is open the dispenser, turn the dosage adjustor to dry without spotting. The detergent for each wash cycle following the instructions provided in the "Programme overview". The amount of the dispenser. How to fill the rinse aid and the detergent dispenser Rinse aid This product makes dishes...
User Manual
Page 9
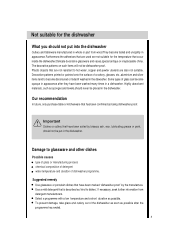
... dishwasher-proof. Use a mild detergent that occur inside the dishwasher.Delicate decorative glassware and vases,special antique or irreplaceable china. Not suitable for the temperature that is described as 'kind to become opaque in appearance after the programme has ended. 8 Our recommendation In future, only purchase table or kitchenware that have been washed many times in the dishwasher. Important Dishes...
... dishwasher-proof. Use a mild detergent that occur inside the dishwasher.Delicate decorative glassware and vases,special antique or irreplaceable china. Not suitable for the temperature that is described as 'kind to become opaque in appearance after the programme has ended. 8 Our recommendation In future, only purchase table or kitchenware that have been washed many times in the dishwasher. Important Dishes...
User Manual
Page 10
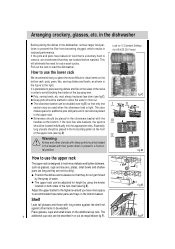
... the need for AS/NZS 2007 tests) fig.C fig.D fig.E fig.F must be adjusted for additional pots and pans and it can be used when the silverware load is extremely hard to avoid blocking the rotation of the rack itself (see fig.E). Position the dishes and cookware so that they are soaked before washed. Adjust the upper basket to the higher level...
... the need for AS/NZS 2007 tests) fig.C fig.D fig.E fig.F must be adjusted for additional pots and pans and it can be used when the silverware load is extremely hard to avoid blocking the rotation of the rack itself (see fig.E). Position the dishes and cookware so that they are soaked before washed. Adjust the upper basket to the higher level...

User Manual
Page 11
...cold water. Detergent Eco Rinse PrewashExtended Aid Wash 5g 25g NORMAL (AS/NZS 2007) LIGHT Normal load of dishes Short cold wash to pre- Hot rinse. 25g dishes are used with delicate items.) Pre-wash with hot water. Drying. Drying. Lightly soiled delicate items. Prewash use cold water. GLASSWARE delicate items. Run immediately after Rinse with cold water. mixed dishes. Rinse with hot water. Rinse with hot water. Extended wash at 50°C. Rinse with cold water. Extended wash at 50°C. Rinse with cold water. Drying. ( ) AS/NZS 2007 test...
...cold water. Detergent Eco Rinse PrewashExtended Aid Wash 5g 25g NORMAL (AS/NZS 2007) LIGHT Normal load of dishes Short cold wash to pre- Hot rinse. 25g dishes are used with delicate items.) Pre-wash with hot water. Drying. Drying. Lightly soiled delicate items. Prewash use cold water. GLASSWARE delicate items. Run immediately after Rinse with cold water. mixed dishes. Rinse with hot water. Rinse with hot water. Extended wash at 50°C. Rinse with cold water. Extended wash at 50°C. Rinse with cold water. Drying. ( ) AS/NZS 2007 test...
User Manual
Page 12
... Appliance Starting a wash cycle... Washing dishes Programme selection The most appropriate programme can vary considerably according to: different amounts of dishes temperature of mains water supply pressure of mains water supply ambient temperature fluctuations in the right half of the overview. Press the ON-OFF button, and the "End" light will turn the knob to with the mark of "Reset" .Then back to the number or...
... Appliance Starting a wash cycle... Washing dishes Programme selection The most appropriate programme can vary considerably according to: different amounts of dishes temperature of mains water supply pressure of mains water supply ambient temperature fluctuations in the right half of the overview. Press the ON-OFF button, and the "End" light will turn the knob to with the mark of "Reset" .Then back to the number or...
User Manual
Page 13
..., "Loading the Detergent"). Cancelling or modifying a wash cycle setting... Wash Cycle Adjustment Buttons "DRY" Button This button (see "Close-up View - Control Panel ", letter "A") when press with normal wash cycle make it possible to switch the rinse aid off the water supply and open the door of the wash cycle... Rotate the knob to breakage. The tablets should be helpful therefore to run the wash cycle at a lower temperature. 12 Control Panel", letter "C" ) when press with light wash cycle make it possible to length the drying phase. Control Panel", letter...
..., "Loading the Detergent"). Cancelling or modifying a wash cycle setting... Wash Cycle Adjustment Buttons "DRY" Button This button (see "Close-up View - Control Panel ", letter "A") when press with normal wash cycle make it possible to switch the rinse aid off the water supply and open the door of the wash cycle... Rotate the knob to breakage. The tablets should be helpful therefore to run the wash cycle at a lower temperature. 12 Control Panel", letter "C" ) when press with light wash cycle make it possible to length the drying phase. Control Panel", letter...
User Manual
Page 14
... every wash, turn off the water supply to the appliance and leave the door slightly ajar so that moisture and odors are not trapped inside. Remove the plug Before cleaning or performing maintenance, always remove the plug from occurring. Do not run a wash cycle with the dishwasher empty and then remove the plug from forming within the appliance. 13 To remove spots or stains from the surface of the interior, use...
... every wash, turn off the water supply to the appliance and leave the door slightly ajar so that moisture and odors are not trapped inside. Remove the plug Before cleaning or performing maintenance, always remove the plug from occurring. Do not run a wash cycle with the dishwasher empty and then remove the plug from forming within the appliance. 13 To remove spots or stains from the surface of the interior, use...
User Manual
Page 15
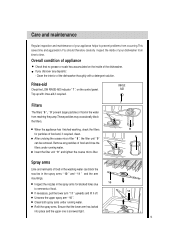
... that the lower arm has locked into place and the upper one is screwed tight. 14 Clean both spray arms under running water. Refit the spray arms. Ensure that no grease or scale has accumulated on the control panel. Care and maintenance Regular inspection and maintenance of your appliance helps to prevent problems from occurring.This saves time and aggravation.You should therefore carefully inspect the inside of the dishwasher. When...
... that the lower arm has locked into place and the upper one is screwed tight. 14 Clean both spray arms under running water. Refit the spray arms. Ensure that no grease or scale has accumulated on the control panel. Care and maintenance Regular inspection and maintenance of your appliance helps to prevent problems from occurring.This saves time and aggravation.You should therefore carefully inspect the inside of the dishwasher. When...
User Manual
Page 16
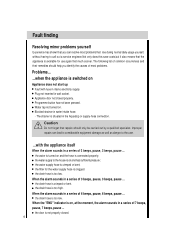
... the water supply hose is switched on Appliance does not start up Fault with the appliance itself When the alarm sounds in a series of 3 beeps, pause, 3 beeps, pause ... Improper repairs can resolve most problems. Problems... ...when the appliance is clogged. the drain hose is too low. the water is connected properly; Plug not inserted in water intake hose. - When the alarm sounds in a series of 7 beeps, pause, 7 beeps, pause ... When the "END" indicator...
... the water supply hose is switched on Appliance does not start up Fault with the appliance itself When the alarm sounds in a series of 3 beeps, pause, 3 beeps, pause ... Improper repairs can resolve most problems. Problems... ...when the appliance is clogged. the drain hose is too low. the water is connected properly; Plug not inserted in water intake hose. - When the alarm sounds in a series of 7 beeps, pause, 7 beeps, pause ... When the "END" indicator...
User Manual
Page 17
... running. Water supply has been interrupted. You can be heared while washing is taking place A spray arm is creased Normal washing up with remnants of the problem. Mechanism is clogged with detergent. The programme is jammed. Knocking sound can power the dishwasher on the side of the inner part of detergent stuck inside the appliance. the model type number (Mod...) And the serial number (S/N...), which are blocked. Remove any other error display...
... running. Water supply has been interrupted. You can be heared while washing is taking place A spray arm is creased Normal washing up with remnants of the problem. Mechanism is clogged with detergent. The programme is jammed. Knocking sound can power the dishwasher on the side of the inner part of detergent stuck inside the appliance. the model type number (Mod...) And the serial number (S/N...), which are blocked. Remove any other error display...
User Manual
Page 18
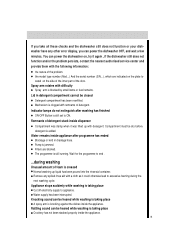
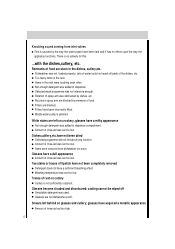
.... Washing temperature was used. Traces of rinse-aid was set too low. Smears left on glasses and cutlery; Remnants of rinse-aid was set too low. Waste-water pump is not sufficiently rustproof. Dishes,cultlery,etc.have a sufficient bleaching effect. Items were removed from inlet valves This is caused by the way the water pipes have been incorrectly fitted. coating cannot be wiped off Unsuitable detergent...
.... Washing temperature was used. Traces of rinse-aid was set too low. Smears left on glasses and cutlery; Remnants of rinse-aid was set too low. Waste-water pump is not sufficiently rustproof. Dishes,cultlery,etc.have a sufficient bleaching effect. Items were removed from inlet valves This is caused by the way the water pipes have been incorrectly fitted. coating cannot be wiped off Unsuitable detergent...
User Manual
Page 19
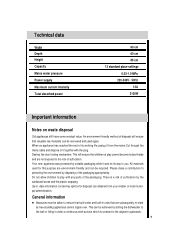
... Height Capacity Mains water pressure Power supply Maximum current intensity Total absorbed power 60 cm 60 cm 85 cm 12 standard place settings 0.03-1.0 MPa 220-240V~ 50Hz 13A 2100W Important information Notes on its working life,unplug it together with any parts of the packaging. Do not allow children to play cannot become locked inside and are environment...
... Height Capacity Mains water pressure Power supply Maximum current intensity Total absorbed power 60 cm 60 cm 85 cm 12 standard place settings 0.03-1.0 MPa 220-240V~ 50Hz 13A 2100W Important information Notes on its working life,unplug it together with any parts of the packaging. Do not allow children to play cannot become locked inside and are environment...

User Manual
Page 20
... with standard specifications. Diagram A N L B 3(1) 1(2) IG 4(2) 2(1) R Filter S D IS E 1 1 2 3 C 220-240V AC 50 Hz PCB F G D-ED CnP1 12 11 10 9 8 7 6 5 4 3 2 1 CnP2 1 2 3 4 T 5 6 1 CnP3 2 3 4 5 K1 K2 K3 6 7 8 9 12 S5 S6 S7 Reset H 1 IAQS 3 2 I J M ML C S C O M L S1 K5 S2 S4 S3 A.Wiring box H.Overflow switch S.Rinsing agent missing switch B.Power switch I. Capacity: 12 place settings Comparability programme: NORMAL wash Rinse-aid setting: 5 Detergent: 25+5g fig.1 fig.2 Height-adjustable top-basket must be...
... with standard specifications. Diagram A N L B 3(1) 1(2) IG 4(2) 2(1) R Filter S D IS E 1 1 2 3 C 220-240V AC 50 Hz PCB F G D-ED CnP1 12 11 10 9 8 7 6 5 4 3 2 1 CnP2 1 2 3 4 T 5 6 1 CnP3 2 3 4 5 K1 K2 K3 6 7 8 9 12 S5 S6 S7 Reset H 1 IAQS 3 2 I J M ML C S C O M L S1 K5 S2 S4 S3 A.Wiring box H.Overflow switch S.Rinsing agent missing switch B.Power switch I. Capacity: 12 place settings Comparability programme: NORMAL wash Rinse-aid setting: 5 Detergent: 25+5g fig.1 fig.2 Height-adjustable top-basket must be...


