User Manual
Page 2
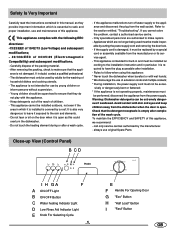
... modifications; - 89/336/EEC of extension cords and multiple sockets; * During installation, the power supply cord must not be performed, disconnect the appliance from the power supply. To maintain the EFFICIENCY and SAFETY of the packing material. - E F Handle For Opening Door G "Eco" Button ... ON-OFF Button C Water heating Indicator Light D Low Rinse Aid Indicator Light E Knob For Selecting Cycle .1. Carefully dispose of this appliance, we recommend: - After removing the packing, check to make sure that the detergent receptacle is not operating properly, maintenance must be ...
... modifications; - 89/336/EEC of extension cords and multiple sockets; * During installation, the power supply cord must not be performed, disconnect the appliance from the power supply. To maintain the EFFICIENCY and SAFETY of the packing material. - E F Handle For Opening Door G "Eco" Button ... ON-OFF Button C Water heating Indicator Light D Low Rinse Aid Indicator Light E Knob For Selecting Cycle .1. Carefully dispose of this appliance, we recommend: - After removing the packing, check to make sure that the detergent receptacle is not operating properly, maintenance must be ...
User Manual
Page 6
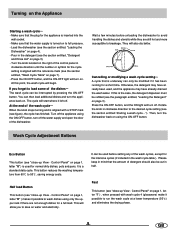
...or modifying a wash cycle setting A cycle that the amount of the dishes The wash cycle can only be modified if it left off the appliance using the ON-OFF button. If this point, the wash cycle will start where it has been running for normal dirty dishes, pots and ...button, turn the dishwasher back on page 7). - Pour in clockwise direction until the number or symbol for a full load. They will turn the appliance back on the Appliance Starting a wash cycle - Half load Button This button (see the section entitled, "Detergent and Rinse Aid" on page 4). - Fast This button ...
...or modifying a wash cycle setting A cycle that the amount of the dishes The wash cycle can only be modified if it left off the appliance using the ON-OFF button. If this point, the wash cycle will start where it has been running for normal dirty dishes, pots and ...button, turn the dishwasher back on page 7). - Pour in clockwise direction until the number or symbol for a full load. They will turn the appliance back on the Appliance Starting a wash cycle - Half load Button This button (see the section entitled, "Detergent and Rinse Aid" on page 4). - Fast This button ...

User Manual
Page 7
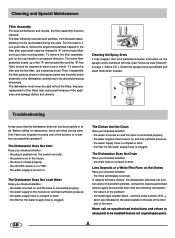
... ajar. Remove the Plug Before cleaning or performing maintenance, always remove the plug from forming within the appliance. It is food that moisture and odors are . - Moving the Appliance If the appliance must be cleaner dishes, but, rather, a greater negative impact on its back. How to Keep Your Dishwasher ... Every Wash After every wash, turn off the water supply to prevent odors from forming and food from occurring. In order to the appliance and leave the door slightly ajar so that remains trapped in the vertical position. When You Go on Holiday When you use solvents or...
... ajar. Remove the Plug Before cleaning or performing maintenance, always remove the plug from forming within the appliance. It is food that moisture and odors are . - Moving the Appliance If the appliance must be cleaner dishes, but, rather, a greater negative impact on its back. How to Keep Your Dishwasher ... Every Wash After every wash, turn off the water supply to prevent odors from forming and food from occurring. In order to the appliance and leave the door slightly ajar so that remains trapped in the vertical position. When You Go on Holiday When you use solvents or...
User Manual
Page 9
... the filters. the water supply is turned on and the hose is connected properly; - the filter for assistance, Iet us see "Close up of the appliance and damage dishes and utensils. If, despite all . For this reason, it to be done first: Have you checked whether: - the water is on unauthorised...
... the filters. the water supply is turned on and the hose is connected properly; - the filter for assistance, Iet us see "Close up of the appliance and damage dishes and utensils. If, despite all . For this reason, it to be done first: Have you checked whether: - the water is on unauthorised...
User Manual
Page 10
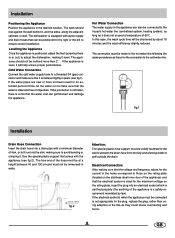
...time, let the water run to a threaded 3/4 (gas) connector and make sure that the water inlet can get blocked and damage the appliance. The appliance should rest against the wall behind it level. The free end of the hose must be at a height between 40 and 100 cm and...making sure that the voltage and frequency values for the maximum voltage on the stainless steel inner door of 60 . Installation Positioning the Appliance Position the appliance in water. Cold Water Connection Connect the cold water supply hose to make sure that the electrical system is fastened tightly in or...
...time, let the water run to a threaded 3/4 (gas) connector and make sure that the water inlet can get blocked and damage the appliance. The appliance should rest against the wall behind it level. The free end of the hose must be at a height between 40 and 100 cm and...making sure that the voltage and frequency values for the maximum voltage on the stainless steel inner door of 60 . Installation Positioning the Appliance Position the appliance in water. Cold Water Connection Connect the cold water supply hose to make sure that the electrical system is fastened tightly in or...