
User Manual
Page 1
Dishwasher HDW100WCT HDW100SCT Instructions for Use 0120505591
Dishwasher HDW100WCT HDW100SCT Instructions for Use 0120505591
User Manual
Page 2
Index Safety Is Very Important Close-up View (Control Panel) Close-up View (Interior) Detergent and Rinse Aid Loading the Dishwasher Turning on the Appliance Energy Saving Tips How to Keep Your Dishwasher in Shape Wash Cycle Table Cleaning and Special Maintenance Troubleshooting Installation Technical data Diagram 2 3 3 4 5 6 7 7 8 9 9-12 13-14 15 15 1
Index Safety Is Very Important Close-up View (Control Panel) Close-up View (Interior) Detergent and Rinse Aid Loading the Dishwasher Turning on the Appliance Energy Saving Tips How to Keep Your Dishwasher in Shape Wash Cycle Table Cleaning and Special Maintenance Troubleshooting Installation Technical data Diagram 2 3 3 4 5 6 7 7 8 9 9-12 13-14 15 15 1

User Manual
Page 3
... installation. Do not lean or sit on the door when it is empty after a wash cycle. Do not use original Spare Parts. The plug must not be accessible after completion of this appliance: Only call a authorised service centre. Carefully remove and dispose of the dishwasher by the manufacture, a service agent of similar qualified persons in doubt, contact the retailer it may over turn off water supply...
... installation. Do not lean or sit on the door when it is empty after a wash cycle. Do not use original Spare Parts. The plug must not be accessible after completion of this appliance: Only call a authorised service centre. Carefully remove and dispose of the dishwasher by the manufacture, a service agent of similar qualified persons in doubt, contact the retailer it may over turn off water supply...

User Manual
Page 4
Close-up View (Control Panel) A "POWER" Button B "END" Light C Handle For Opening Door D Knob For Selecting Cycle Close-up View (Interior) A Upper Rack B Rack Height Adjustor C Top Spray Arm D Lower Rack 3 E Bottom Spray Arm F Washing Filter G Detergent and Rinse Aid Dispenser
Close-up View (Control Panel) A "POWER" Button B "END" Light C Handle For Opening Door D Knob For Selecting Cycle Close-up View (Interior) A Upper Rack B Rack Height Adjustor C Top Spray Arm D Lower Rack 3 E Bottom Spray Arm F Washing Filter G Detergent and Rinse Aid Dispenser
User Manual
Page 5
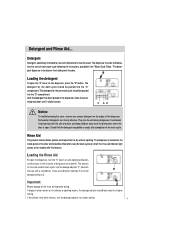
... rinse aid used . If the dishes have white streaks, turn the "E" cap in an anti-clockwise direction and then pour in place. If drops of the door and should be refilled before the start of the dispenser. C AD Notice: To facilitate closing the cover, remove any excess detergent on the dispenser, press the "B" button. Check that the detergent receptable is located on the inside panel the door. Detergent Detergent specifically intended for each wash cycle...
... rinse aid used . If the dishes have white streaks, turn the "E" cap in an anti-clockwise direction and then pour in place. If drops of the door and should be refilled before the start of the dispenser. C AD Notice: To facilitate closing the cover, remove any excess detergent on the dispenser, press the "B" button. Check that the detergent receptable is located on the inside panel the door. Detergent Detergent specifically intended for each wash cycle...

User Manual
Page 6
... the end of the rack guide rails to the side, remove the rackcompletely and refit using the alternate set of the top spray arm. - To adjust the height of the upper rack, rotate the caps located on the sides of the racks in order to clean items on comparability tests implemented in compliance with AS/NZS 2007 Appliance loaded in the bottom basket for large items. Load for extra wash cycles...
... the end of the rack guide rails to the side, remove the rackcompletely and refit using the alternate set of the top spray arm. - To adjust the height of the upper rack, rotate the caps located on the sides of the racks in order to clean items on comparability tests implemented in compliance with AS/NZS 2007 Appliance loaded in the bottom basket for large items. Load for extra wash cycles...
User Manual
Page 7
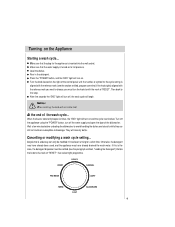
... still hot and more susceptible to full pressure. Make sure that is inserted into the wall socket. Press the "POWER" button, and the "END" light will turn on the Appliance Starting a wash cycle... Cancelling or modifying a wash cycle setting... Turning on . Otherwise, the detergent may have already been used, and the appliance may have already drained the wash water. After five seconds the "END" light will turn off the water supply and open the door of "RESET...
... still hot and more susceptible to full pressure. Make sure that is inserted into the wall socket. Press the "POWER" button, and the "END" light will turn on the Appliance Starting a wash cycle... Cancelling or modifying a wash cycle setting... Turning on . Otherwise, the detergent may have already been used, and the appliance may have already drained the wash water. After five seconds the "END" light will turn off the water supply and open the door of "RESET...

User Manual
Page 8
... not trapped inside. Use the right amount of detergent: if you run a wash cycle with the dishwasher empty and then remove the plug from forming. Choose the right wash cycle: the choice of the interior, use only a cloth and warm soapy water. Moving the Appliance If the appliance must be cleaner dishes, but, rather, a greater negative impact on energy. Remove the Plug Before cleaning or performing maintenance, always remove the plug from...
... not trapped inside. Use the right amount of detergent: if you run a wash cycle with the dishwasher empty and then remove the plug from forming. Choose the right wash cycle: the choice of the interior, use only a cloth and warm soapy water. Moving the Appliance If the appliance must be cleaner dishes, but, rather, a greater negative impact on energy. Remove the Plug Before cleaning or performing maintenance, always remove the plug from...
User Manual
Page 9
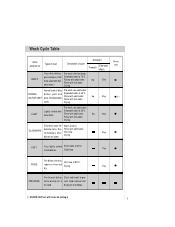
...-rinse of dirty Pre-wash use cold water. Rinse Aid () FAST Very lightly solied Short wash at 70°C. RINSE require a rinse and Drying. 15g dry. Rinse with hot water. Economic cycle for a vent food residue from full load. mixed dishes. Wash Cycle Table Wash Types of load programme Description of cycle Detergent Extended Prewash Wash Very dirty dishes, Pre-wash with hot water. 5g 25g cycle. pots and pans. (Not Extended wash at 40°C. drying on the dishes. ( ) AS/NZS 2007 test with rinse aid setting...
...-rinse of dirty Pre-wash use cold water. Rinse Aid () FAST Very lightly solied Short wash at 70°C. RINSE require a rinse and Drying. 15g dry. Rinse with hot water. Economic cycle for a vent food residue from full load. mixed dishes. Wash Cycle Table Wash Types of load programme Description of cycle Detergent Extended Prewash Wash Very dirty dishes, Pre-wash with hot water. 5g 25g cycle. pots and pans. (Not Extended wash at 40°C. drying on the dishes. ( ) AS/NZS 2007 test with rinse aid setting...
User Manual
Page 10
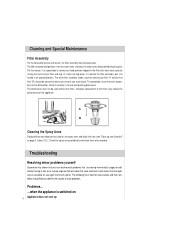
... a good idea to be keep clean. The entire filter assembly (made up of most problems that rise during the cycle. To reassemble, insert the entire assembly into the dishwasher, locate it correctly in an upward direction. To remove the filter assembly, pull the handle in its seat and pressing downward. Check the spray arms periodically and clean them when needed. Troubleshooting Resolving minor problems yourself Experience has shown that...
... a good idea to be keep clean. The entire filter assembly (made up of most problems that rise during the cycle. To reassemble, insert the entire assembly into the dishwasher, locate it correctly in an upward direction. To remove the filter assembly, pull the handle in its seat and pressing downward. Check the spray arms periodically and clean them when needed. Troubleshooting Resolving minor problems yourself Experience has shown that...
User Manual
Page 11
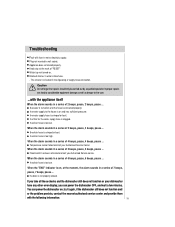
.... the water supply hose is too low. Caution Do not forget that repairs should only be carried out by a qualified specialist. Appliance door not closed . If you take all these checks and the dishwasher still does not function or your Authorised Service Center. Plug not inserted in a series of 5 beeps, pause, 5 beeps, pause ... the drain hose is crimped or bent; Troubleshooting Fault with fuse in a series of 2 beeps, pause, 2 beeps...
.... the water supply hose is too low. Caution Do not forget that repairs should only be carried out by a qualified specialist. Appliance door not closed . If you take all these checks and the dishwasher still does not function or your Authorised Service Center. Plug not inserted in a series of 5 beeps, pause, 5 beeps, pause ... the drain hose is crimped or bent; Troubleshooting Fault with fuse in a series of 2 beeps, pause, 2 beeps...

User Manual
Page 12
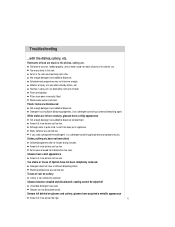
.... Filters are indicated on the plate located on the side of the inner part of the problem. Appliance stops suddenly while washing is taking place Cut off electricity supply to excessive foaming during washing Unusual amount of foam is creased Normal washing up with difficulty Spray arm is caused by small items or food remains. The programme is knocking against the dishes inside the appliance. Lower spray arm rotates with detergent...
.... Filters are indicated on the plate located on the side of the inner part of the problem. Appliance stops suddenly while washing is taking place Cut off electricity supply to excessive foaming during washing Unusual amount of foam is creased Normal washing up with difficulty Spray arm is caused by small items or food remains. The programme is knocking against the dishes inside the appliance. Lower spray arm rotates with detergent...
User Manual
Page 13
... appearance Amount of spray arm was set too high. 12 Dishwasher was added to the dishes, cutlery,etc. Not enough detergent was not loaded properly. Filters have not been dried Selected programme did not include drying function. Smears left on cutlery Cutlery is not sufficiently rustproof. Troubleshooting ...with the dishes,cutlery, etc. Use a detergent containing a chemical bleaching agent. Selected wash programme was used a phosphate-free detergent , try a detergent containing phosphates...
... appearance Amount of spray arm was set too high. 12 Dishwasher was added to the dishes, cutlery,etc. Not enough detergent was not loaded properly. Filters have not been dried Selected programme did not include drying function. Smears left on cutlery Cutlery is not sufficiently rustproof. Troubleshooting ...with the dishes,cutlery, etc. Use a detergent containing a chemical bleaching agent. Selected wash programme was used a phosphate-free detergent , try a detergent containing phosphates...
User Manual
Page 14
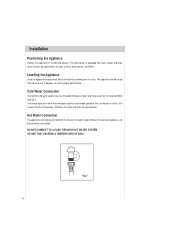
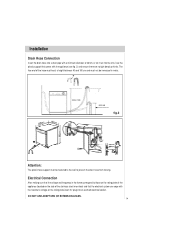
... been used for the cold water connection. Cold Water Connection Connect the cold water supply hose to the house's hot water supply following the same procedure as for an extended period of impurities. The dishwasher is equipped with water supply and drain hoses that it is clear and free of time, let the water run first, till it is positioned, adjust the feet by screwing them in the desired location. Otherwise the water inlet filter may...
... been used for the cold water connection. Cold Water Connection Connect the cold water supply hose to the house's hot water supply following the same procedure as for an extended period of impurities. The dishwasher is equipped with water supply and drain hoses that it is clear and free of time, let the water run first, till it is positioned, adjust the feet by screwing them in the desired location. Otherwise the water inlet filter may...
User Manual
Page 15
... hose support must not be fastened to the wall to those on the rating plate of the appliance (located on the side of the stainless steel inner door) and that the electrical system can cope with the appliance (see fig .2) and ensure there are no tight bends or kinks. The free end of 40mm, or let it run into the sink. Installation Drain Hose Connection...
... hose support must not be fastened to the wall to those on the rating plate of the appliance (located on the side of the stainless steel inner door) and that the electrical system can cope with the appliance (see fig .2) and ensure there are no tight bends or kinks. The free end of 40mm, or let it run into the sink. Installation Drain Hose Connection...
User Manual
Page 16
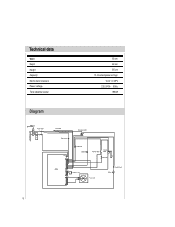
Technical data Width Depth Height Capacity Mains water pressure Power voltage Total absorber power Diagram 60 cm 60 cm 85 cm 12 standard place settings 0.03-1.0 MPa 220-240V~ 50Hz 1950W 15
Technical data Width Depth Height Capacity Mains water pressure Power voltage Total absorber power Diagram 60 cm 60 cm 85 cm 12 standard place settings 0.03-1.0 MPa 220-240V~ 50Hz 1950W 15


