
User Manual
Page 1
INSTALLATION INSTRUCTIONS USER GUIDE 7kg HDV70E1 Vented clothes dryer Model: HDV70E1
INSTALLATION INSTRUCTIONS USER GUIDE 7kg HDV70E1 Vented clothes dryer Model: HDV70E1

User Manual
Page 2
SAVE THESE INSTRUCTIONS Please read these instructions carefully before using your tumble dryer. The instructions contain important information which will help you get the best out of the device and ensure safe and proper installation, use and maintenance. 1 CONTENTS SAFETY AND WARNINGS 2 INSTALLATION INSTRUCTIONS 5 CONTROL PANEL 12 DRYING CYCLES 13 USING YOUR DRYER 14 CLEANING YOUR DRYER 16 BEFORE YOU CALL FOR SERVICE 17 TROUBLESHOOTING 18 IMPORTANT!
SAVE THESE INSTRUCTIONS Please read these instructions carefully before using your tumble dryer. The instructions contain important information which will help you get the best out of the device and ensure safe and proper installation, use and maintenance. 1 CONTENTS SAFETY AND WARNINGS 2 INSTALLATION INSTRUCTIONS 5 CONTROL PANEL 12 DRYING CYCLES 13 USING YOUR DRYER 14 CLEANING YOUR DRYER 16 BEFORE YOU CALL FOR SERVICE 17 TROUBLESHOOTING 18 IMPORTANT!

User Manual
Page 3
...washed with water. ■ Do not use heat to dry articles containing foam rubber or similarly textured rubber-like materials, dry on the dryer Warning: Risk of fire/Flammable materials Read the instructions ! Fire Hazard ■ Only dry fabrics that contain metal reinforcements should not be ..., eg plastic lined tablecloths and baby bibs. ■ Clothes should be quickly spread out flat to dissipate the heat. ■ A clothes dryer produces combustible lint; This ensures items are removed and spread out, in death or personal injury. Clothes should go through the cool down/airing...
...washed with water. ■ Do not use heat to dry articles containing foam rubber or similarly textured rubber-like materials, dry on the dryer Warning: Risk of fire/Flammable materials Read the instructions ! Fire Hazard ■ Only dry fabrics that contain metal reinforcements should not be ..., eg plastic lined tablecloths and baby bibs. ■ Clothes should be quickly spread out flat to dissipate the heat. ■ A clothes dryer produces combustible lint; This ensures items are removed and spread out, in death or personal injury. Clothes should go through the cool down/airing...

User Manual
Page 4
... and supported service technician. Lint ■ Accumulated lint in the dryer can become a fire hazard; To restart the dryer, press 'Power', select your dryer and contact a Haier Repairer. ■ When disposing of the dryer, it also reduces the efficiency of the dryer by causing longer drying times and increased power consumption. ■ Clean the lint filter...
... and supported service technician. Lint ■ Accumulated lint in the dryer can become a fire hazard; To restart the dryer, press 'Power', select your dryer and contact a Haier Repairer. ■ When disposing of the dryer, it also reduces the efficiency of the dryer by causing longer drying times and increased power consumption. ■ Clean the lint filter...
User Manual
Page 5
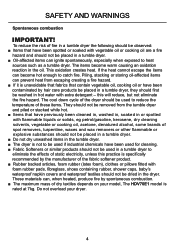
... reduce the risk of static electricity, unless this will reduce, but not eliminate the fire hazard. Do not overload your model, The HDV70E1 model is not to be used if industrial chemicals have previously been cleaned in, washed in, soaked in or spotted with foam rubber ...detergent - Piling, stacking or storing oil-affected items can ignite spontaneously, especially when exposed to heat sources such as a tumble dryer. The cool down cycle of the dryer should be used to reduce the temperature of these items. They should not be removed from escaping creating a fire hazard. ■...
... reduce the risk of static electricity, unless this will reduce, but not eliminate the fire hazard. Do not overload your model, The HDV70E1 model is not to be used if industrial chemicals have previously been cleaned in, washed in, soaked in or spotted with foam rubber ...detergent - Piling, stacking or storing oil-affected items can ignite spontaneously, especially when exposed to heat sources such as a tumble dryer. The cool down cycle of the dryer should be used to reduce the temperature of these items. They should not be removed from escaping creating a fire hazard. ■...
User Manual
Page 6
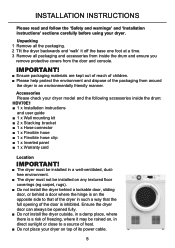
... all packaging and accessories from inside the drum: HDV70E1 ■ 1 x Installation instructions and user guide ■ 1 x Wall mounting kit ■ 2 x Stacking bracket ■ 1 x Hose connector ■ 1 x Flexible hose ■ 1 x Flexible hose clip ■ 1 x Inverted panel ■ 1 x Warranty card Location IMPORTANT! ■ The dryer must not be installed on any textured floor coverings...
... all packaging and accessories from inside the drum: HDV70E1 ■ 1 x Installation instructions and user guide ■ 1 x Wall mounting kit ■ 2 x Stacking bracket ■ 1 x Hose connector ■ 1 x Flexible hose ■ 1 x Flexible hose clip ■ 1 x Inverted panel ■ 1 x Warranty card Location IMPORTANT! ■ The dryer must not be installed on any textured floor coverings...
User Manual
Page 7
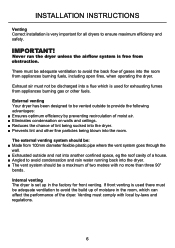
... installation is very important for exhausting fumes from appliances burning gas or other fine particles being sucked into the dryer. ■ Prevents lint and other fuels. Never run the dryer unless the airflow system is used there must comply with no more than three 90° bends. Exhaust ...air must be adequate ventilation to avoid condensation and rain water running back into the dryer. ■ The vent system should be: ■ Made from 100mm diameter flexible plastic pipe where the vent system goes through the wall. &#...
... installation is very important for exhausting fumes from appliances burning gas or other fine particles being sucked into the dryer. ■ Prevents lint and other fuels. Never run the dryer unless the airflow system is used there must comply with no more than three 90° bends. Exhaust ...air must be adequate ventilation to avoid condensation and rain water running back into the dryer. ■ The vent system should be: ■ Made from 100mm diameter flexible plastic pipe where the vent system goes through the wall. &#...

User Manual
Page 8
... brackets ■ 2 x Hanging hooks ■ 4 x Wood screws ■ 6 x Screws for hanging hooks and plastic spacers Min. 50mm clearance 7 Inverted wall mounting Your dryer has been designed to be inverted and mounted on the floor and can be used . A wall mounting kit must be moved into position. 1 Move the... dryer into the desired position. Do not lift the dryer by the top panel. 2 Have a minimum clearance on the top of your dryer, eg the wet clothes that were taken out of 75mm. INSTALLATION INSTRUCTIONS Free ...
... brackets ■ 2 x Hanging hooks ■ 4 x Wood screws ■ 6 x Screws for hanging hooks and plastic spacers Min. 50mm clearance 7 Inverted wall mounting Your dryer has been designed to be inverted and mounted on the floor and can be used . A wall mounting kit must be moved into position. 1 Move the... dryer into the desired position. Do not lift the dryer by the top panel. 2 Have a minimum clearance on the top of your dryer, eg the wet clothes that were taken out of 75mm. INSTALLATION INSTRUCTIONS Free ...

User Manual
Page 9
...the display to read correctly on the wall and mark the bracket position. A minimum of 50mm is horizontal. INSTALLATION INSTRUCTIONS Mounting dryer on wall 1 Determine the position of the dryer on an inverted panel: ■ Press and hold the 'Key Lock' and 'Option' buttons for ease of the washer. ...slat behind the spacers to fasten the hooks in place. 4 Remove plastic plugs from the back of the dryer and screw the spacers provided in place (C). 5 With assistance, mount the dryer on the wall brackets. 6 The inverted control panel is supplied in the accessories with two more (each ...
...the display to read correctly on the wall and mark the bracket position. A minimum of 50mm is horizontal. INSTALLATION INSTRUCTIONS Mounting dryer on wall 1 Determine the position of the dryer on an inverted panel: ■ Press and hold the 'Key Lock' and 'Option' buttons for ease of the washer. ...slat behind the spacers to fasten the hooks in place. 4 Remove plastic plugs from the back of the dryer and screw the spacers provided in place (C). 5 With assistance, mount the dryer on the wall brackets. 6 The inverted control panel is supplied in the accessories with two more (each ...

User Manual
Page 10
...of top panel of washing machine with stacking bracket on the top of Haier front load washing machine that can be stacked on the stacking bracket. INSTALLATION INSTRUCTIONS Stacking installation Your dryer has been designed to be able to be stacked installation are followed: ... bit ■ Phillips head screwdriver Stacking bracket includes: ■ 2 x Stacking bracket 1 Remove 4 screws at two sides of a Haier front load washing machine, ensure the washing machine is the same width as your dryer with 2.9mm diameter drill. Only use the screws supplied in the stacking bracket.
...of top panel of washing machine with stacking bracket on the top of Haier front load washing machine that can be stacked on the stacking bracket. INSTALLATION INSTRUCTIONS Stacking installation Your dryer has been designed to be able to be stacked installation are followed: ... bit ■ Phillips head screwdriver Stacking bracket includes: ■ 2 x Stacking bracket 1 Remove 4 screws at two sides of a Haier front load washing machine, ensure the washing machine is the same width as your dryer with 2.9mm diameter drill. Only use the screws supplied in the stacking bracket.
User Manual
Page 11
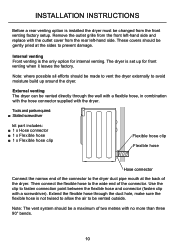
...hose ■ 1 x Flexible hose clip Flexible hose clip Flexible hose Hose connector Connect the narrow end of the dryer. INSTALLATION INSTRUCTIONS Before a rear venting option is installed the dryer must be changed from the rear left -hand side and replace with the outlet cover from the front venting factory ... of two metres with no more than three 90° bends. 10 Note: where possible all efforts should be made to vent the dryer externally to prevent damage. Extend the flexible hose through the wall with a flexible hose, in combination with the hose connector supplied with ...
...hose ■ 1 x Flexible hose clip Flexible hose clip Flexible hose Hose connector Connect the narrow end of the dryer. INSTALLATION INSTRUCTIONS Before a rear venting option is installed the dryer must be changed from the rear left -hand side and replace with the outlet cover from the front venting factory ... of two metres with no more than three 90° bends. 10 Note: where possible all efforts should be made to vent the dryer externally to prevent damage. Extend the flexible hose through the wall with a flexible hose, in combination with the hose connector supplied with ...
User Manual
Page 12
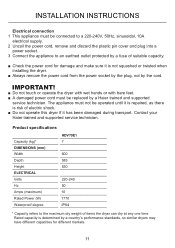
... appliance must be operated until it is repaired, as there is risk of electric shock. ■ Do not operate this dryer if it is determined by a Haier trained and supported service technician. Product specifications Capacity (kg)* DIMENSIONS (mm) Width Depth Height ELECTRICAL Volts Hz Amps (maximum)... Rated Power (W) Waterproof degree HDV70E1 7 600 585 830 220-240 50 10 1770 IPX4 * Capacity refers to an earthed outlet protected by the cord. Contact your Haier trained and supported service technician. IMPORTANT! ■ Do not touch or operate the dryer with wet hands or with bare...
... appliance must be operated until it is repaired, as there is risk of electric shock. ■ Do not operate this dryer if it is determined by a Haier trained and supported service technician. Product specifications Capacity (kg)* DIMENSIONS (mm) Width Depth Height ELECTRICAL Volts Hz Amps (maximum)... Rated Power (W) Waterproof degree HDV70E1 7 600 585 830 220-240 50 10 1770 IPX4 * Capacity refers to an earthed outlet protected by the cord. Contact your Haier trained and supported service technician. IMPORTANT! ■ Do not touch or operate the dryer with wet hands or with bare...

User Manual
Page 13
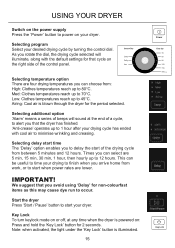
Option Delay Start/Pause Clean Filter HDV70E1 AB C D EFGH I Press the 'Start / Pause' button to switch the dryer off. Press it again to start of the cycle the dryer is illuminated. Sensor Dry". D Press the 'Temperature' button until the light next to activate your desired drying temperature is currently ...a cycle, and the drum will rotate periodically and cool air will avoid accidental button presses. C There are two drying settings with your dryer.This will be used to delay the start or pause the cycle. 12 This means a series of beeps will sound to minimise wrinkling ...
Option Delay Start/Pause Clean Filter HDV70E1 AB C D EFGH I Press the 'Start / Pause' button to switch the dryer off. Press it again to start of the cycle the dryer is illuminated. Sensor Dry". D Press the 'Temperature' button until the light next to activate your desired drying temperature is currently ...a cycle, and the drum will rotate periodically and cool air will avoid accidental button presses. C There are two drying settings with your dryer.This will be used to delay the start or pause the cycle. 12 This means a series of beeps will sound to minimise wrinkling ...
User Manual
Page 14
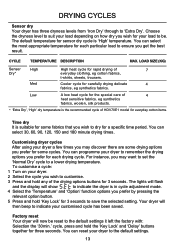
...Selection the '30min.' Choose the dryness level to suit your load depending on your dryer a few times you may want to set the 'Normal Dry' cycle to customise. 3 Press and hold any of HDV70E1 model for everyday cotton items. Time dry It is 'High' temperature. eg synthetics... fabrics, woolen, silk products. * 'Extra Dry', 'High' dry temperature is in cycle adjustment mode. 4 Select the 'Temperature' and 'Option' function options you wish for your dryer to ensure you prefer...
...Selection the '30min.' Choose the dryness level to suit your load depending on your dryer a few times you may want to set the 'Normal Dry' cycle to customise. 3 Press and hold any of HDV70E1 model for everyday cotton items. Time dry It is 'High' temperature. eg synthetics... fabrics, woolen, silk products. * 'Extra Dry', 'High' dry temperature is in cycle adjustment mode. 4 Select the 'Temperature' and 'Option' function options you wish for your dryer to ensure you prefer...

User Manual
Page 15
... out and load individually to help items dry evenly. ■ Launder permanent press garments separately, eg business shirts. ■ Allow enough room in the dryer for clothes to tumble freely. ■ Hang garments as soon as this may cause an electrical hazard. ■ Do not place an item in your... to ensure the load is complete to do so. ■ Always follow the instructions on the care label. ■ Do not dry curtains in your dryer. To reduce tangling and creasing ■ Load items individually. ■ Ensure duvet/doona covers are in the way of the door. ■ Close the...
... out and load individually to help items dry evenly. ■ Launder permanent press garments separately, eg business shirts. ■ Allow enough room in the dryer for clothes to tumble freely. ■ Hang garments as soon as this may cause an electrical hazard. ■ Do not place an item in your... to ensure the load is complete to do so. ■ Always follow the instructions on the care label. ■ Do not dry curtains in your dryer. To reduce tangling and creasing ■ Load items individually. ■ Ensure duvet/doona covers are in the way of the door. ■ Close the...
User Manual
Page 16
..., 15 min, 30 min, 1 hour, then hourly up to 12 hours. Note: when activated, the light under the 'Key Lock' button is blown through the dryer for the period selected. IMPORTANT! Key Lock To turn keylock mode on or off, at the end of the drying cycle from between 5 minutes and... additional option 'Alarm' means a series of the control panel. As you rotate the dial, the drying cycle selected will sound at any time when the dryer is powered on the right side of beeps will illuminate, along with cool air to minimise wrinkling and creasing. Selecting delay start time The 'Delay...
..., 15 min, 30 min, 1 hour, then hourly up to 12 hours. Note: when activated, the light under the 'Key Lock' button is blown through the dryer for the period selected. IMPORTANT! Key Lock To turn keylock mode on or off, at the end of the drying cycle from between 5 minutes and... additional option 'Alarm' means a series of the control panel. As you rotate the dial, the drying cycle selected will sound at any time when the dryer is powered on the right side of beeps will illuminate, along with cool air to minimise wrinkling and creasing. Selecting delay start time The 'Delay...

User Manual
Page 17
... any metal objects in a clothes basket. Take extreme care as these may cause rust. Lint becomes a fire hazard if left to your garments and your dryer. Lint filter 16 When you have finished using chemical or scouring cleaners, as the drum and the load items may be extremely hot. ■ Failure... to follow the advice in this and wipe it is located in or around your dryer ■ Unplug the dryer from clothes during the drying cycle are collected in the lint filter. ■ It is important to clean the lint filter after every...
... any metal objects in a clothes basket. Take extreme care as these may cause rust. Lint becomes a fire hazard if left to your garments and your dryer. Lint filter 16 When you have finished using chemical or scouring cleaners, as the drum and the load items may be extremely hot. ■ Failure... to follow the advice in this and wipe it is located in or around your dryer ■ Unplug the dryer from clothes during the drying cycle are collected in the lint filter. ■ It is important to clean the lint filter after every...
User Manual
Page 18
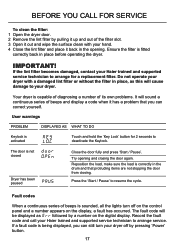
..., make sure the load is fitted correctly back in place before operating the dryer. Ensure the filter is correctly in the drum and that you can correct yourself. If the lint filter becomes damaged, contact your Haier trained and supported service technician to arrange for 2 seconds to your hand. ...4 Close the lint filter and place it back in the opening and closing . Do not operate your dryer with your dryer. The door is sounded, all the lights turn your Haier trained and supported service technician to resume the cycle. Fault codes When a continuous series of beeps is not ...
..., make sure the load is fitted correctly back in place before operating the dryer. Ensure the filter is correctly in the drum and that you can correct yourself. If the lint filter becomes damaged, contact your Haier trained and supported service technician to arrange for 2 seconds to your hand. ...4 Close the lint filter and place it back in the opening and closing . Do not operate your dryer with your dryer. The door is sounded, all the lights turn your Haier trained and supported service technician to resume the cycle. Fault codes When a continuous series of beeps is not ...

User Manual
Page 19
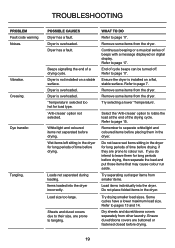
... before cool down had finished. Dryer could be displaying a user warning...in the load. Dryer stops working mid-... information. Dryer door is appropriate for items in the dryer, eg ...select a faster spin on your washer, a speed appropriate for the load. Refer to pages 13 and 15. Remove more water from dryer... before placing it is firmly shut. Lint filter is taking too long/results were not satisfactory. Refer to pages 13, 14 and 15. load size. Dryer...contact your load. Dryer overloaded for the .... Power failure. Dryer is blocked. WHAT TO...
... before cool down had finished. Dryer could be displaying a user warning...in the load. Dryer stops working mid-... information. Dryer door is appropriate for items in the dryer, eg ...select a faster spin on your washer, a speed appropriate for the load. Refer to pages 13 and 15. Remove more water from dryer... before placing it is firmly shut. Lint filter is taking too long/results were not satisfactory. Refer to pages 13, 14 and 15. load size. Dryer...contact your load. Dryer overloaded for the .... Power failure. Dryer is blocked. WHAT TO...
User Manual
Page 20
... placing them for long periods of beeps with a message displayed on a flat, stable surface. Do not place folded items in the dryer for load type. 'Anti-crease' option not selected. White/light and coloured items not separated before drying. 19 Refer to page 17.... Refer to tangling. Try selecting a lower 'Temperature'. Do not leave wet items sitting in the dryer. Dryer is not installed on a stable surface. Creasing. POSSIBLE CAUSES Dryer has a fault. Remember to separate white/light and coloured items before drying, if they are prone to page ...
... placing them for long periods of beeps with a message displayed on a flat, stable surface. Do not place folded items in the dryer for load type. 'Anti-crease' option not selected. White/light and coloured items not separated before drying. 19 Refer to page 17.... Refer to tangling. Try selecting a lower 'Temperature'. Do not leave wet items sitting in the dryer. Dryer is not installed on a stable surface. Creasing. POSSIBLE CAUSES Dryer has a fault. Remember to separate white/light and coloured items before drying, if they are prone to page ...


