User Manual
Page 2
... operate your appliance, follow basic precautions, including the following: 1, Read all instructions before using your appliance in the wall, have a certified electrician install the proper receptacle. Do not tamper with the correct electrical supply. 18. To reduce the risk of explosive fumes. 10. Replace immediately worn power cords, loose plugs/power outlets, 7. Do not add or mix any repairs, 8, Do not open the door...
... operate your appliance, follow basic precautions, including the following: 1, Read all instructions before using your appliance in the wall, have a certified electrician install the proper receptacle. Do not tamper with the correct electrical supply. 18. To reduce the risk of explosive fumes. 10. Replace immediately worn power cords, loose plugs/power outlets, 7. Do not add or mix any repairs, 8, Do not open the door...
User Manual
Page 3
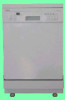
This easy-to your dishwasher. You will guide you for purchasing our Haier product. iswillletthetrapped hydrogeenscapDe.urintghisprocesdsonoturnonanelectraicppliance, smokelig, hta match/lighoterrusea flametoavoidanaccidenats,hydrogen...a label in getting the best use manual will need it to record the model and serial number. SAVETHESEINSTRUCTIONS Thank you in back of purchase Staple your receipt to -use of your manual. Remember to obtain warranty service. then2 weekTs.hiscouldbeexplosivaendcanexploduendecrertain circumstanIcfethsi.sisthecaseb,...
This easy-to your dishwasher. You will guide you for purchasing our Haier product. iswillletthetrapped hydrogeenscapDe.urintghisprocesdsonoturnonanelectraicppliance, smokelig, hta match/lighoterrusea flametoavoidanaccidenats,hydrogen...a label in getting the best use manual will need it to record the model and serial number. SAVETHESEINSTRUCTIONS Thank you in back of purchase Staple your receipt to -use of your manual. Remember to obtain warranty service. then2 weekTs.hiscouldbeexplosivaendcanexploduendecrertain circumstanIcfethsi.sisthecaseb,...
User Manual
Page 4
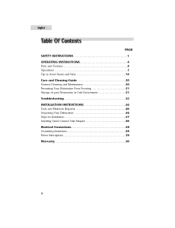
... INSTRUCTIONS 1 OPERATING INSTRUCTIONS 4 Parts and Features 4 Operations 7 Tips to Avoid Stains and Films 14 Care and Cleaning Guide 20 General Cleaning and Maintenance 20 Preventing Your Dishwasher From Freezing 21 Storage of your Dishwasher in Cold Environment 21 Troubleshooting 22 INSTALLATION INSTRUCTIONS 26 Tools and Materials Required 26 Unpacking Your Dishwasher 26 Steps for Installation 27 Installing Quick Connect Sink Adapter 28 Electrical Connections 29 Grounding Instructions 29 Power Interruptions 29 Warranty...
... INSTRUCTIONS 1 OPERATING INSTRUCTIONS 4 Parts and Features 4 Operations 7 Tips to Avoid Stains and Films 14 Care and Cleaning Guide 20 General Cleaning and Maintenance 20 Preventing Your Dishwasher From Freezing 21 Storage of your Dishwasher in Cold Environment 21 Troubleshooting 22 INSTALLATION INSTRUCTIONS 26 Tools and Materials Required 26 Unpacking Your Dishwasher 26 Steps for Installation 27 Installing Quick Connect Sink Adapter 28 Electrical Connections 29 Grounding Instructions 29 Power Interruptions 29 Warranty...

User Manual
Page 8
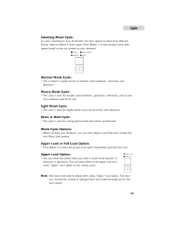
..., Normal, Rinse & Hold and Light wash cycle options. You can delay the starting time for a wash cycle between 1 to remove items right a way after you turn the power "On", the function indicator light will go "On". If you try to 9 hours, Timer Display: • This display shows number of hours you are in order to avoid any water leak, Wash Cycle Selector Button 1_ : • Press this button to expand slowly inside the dishwasher because of hot air...
..., Normal, Rinse & Hold and Light wash cycle options. You can delay the starting time for a wash cycle between 1 to remove items right a way after you turn the power "On", the function indicator light will go "On". If you try to 9 hours, Timer Display: • This display shows number of hours you are in order to avoid any water leak, Wash Cycle Selector Button 1_ : • Press this button to expand slowly inside the dishwasher because of hot air...

User Manual
Page 9
... door is opened during the operation. The light indictor will stop automatically if the door is closed again, Warning: The dishwasher door must be closed at all times during the operation. Wash Cycle Indicator Light: [] Heavy []Normal • Riase & Hold [] Liglll • When the wash cycle is selected, the light comes on when you want to select Vented Dry option to add or remove dishware during the cycle operation. Press this option is selected. The heating element...
... door is opened during the operation. The light indictor will stop automatically if the door is closed again, Warning: The dishwasher door must be closed at all times during the operation. Wash Cycle Indicator Light: [] Heavy []Normal • Riase & Hold [] Liglll • When the wash cycle is selected, the light comes on when you want to select Vented Dry option to add or remove dishware during the cycle operation. Press this option is selected. The heating element...
User Manual
Page 10
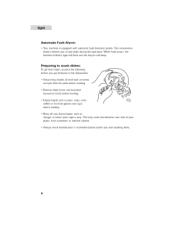
... dishwasher: • Discard big chunks of any faults during the operation, When fault occurs, the function indicator light will flash and the buzzer will beep. Preparing to your • Always check manufacturer's recommendations before loading, • Rinse off acid based liquid, such as vinegar or lemon juice right a way. This may cause discoloration plates, food containers or internal cabinet, over time to wash dishes...
... dishwasher: • Discard big chunks of any faults during the operation, When fault occurs, the function indicator light will flash and the buzzer will beep. Preparing to your • Always check manufacturer's recommendations before loading, • Rinse off acid based liquid, such as vinegar or lemon juice right a way. This may cause discoloration plates, food containers or internal cabinet, over time to wash dishes...
User Manual
Page 11
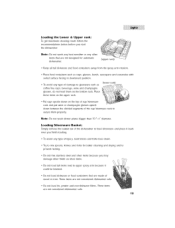
lO Loading the Lower & Upper rack: To get maximum cleaning result, follow the recommendations below before you start the dishwasher: Note: Do not wash any heat sensitive or any other items that are not designed for automatic dishwasher. (upper rack) • Keep all tall dishware and food containers away from the spray arm rotation. • Place food containers such as cups, glasses, bowls, saucepans and...
lO Loading the Lower & Upper rack: To get maximum cleaning result, follow the recommendations below before you start the dishwasher: Note: Do not wash any heat sensitive or any other items that are not designed for automatic dishwasher. (upper rack) • Keep all tall dishware and food containers away from the spray arm rotation. • Place food containers such as cups, glasses, bowls, saucepans and...
User Manual
Page 13
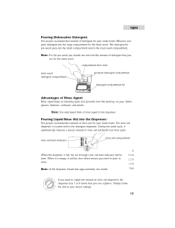
... detergent compartment detergent compartment lid Advantages of Rinse Agent: Rinse agent helps in removing spots and prevents new film build-up on your wash loads. During the wash cycle, it will be clear which means you need to pour in the dispenser. F12 3/4Fu i/2Fu i/4Fu Emp If you want to adjust the amount of rinse aid dispensed, the dispenser has 1 to the detergent dispenser. The detergent for pre-wash goes into the Dispenser: Use...
... detergent compartment detergent compartment lid Advantages of Rinse Agent: Rinse agent helps in removing spots and prevents new film build-up on your wash loads. During the wash cycle, it will be clear which means you need to pour in the dispenser. F12 3/4Fu i/2Fu i/4Fu Emp If you want to adjust the amount of rinse aid dispensed, the dispenser has 1 to the detergent dispenser. The detergent for pre-wash goes into the Dispenser: Use...
User Manual
Page 14
... the rinse aid level become less, the size of the children reach. Make sure all items are loaded in proper detergent into the detergent dispenser. 3. Open the door and let hot steam inside the dishwasher out. Close the door and latch safely. 4. Select the desired wash cycle and options. 5, Press "Start" button to start with damp cloth. After the hot steam is harmful! At this time you finish pouring, replace the cap back by turning it...
... the rinse aid level become less, the size of the children reach. Make sure all items are loaded in proper detergent into the detergent dispenser. 3. Open the door and let hot steam inside the dishwasher out. Close the door and latch safely. 4. Select the desired wash cycle and options. 5, Press "Start" button to start with damp cloth. After the hot steam is harmful! At this time you finish pouring, replace the cap back by turning it...
User Manual
Page 15
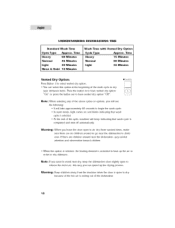
...: Normal, Heavy, Light and Rinse & Hold option, Press Button 1 to wash small numbers of detergent than you want to select proper wash cycle option based on the soil content on the control panel. • Uppm Load • Full Load Note: The lower rack must use one-hall the amount of dishware or glassware. Heavy Wash Cycle: • This cycle is used for lightly soiled or pre-rinsed dishes and silverware. Upper Load or Full Load Option...
...: Normal, Heavy, Light and Rinse & Hold option, Press Button 1 to wash small numbers of detergent than you want to select proper wash cycle option based on the soil content on the control panel. • Uppm Load • Full Load Note: The lower rack must use one-hall the amount of dishware or glassware. Heavy Wash Cycle: • This cycle is used for lightly soiled or pre-rinsed dishes and silverware. Upper Load or Full Load Option...
User Manual
Page 16
... of the wash cycle to dry your dishware items. Press the button in order to release the moist air, this option is selected, the heating element is completed and shut off automatically. iiiiiiiiiiiiiiiiiiiiiiiiiiiiiiiiiiiiiiiiiiiiiiiiiiUi!i! !i !i !i !i !i !i !i !i !i !i !i !i !i !i !i !i !i !i ! Time 60 Minutes 45 Minutes Light Rinse & Hold 40 Minutes 10 Minutes Wash Time with Vented Dry Option Cycle Type Heavy Normal Approx. Note: If you want to avoid heat dry, keep the dishwasher door slightly open to dry dishware.
... of the wash cycle to dry your dishware items. Press the button in order to release the moist air, this option is selected, the heating element is completed and shut off automatically. iiiiiiiiiiiiiiiiiiiiiiiiiiiiiiiiiiiiiiiiiiiiiiiiiiUi!i! !i !i !i !i !i !i !i !i !i !i !i !i !i !i !i !i !i !i ! Time 60 Minutes 45 Minutes Light Rinse & Hold 40 Minutes 10 Minutes Wash Time with Vented Dry Option Cycle Type Heavy Normal Approx. Note: If you want to avoid heat dry, keep the dishwasher door slightly open to dry dishware.
User Manual
Page 17
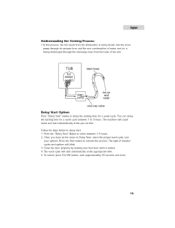
... delay the starting time for a wash cycle between 1-9 hours. 2, Once you have set time, Follow the steps below to delay start: I to delay the starting time for a wash cycle. The machine will blink. 3, Close the door properly by making sure that door latch is being discharged through the discharge hose from the dishwasher is being drawn into the drain pump through its vacuum force and the mix condensation of water and air is locked. 4. Understanding the Venting...
... delay the starting time for a wash cycle between 1-9 hours. 2, Once you have set time, Follow the steps below to delay start: I to delay the starting time for a wash cycle. The machine will blink. 3, Close the door properly by making sure that door latch is being discharged through the discharge hose from the dishwasher is being drawn into the drain pump through its vacuum force and the mix condensation of water and air is locked. 4. Understanding the Venting...
User Manual
Page 18
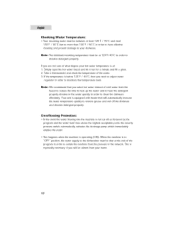
... open the hot water faucet and let it run for a minute and fill a glass, 2. Overflowing Protection: • in order to maintain that temperature level. in order to If you need to adjust water regulator in order to clean the dishware effectively. Note: The minimum incoming temperature must be between at the end of cold water from the pressure in order to remove...
... open the hot water faucet and let it run for a minute and fill a glass, 2. Overflowing Protection: • in order to maintain that temperature level. in order to If you need to adjust water regulator in order to clean the dishware effectively. Note: The minimum incoming temperature must be between at the end of cold water from the pressure in order to remove...
User Manual
Page 21
... below the lower rack, • After wash and dry cycle is finished, you wash and clean all three filters gently in hot, soapy water and rinse them thoroughly periodically to take the filter out. • Remove and clean any sharp objects that can scratch the cabinet surface, Cleaning Dishwasher Filters: • The filters are located inside of dishwasher. • Use warm soapy water with soft brush or piece of cloth to clean the interior of a tub...
... below the lower rack, • After wash and dry cycle is finished, you wash and clean all three filters gently in hot, soapy water and rinse them thoroughly periodically to take the filter out. • Remove and clean any sharp objects that can scratch the cabinet surface, Cleaning Dishwasher Filters: • The filters are located inside of dishwasher. • Use warm soapy water with soft brush or piece of cloth to clean the interior of a tub...
User Manual
Page 23
... the load, • May have to close the door properly. Dishes are cloudy • Use of old or poor detergent. You need to check if vented dry option is "ON" position. • low water temperature, You may need to adjust water regulator. • Overloading of dishware. Dishwasher does not work: • Check if the unit is plugged in your area, You may need to install water softener. • Spray arms may...
... the load, • May have to close the door properly. Dishes are cloudy • Use of old or poor detergent. You need to check if vented dry option is "ON" position. • low water temperature, You may need to adjust water regulator. • Overloading of dishware. Dishwasher does not work: • Check if the unit is plugged in your area, You may need to install water softener. • Spray arms may...

User Manual
Page 24
... overload. Etching: • Too much detergent Use the appropriate used . You need to allow cycle to be hand washed. Make sure delicate items are being tossed around the tub. Noise: Some of the sounds you will hear are normal. • You will hear sound of the water fill and rinse. • You will hear drain valve opening to pump water out. • You will hear...
... overload. Etching: • Too much detergent Use the appropriate used . You need to allow cycle to be hand washed. Make sure delicate items are being tossed around the tub. Noise: Some of the sounds you will hear are normal. • You will hear sound of the water fill and rinse. • You will hear drain valve opening to pump water out. • You will hear...
User Manual
Page 25
..., the dishwasher operation will discolor the tub with extended use of the detergent, • Some "acid based" and "paste based" foods may discolor the tub. Read container label carefully before use . Draining Problem: • Check the level of the cycle. 24 You may stop in you area. You need to decrease the level of old detergent. Use of rinse cycle helps to use air dry option by leaving your door open for...
..., the dishwasher operation will discolor the tub with extended use of the detergent, • Some "acid based" and "paste based" foods may discolor the tub. Read container label carefully before use . Draining Problem: • Check the level of the cycle. 24 You may stop in you area. You need to decrease the level of old detergent. Use of rinse cycle helps to use air dry option by leaving your door open for...
User Manual
Page 26
... lower rack. The water will not fill: • Check water supply. If not, call for service. Note: If for any reason the dishwasher malfunctions during the operation, follow the steps below to drain the water out, I) Shut off the dishwasher and wait few seconds drain pump will hear some type drain pump noise in the dishwasher, Observe if the drain hose is pumping water out in to the sink. 3) Immediately turn off the dishwasher...
... lower rack. The water will not fill: • Check water supply. If not, call for service. Note: If for any reason the dishwasher malfunctions during the operation, follow the steps below to drain the water out, I) Shut off the dishwasher and wait few seconds drain pump will hear some type drain pump noise in the dishwasher, Observe if the drain hose is pumping water out in to the sink. 3) Immediately turn off the dishwasher...
User Manual
Page 27
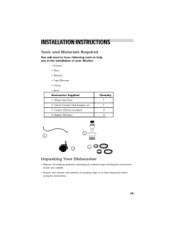
Quick Connect Sink Adapter set 3. Casters (factory installed) 4, Rubber Washers Quantity 1 1 4 4 B oO Unpacking Your Dishwasher • Remove all packing materials including all adhesive tape holding the accessories inside and outside, • Inspect and remove any remains of your Washer: Pliers Wrench Tape Measure Gloves level Accessories Supplied 1, Water Inlet Hose 2. TooMs and Materials Required You will need to have you in the installation Scissors following tools to help of packing, tape or printed materials before using the dishwasher. 26
Quick Connect Sink Adapter set 3. Casters (factory installed) 4, Rubber Washers Quantity 1 1 4 4 B oO Unpacking Your Dishwasher • Remove all packing materials including all adhesive tape holding the accessories inside and outside, • Inspect and remove any remains of your Washer: Pliers Wrench Tape Measure Gloves level Accessories Supplied 1, Water Inlet Hose 2. TooMs and Materials Required You will need to have you in the installation Scissors following tools to help of packing, tape or printed materials before using the dishwasher. 26
User Manual
Page 28
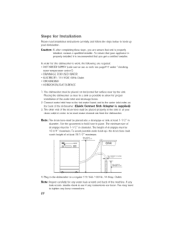
... appliance is properly installed it is supplied) 3, The other end of the drain hose must be placed properly in the sink or at least 1-1/2" in diameter. Plug in order to let used water drained out from the dishwasher. Note: The drain hose must be placed on the back of the dishwasher. (Quick Connect Sink Adapter is recommended that you are loose, You may need to a regular 115...
... appliance is properly installed it is supplied) 3, The other end of the drain hose must be placed properly in the sink or at least 1-1/2" in diameter. Plug in order to let used water drained out from the dishwasher. Note: The drain hose must be placed on the back of the dishwasher. (Quick Connect Sink Adapter is recommended that you are loose, You may need to a regular 115...


