Product Manual
Page 3
... Do not clean coffee maker with this appliance. SAVE THESE INSTRUCTIONS HOUSEHOLD USE ONLY Staple your manual. English 14. Do not set a hot carafe on a range top or in a conventional or microwave oven. 18. Scalding may occur is the cover is designed for other abrasive materials. ...Do not use appliance for use with scouring powders, steel wool pads, or other than intended use a cracked carafe or a carafe that has a loose or weak- You will need it to your receipt to obtain warranty service. 2 ened handle. 20. The container ...
... Do not clean coffee maker with this appliance. SAVE THESE INSTRUCTIONS HOUSEHOLD USE ONLY Staple your manual. English 14. Do not set a hot carafe on a range top or in a conventional or microwave oven. 18. Scalding may occur is the cover is designed for other abrasive materials. ...Do not use appliance for use with scouring powders, steel wool pads, or other than intended use a cracked carafe or a carafe that has a loose or weak- You will need it to your receipt to obtain warranty service. 2 ened handle. 20. The container ...
Product Manual
Page 6
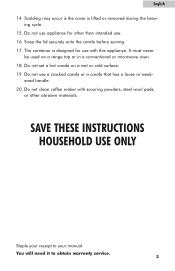
Keep Warm Plate 9. Power On Indicator Light 5. Removable Filter Basket 4. Water Level Indicator 8. Removable Filter 3. Water Reservoir 2. Flip Up Cover 7. Carafe English PARTS AND FEATURES 6 1 2 7 3 4 5 9 8 1. Control Panel/LCD Display 5 6.
Keep Warm Plate 9. Power On Indicator Light 5. Removable Filter Basket 4. Water Level Indicator 8. Removable Filter 3. Water Reservoir 2. Flip Up Cover 7. Carafe English PARTS AND FEATURES 6 1 2 7 3 4 5 9 8 1. Control Panel/LCD Display 5 6.

Product Manual
Page 7
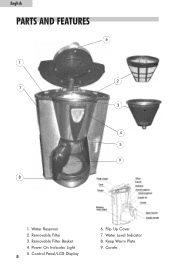
... your first brew cycle, you may adjust according to the MAX marker and follow the steps below (but you will now begin. 6 Remove and Clean carafe, Lid, Filter and filter basket thoroughly with water to a power outlet. OPERATION Making Coffee 1) Open the flip up to your desired fill level. Note: Please... clean water by filling the reservoir up lid of coffee maker, use ground coffee at this time), then pour the cycled water out of the carafe. Then place the filter into the outlet, the LCD will display "AM 12:00" (fig.1). 6) Press the "ON/OFF" button, the "RUN" indicator lamp ...
... your first brew cycle, you may adjust according to the MAX marker and follow the steps below (but you will now begin. 6 Remove and Clean carafe, Lid, Filter and filter basket thoroughly with water to a power outlet. OPERATION Making Coffee 1) Open the flip up to your desired fill level. Note: Please... clean water by filling the reservoir up lid of coffee maker, use ground coffee at this time), then pour the cycled water out of the carafe. Then place the filter into the outlet, the LCD will display "AM 12:00" (fig.1). 6) Press the "ON/OFF" button, the "RUN" indicator lamp ...
Product Manual
Page 8
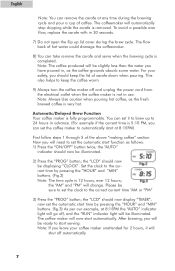
... start automatically. The coffee maker will change. The flow back of hot water could damage the coffeemaker. 8) You can remove the carafe at 8:15PM the "AUTO" indicator light will automatically stop dripping while the carafe is 5:10 PM, you leave your safety, you have poured in advance. (For example if...unplug the power cord from the electrical outlet when the coffee maker is 12 hours, ever 12 hours; The coffeemaker will go off automatically. 7 To avoid a possible over flow, replace the carafe with in 30 seconds. 7) Do not open the flip up to 24 hours in , as the fresh ...
... start automatically. The coffee maker will change. The flow back of hot water could damage the coffeemaker. 8) You can remove the carafe at 8:15PM the "AUTO" indicator light will automatically stop dripping while the carafe is 5:10 PM, you leave your safety, you have poured in advance. (For example if...unplug the power cord from the electrical outlet when the coffee maker is 12 hours, ever 12 hours; The coffeemaker will go off automatically. 7 To avoid a possible over flow, replace the carafe with in 30 seconds. 7) Do not open the flip up to 24 hours in , as the fresh ...
Product Manual
Page 9
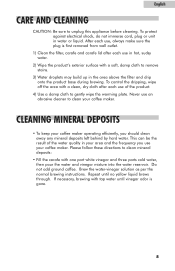
English CARE AND CLEANING CAUTION: Be sure to clean mineral deposits: • Fill the carafe with one part white vinegar and three parts cold water, then pour the water and vinegar mixture into the water reservoir. Do not add ground ... brewing instructions. Please follow these directions to unplug this appliance before cleaning. Repeat until vinegar odor is first removed from wall outlet. 1) Clean the filter, carafe and carafe lid after each use in hot, sudsy water. 2) Wipe the product's exterior surface with a clean, dry cloth after each use , always make sure the...
English CARE AND CLEANING CAUTION: Be sure to clean mineral deposits: • Fill the carafe with one part white vinegar and three parts cold water, then pour the water and vinegar mixture into the water reservoir. Do not add ground ... brewing instructions. Please follow these directions to unplug this appliance before cleaning. Repeat until vinegar odor is first removed from wall outlet. 1) Clean the filter, carafe and carafe lid after each use in hot, sudsy water. 2) Wipe the product's exterior surface with a clean, dry cloth after each use , always make sure the...

