
Product Manual
Page 2
Do not place on or taking off parts and before cleaning. Do not touch hot surfaces. Return appliance to persons do not immerse cord, plug or unit in a heated oven. 12. To disconnect, turn all instructions carefully. 2. Read all controls to fill the water reservoir. Never use with a damaged cord or plug, or after the appliance malfunctions or has been damaged in...
Do not place on or taking off parts and before cleaning. Do not touch hot surfaces. Return appliance to persons do not immerse cord, plug or unit in a heated oven. 12. To disconnect, turn all instructions carefully. 2. Read all controls to fill the water reservoir. Never use with a damaged cord or plug, or after the appliance malfunctions or has been damaged in...
Product Manual
Page 3
Do not clean coffee maker with this appliance. Do not use . 16. The container is lifted or removed during the brew- Do not set a hot carafe on a range top or in a conventional or microwave oven. 18. ened handle. 20. You will need it to your manual. Scalding may occur is the cover is designed for other abrasive materials. Do not use appliance for use with...
Do not clean coffee maker with this appliance. Do not use . 16. The container is lifted or removed during the brew- Do not set a hot carafe on a range top or in a conventional or microwave oven. 18. ened handle. 20. You will need it to your manual. Scalding may occur is the cover is designed for other abrasive materials. Do not use appliance for use with...
Product Manual
Page 4
English TABLE OF CONTENTS PAGE Important Safeguards 1 Parts and Features 5 Before Using for the First Time 6 Operation 6 Care and Cleaning 8 Cleaning Mineral Deposits 8 Hints for Great Tasting Coffee 9 Storage 9 Limited Warranty 10 3
English TABLE OF CONTENTS PAGE Important Safeguards 1 Parts and Features 5 Before Using for the First Time 6 Operation 6 Care and Cleaning 8 Cleaning Mineral Deposits 8 Hints for Great Tasting Coffee 9 Storage 9 Limited Warranty 10 3

Product Manual
Page 5
... in or tripping over . 4 The extension cord should be used if care is listed on the bottom panel of the counter top or table top where... it can be pulled on by children or tripped over a long cord. English Polarized Plug This appliance has a polarized plug, To reduce the risk of this appliance. Power Cord A short power...reduce risks resulting from becoming entangled in their use: The marked electrical rating of extension cord is intended to fit into a polarized outlet only one way, If the plug does not fit fully...
... in or tripping over . 4 The extension cord should be used if care is listed on the bottom panel of the counter top or table top where... it can be pulled on by children or tripped over a long cord. English Polarized Plug This appliance has a polarized plug, To reduce the risk of this appliance. Power Cord A short power...reduce risks resulting from becoming entangled in their use: The marked electrical rating of extension cord is intended to fit into a polarized outlet only one way, If the plug does not fit fully...
Product Manual
Page 6
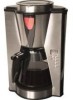
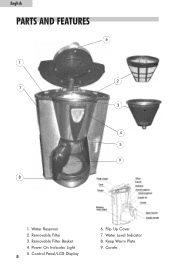
Water Reservoir 2. Removable Filter 3. Carafe English PARTS AND FEATURES 6 1 2 7 3 4 5 9 8 1. Water Level Indicator 8. Power On Indicator Light 5. Flip Up Cover 7. Control Panel/LCD Display 5 6. Removable Filter Basket 4. Keep Warm Plate 9.
Water Reservoir 2. Removable Filter 3. Carafe English PARTS AND FEATURES 6 1 2 7 3 4 5 9 8 1. Water Level Indicator 8. Power On Indicator Light 5. Flip Up Cover 7. Control Panel/LCD Display 5 6. Removable Filter Basket 4. Keep Warm Plate 9.

Product Manual
Page 7
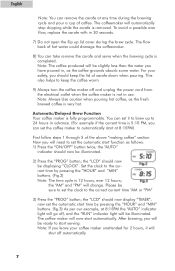
... to fill the water reservoir with warm water. Unpack the unit. 2. OPERATION Making Coffee 1) Open the flip up to filter. Repeat 2 times. One level tablespoon for the unit on to the warming plate. 5) Plug the power cord into the filter basket. 3) Add ground coffee to the MAX marker and follow the steps below (but you will now begin. 6 Remove and Clean carafe, Lid, Filter and filter basket thoroughly with cold water. Make sure it is...
... to fill the water reservoir with warm water. Unpack the unit. 2. OPERATION Making Coffee 1) Open the flip up to filter. Repeat 2 times. One level tablespoon for the unit on to the warming plate. 5) Plug the power cord into the filter basket. 3) Add ground coffee to the MAX marker and follow the steps below (but you will now begin. 6 Remove and Clean carafe, Lid, Filter and filter basket thoroughly with cold water. Make sure it is...
Product Manual
Page 8
... displaying "CLOCK". The flow back of carafe down when pouring. Note: Always Use caution when pouring hot coffee, as the coffee grounds absorb some water. You can set the coffee maker to keep the lid of hot water could damage the coffeemaker. 8) You can remove the carafe at any time during the brew cycle. the "LCD" should keep the coffee warm. 9) Always turn the coffee maker off , and the "RUN" indicator light will need to start serving. After brewing, you can set the automatic start...
... displaying "CLOCK". The flow back of carafe down when pouring. Note: Always Use caution when pouring hot coffee, as the coffee grounds absorb some water. You can set the coffee maker to keep the lid of hot water could damage the coffeemaker. 8) You can remove the carafe at any time during the brew cycle. the "LCD" should keep the coffee warm. 9) Always turn the coffee maker off , and the "RUN" indicator light will need to start serving. After brewing, you can set the automatic start...
Product Manual
Page 9
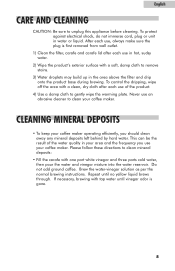
... brewing instructions. Repeat until vinegar odor is first removed from wall outlet. 1) Clean the filter, carafe and carafe lid after each use in your coffee maker operating efficiently, you use an abrasive cleaner to gently wipe the warming plate. To protect against electrical shock, do not immerse cord, plug or unit in the area above the filter and drip onto the product base during brewing. CLEANING MINERAL DEPOSITS • To keep...
... brewing instructions. Repeat until vinegar odor is first removed from wall outlet. 1) Clean the filter, carafe and carafe lid after each use in your coffee maker operating efficiently, you use an abrasive cleaner to gently wipe the warming plate. To protect against electrical shock, do not immerse cord, plug or unit in the area above the filter and drip onto the product base during brewing. CLEANING MINERAL DEPOSITS • To keep...
Product Manual
Page 10
... to fray and break. 9 Regularly clean your coffee maker while it to the extraction of brewed, black coffee are used. Store your coffee maker in a clean dry place. For optimum coffee taste, buy whole coffee beans and grind them finely just before storing. HINTS FOR GREAT-TASTING COFFEE 1. STORAGE Unplug the unit and allow it is essential for making great-tasting coffee. Never wrap cord tightly around...
... to fray and break. 9 Regularly clean your coffee maker while it to the extraction of brewed, black coffee are used. Store your coffee maker in a clean dry place. For optimum coffee taste, buy whole coffee beans and grind them finely just before storing. HINTS FOR GREAT-TASTING COFFEE 1. STORAGE Unplug the unit and allow it is essential for making great-tasting coffee. Never wrap cord tightly around...
Product Manual
Page 11
...-purchase (the original receipt) Exceptions: Commercial or Rental Use Warranty is not covered by this warranty: Damage from other than authorized service center. Haier will repair or replace any part free of original purchase. Some states do not allow limitations on how long an implied warranty lasts, so the above limitations may have the following information available: Model number of household fuses, circuit breakers or wiring.
...-purchase (the original receipt) Exceptions: Commercial or Rental Use Warranty is not covered by this warranty: Damage from other than authorized service center. Haier will repair or replace any part free of original purchase. Some states do not allow limitations on how long an implied warranty lasts, so the above limitations may have the following information available: Model number of household fuses, circuit breakers or wiring.

