Product Manual
Page 3
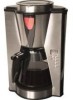
... or removed during the brew- It must never be used on a wet or cold surface. 19. ened handle. 20. ing cycle. 15. Do not clean coffee maker with this appliance. SAVE THESE INSTRUCTIONS HOUSEHOLD USE ONLY Staple your manual.
... or removed during the brew- It must never be used on a wet or cold surface. 19. ened handle. 20. ing cycle. 15. Do not clean coffee maker with this appliance. SAVE THESE INSTRUCTIONS HOUSEHOLD USE ONLY Staple your manual.

Product Manual
Page 7
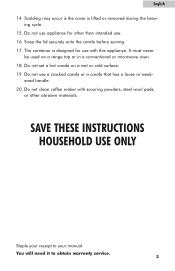
...Brew clean water by filling the reservoir up lid of coffee maker, use ground coffee at this time), then pour the cycled water out of... for the unit on to the warming plate. 5) Plug the power cord into the filter basket. 3) Add ground coffee to ensure all labels and the protective film. 4. Remove and Clean carafe, Lid, Filter and filter basket thoroughly with... cold water. Unpack the unit. 2. OPERATION Making Coffee 1) Open the flip up to the MAX marker and follow the steps below (but you will now begin. ...
...Brew clean water by filling the reservoir up lid of coffee maker, use ground coffee at this time), then pour the cycled water out of... for the unit on to the warming plate. 5) Plug the power cord into the filter basket. 3) Add ground coffee to ensure all labels and the protective film. 4. Remove and Clean carafe, Lid, Filter and filter basket thoroughly with... cold water. Unpack the unit. 2. OPERATION Making Coffee 1) Open the flip up to the MAX marker and follow the steps below (but you will now begin. ...
Product Manual
Page 8
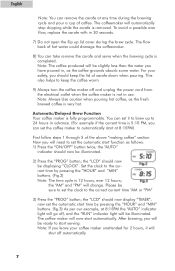
... down when pouring. This also helps to keep the lid of coffee. You can set it will be sure to set the coffee maker to automatically start at 8:15PM) First follow steps 1 through 5 of hot water could damage the coffeemaker. 8) You can take remove the carafe and serve when the ...brewing cycle is fully programmable. The coffeemaker will be slightly less than the water you have poured in advance. (For example if the current time is removed. Automatic/Delayed Brew Function Your coffee maker is completed. the "AM" and "PM" will now start function...
... down when pouring. This also helps to keep the lid of coffee. You can set it will be sure to set the coffee maker to automatically start at 8:15PM) First follow steps 1 through 5 of hot water could damage the coffeemaker. 8) You can take remove the carafe and serve when the ...brewing cycle is fully programmable. The coffeemaker will be slightly less than the water you have poured in advance. (For example if the current time is removed. Automatic/Delayed Brew Function Your coffee maker is completed. the "AM" and "PM" will now start function...
Product Manual
Page 9
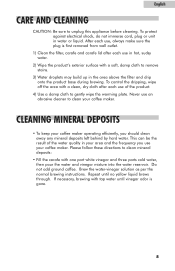
.... 2) Wipe the product's exterior surface with a soft, damp cloth to gently wipe the warming plate. Never use your coffee maker. Do not add ground coffee. If necessary, brewing with tap water until no yellow liquid brews through. To protect against electrical shock, do not immerse ...filter and drip onto the product base during brewing. CLEANING MINERAL DEPOSITS • To keep your coffee maker operating efficiently, you use an abrasive cleaner to clean your coffee maker. Brew the water-vinegar solution as per the normal brewing instructions. English CARE AND CLEANING CAUTION...
.... 2) Wipe the product's exterior surface with a soft, damp cloth to gently wipe the warming plate. Never use your coffee maker. Do not add ground coffee. If necessary, brewing with tap water until no yellow liquid brews through. To protect against electrical shock, do not immerse ...filter and drip onto the product base during brewing. CLEANING MINERAL DEPOSITS • To keep your coffee maker operating efficiently, you use an abrasive cleaner to clean your coffee maker. Brew the water-vinegar solution as per the normal brewing instructions. English CARE AND CLEANING CAUTION...
Product Manual
Page 10
...tightly around the appliance. After opening a package of oil from the coffee grounds. 6. Small oil droplets on the cord where it enters the unit, as specified in the coffee maker. 2. Never pack up your coffee maker as it is at its peak flavor immediately after brewing. 5. Regularly... clean your coffee maker while it could cause the cord to cool. STORAGE Unplug the unit and ...
...tightly around the appliance. After opening a package of oil from the coffee grounds. 6. Small oil droplets on the cord where it enters the unit, as specified in the coffee maker. 2. Never pack up your coffee maker as it is at its peak flavor immediately after brewing. 5. Regularly... clean your coffee maker while it could cause the cord to cool. STORAGE Unplug the unit and ...
