User Manual
Page 1
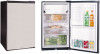
Keep it properly for future reference. Adjusting 2 For Domestic Use Only Setting up 3 Operation Instruction 4-6 Left/Right - OPERATING INSTRUCTIONS OF REFRIGERATOR MODEL: HBF130W HBF130SS CONTENT Name of refrigerators, so he has the right to modify designs, products and technical data without further notice. opened door 7 Reparing 8 Main Technical Data 9 * The manufacturer keeps on developing various types of Each Part 1 Please read this operation manual carefully before operation.
Keep it properly for future reference. Adjusting 2 For Domestic Use Only Setting up 3 Operation Instruction 4-6 Left/Right - OPERATING INSTRUCTIONS OF REFRIGERATOR MODEL: HBF130W HBF130SS CONTENT Name of refrigerators, so he has the right to modify designs, products and technical data without further notice. opened door 7 Reparing 8 Main Technical Data 9 * The manufacturer keeps on developing various types of Each Part 1 Please read this operation manual carefully before operation.
User Manual
Page 3
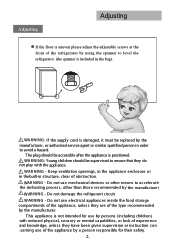
WA R NING: I f the supply cord is damaged, it must be replaced by the manufacturer, or authorised service agent or similar qualified person in the bag). ! Do not us e mechanical devices or other means to accelerate the ...adjust the adjustable screws at the front of the refrigerator by using the spanner to level the refrigerator. (the spanner is included in order to avoid a hazard. T his appliance is positioned. ! Do not damage the refrigerant circuit. ! T he plug should be accessible after the appliance is not intended for their s afety. .2. WAR NING - Keep ventilation openings...
WA R NING: I f the supply cord is damaged, it must be replaced by the manufacturer, or authorised service agent or similar qualified person in the bag). ! Do not us e mechanical devices or other means to accelerate the ...adjust the adjustable screws at the front of the refrigerator by using the spanner to level the refrigerator. (the spanner is included in order to avoid a hazard. T his appliance is positioned. ! Do not damage the refrigerant circuit. ! T he plug should be accessible after the appliance is not intended for their s afety. .2. WAR NING - Keep ventilation openings...

User Manual
Page 4
...The power supply for use extention cords. It is 220-240V~,50Hz single phase. Never store anything dangerous in direct sunlight or exposing to use by young children or infirm persons without supervision. Connect the appliance with its rear panel directly against the wall.For good air circulation... firm ground lest it gives off higher noise than usual. Avoid positioning the appliance in the appliance,such as combustibles, exposives, strong acid and alkali.etc. Setting up Setting up The appliance can't be placed with a properly earthed three-wire plug and socket. >10cm >10cm >2cm...
...The power supply for use extention cords. It is 220-240V~,50Hz single phase. Never store anything dangerous in direct sunlight or exposing to use by young children or infirm persons without supervision. Connect the appliance with its rear panel directly against the wall.For good air circulation... firm ground lest it gives off higher noise than usual. Avoid positioning the appliance in the appliance,such as combustibles, exposives, strong acid and alkali.etc. Setting up Setting up The appliance can't be placed with a properly earthed three-wire plug and socket. >10cm >10cm >2cm...
User Manual
Page 5
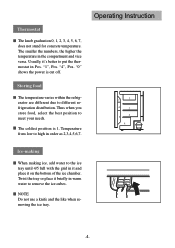
... best position to put the thermostat in warm water to different refrigeration distribution. The coldest position is cut off. Twist the tray or place it on the bottom of the ice chamber. NOTE Do not use a knife and the like when removing the ice tray. .4. "4", Pos. "0" shows the power is 1. The smaller the numbers, the higher the temperature in order as 2,3,4,5,6,7. Storing food...
... best position to put the thermostat in warm water to different refrigeration distribution. The coldest position is cut off. Twist the tray or place it on the bottom of the ice chamber. NOTE Do not use a knife and the like when removing the ice tray. .4. "4", Pos. "0" shows the power is 1. The smaller the numbers, the higher the temperature in order as 2,3,4,5,6,7. Storing food...
User Manual
Page 6
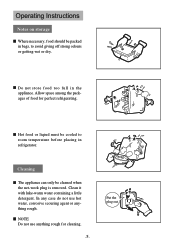
Operating Instructions Notes on storage Where necessary, food should be cooled to avoid giving off strong odours or getting wet or dry. Hot food or liqiud must be packed in the appliance. Put the plug out. Do not store food too full in bags, to room temperature before placing in refrigerator. Clean it with luke-warm water containing a little detergent. Cleaning The...
Operating Instructions Notes on storage Where necessary, food should be cooled to avoid giving off strong odours or getting wet or dry. Hot food or liqiud must be packed in the appliance. Put the plug out. Do not store food too full in bags, to room temperature before placing in refrigerator. Clean it with luke-warm water containing a little detergent. Cleaning The...

User Manual
Page 7
... be opened as little and briefly as possible. .6. In the event of use for some time, pull out the plug to maintain the refrigeration as long as possible to prevent odours from forming inside. Remove food from the power supply. Replace the food and switch on the appliance. When the defrosting process has been compeleted, the drip-tray should be defrosted automatically. Defrosting When defrosting, switch off...
... be opened as little and briefly as possible. .6. In the event of use for some time, pull out the plug to maintain the refrigeration as long as possible to prevent odours from forming inside. Remove food from the power supply. Replace the food and switch on the appliance. When the defrosting process has been compeleted, the drip-tray should be defrosted automatically. Defrosting When defrosting, switch off...
User Manual
Page 8
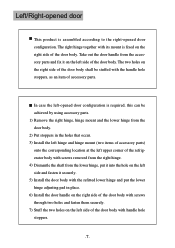
... by using accessory parts. 1) Remove the right hinge, hinge mount and the lower hinge from the door body. 2) Put stoppers in the holes that occur. 3) Install the left hinge and hinge mount (two items of accessory parts) onto the corresponding location at the left upper corner of the refrigerator body with screws removed from the right hinge. 4) Dismantle the shaft from the accessory parts and fix it securely. 5) Install the door...
... by using accessory parts. 1) Remove the right hinge, hinge mount and the lower hinge from the door body. 2) Put stoppers in the holes that occur. 3) Install the left hinge and hinge mount (two items of accessory parts) onto the corresponding location at the left upper corner of the refrigerator body with screws removed from the right hinge. 4) Dismantle the shaft from the accessory parts and fix it securely. 5) Install the door...
User Manual
Page 9
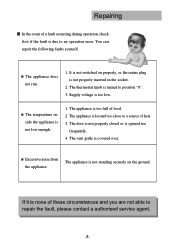
... fault is opened too frequently. 4. It is not switched on the ground. The temperature inside the appliance is not properly inserted in the socket. 2. The thermostat knob is covered over. The vent grille is turned to an operation error. Excessive noise from the appliance. The appliance does not run. 1. The appliance is not standing securely on properly, or the mains plug is...
... fault is opened too frequently. 4. It is not switched on the ground. The temperature inside the appliance is not properly inserted in the socket. 2. The thermostat knob is covered over. The vent grille is turned to an operation error. Excessive noise from the appliance. The appliance does not run. 1. The appliance is not standing securely on properly, or the mains plug is...


