
User Manual
Page 2
... void the warranty. 9. Close supervision is necessary when the appliance is used , but only when the blender is not operating. 8. The use by pulling on the motor base without the jar properly attached. 13. Do not use , before cleaning. 4. When blending hot liquids, remove the measuring...not in any manner. Always operate the blender with moving parts. 5. This appliance is dropped or damaged in use outdoors. 10. Read all controls to the blender. Unplug from the wall outlet by children. 7. KEEP HANDS AND UTENSILS OUT OF THE JAR WHILE BLENDING to reduce the risk of...
... void the warranty. 9. Close supervision is necessary when the appliance is used , but only when the blender is not operating. 8. The use by pulling on the motor base without the jar properly attached. 13. Do not use , before cleaning. 4. When blending hot liquids, remove the measuring...not in any manner. Always operate the blender with moving parts. 5. This appliance is dropped or damaged in use outdoors. 10. Read all controls to the blender. Unplug from the wall outlet by children. 7. KEEP HANDS AND UTENSILS OUT OF THE JAR WHILE BLENDING to reduce the risk of...
User Manual
Page 3
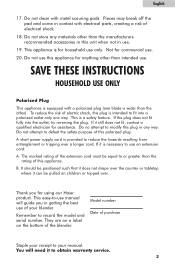
...reduce the hazards resulting from entanglement or tripping over the counter or tabletop where it still does not fit, contact a qualified electrician for using our Haier product. This is provided to -use an extension cord: A. A short power supply cord is a safety feature. Pieces may break off the ...your manual. Do not attempt to or greater than the manufacturers recommended accessories in this unit when not in contact with electrical parts, creating a risk of the blender. The marked rating of the extension cord must be pulled on the bottom of electrical shock. 18. Thank you in ...
...reduce the hazards resulting from entanglement or tripping over the counter or tabletop where it still does not fit, contact a qualified electrician for using our Haier product. This is provided to -use an extension cord: A. A short power supply cord is a safety feature. Pieces may break off the ...your manual. Do not attempt to or greater than the manufacturers recommended accessories in this unit when not in contact with electrical parts, creating a risk of the blender. The marked rating of the extension cord must be pulled on the bottom of electrical shock. 18. Thank you in ...
User Manual
Page 4
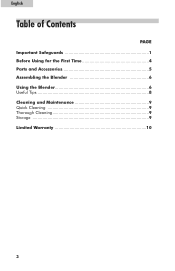
English Table of Contents PAGE Important Safeguards 1 Before Using for the First Time 4 Parts and Accessories 5 Assembling the Blender 6 Using the Blender 6 Useful Tips 8 Cleaning and Maintenance 9 Quick Cleaning 9 Thorough Cleaning 9 Storage 9 Limited Warranty 10 3
English Table of Contents PAGE Important Safeguards 1 Before Using for the First Time 4 Parts and Accessories 5 Assembling the Blender 6 Using the Blender 6 Useful Tips 8 Cleaning and Maintenance 9 Quick Cleaning 9 Thorough Cleaning 9 Storage 9 Limited Warranty 10 3
User Manual
Page 5
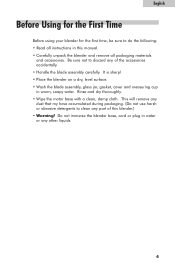
... • Wipe the motor base with a clean, damp cloth. English Before Using for the First Time Before using your blender for the first time, be sure to clean any part of the accessories accidentally. • Handle the blade assembly carefully. This will remove any dust that my have accumulated during packaging...do the following: • Read all packaging materials and accessories. Be sure not to discard any other liquids. 4 It is sharp! • Place the blender on a dry, level surface. • Wash the blade assembly, glass jar, gasket, cover and measuring cup in warm, soapy water.
... • Wipe the motor base with a clean, damp cloth. English Before Using for the First Time Before using your blender for the first time, be sure to clean any part of the accessories accidentally. • Handle the blade assembly carefully. This will remove any dust that my have accumulated during packaging...do the following: • Read all packaging materials and accessories. Be sure not to discard any other liquids. 4 It is sharp! • Place the blender on a dry, level surface. • Wash the blade assembly, glass jar, gasket, cover and measuring cup in warm, soapy water.

User Manual
Page 6
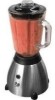
English Parts and Accessories 10 7 8 9 1 2 3 4 5 6 1. Motor Base 8. Gasket 5. Jar Assembly Cover 3. 48 oz. Glass Jar 4. Blade Assembly 5 6. Pulse Button 9. Collar 7. Measuring Cup 2. Power Switch 10.
English Parts and Accessories 10 7 8 9 1 2 3 4 5 6 1. Motor Base 8. Gasket 5. Jar Assembly Cover 3. 48 oz. Glass Jar 4. Blade Assembly 5 6. Pulse Button 9. Collar 7. Measuring Cup 2. Power Switch 10.

User Manual
Page 7
... a flat, level surface. Uncoil the required length of the glass jar (3). Before removing the jar assembly from the blender base after use ! 11. Firmly place the jar assembly onto the motor base so that all parts of the glass jar (3) and turn clockwise to secure. 6. Never operate the blender without the jar being completely assembled and securely tightened. 4. Make sure...
... a flat, level surface. Uncoil the required length of the glass jar (3). Before removing the jar assembly from the blender base after use ! 11. Firmly place the jar assembly onto the motor base so that all parts of the glass jar (3) and turn clockwise to secure. 6. Never operate the blender without the jar being completely assembled and securely tightened. 4. Make sure...
User Manual
Page 10
... the motor base and rinse with warm water to remove large food particles. • Fill the glass jar with warm water to remove large food particles. • Disassemble the jar assembly parts. Storage Store the blender fully assembled and in an upright position in warm, soapy water. Never immerse the motor base, power cord and...
... the motor base and rinse with warm water to remove large food particles. • Fill the glass jar with warm water to remove large food particles. • Disassemble the jar assembly parts. Storage Store the blender fully assembled and in an upright position in warm, soapy water. Never immerse the motor base, power cord and...

User Manual
Page 11
..., please have other rights, which vary, from other than authorized service center. A clear description of defective parts beyond the initial 12-month period. The remedy provided in this product, please contact "Haier Customer Satisfaction Service at 1-877-337-3639 between 9:00 AM and 5:00 PM (EST) Monday to present...Warranty Full One Year This warranty covers all defects in lieu of all other remedies. If you are able to Friday. Haier will repair or replace any part free of charge including labor that fails due to a defect in materials or workmanship, or replace with this warranty is...
..., please have other rights, which vary, from other than authorized service center. A clear description of defective parts beyond the initial 12-month period. The remedy provided in this product, please contact "Haier Customer Satisfaction Service at 1-877-337-3639 between 9:00 AM and 5:00 PM (EST) Monday to present...Warranty Full One Year This warranty covers all defects in lieu of all other remedies. If you are able to Friday. Haier will repair or replace any part free of charge including labor that fails due to a defect in materials or workmanship, or replace with this warranty is...


