

User Manual
Page 2
... manufacturer may be used near children. Contact the Customer Service Center for use of accessory attachments not recommended by pulling on or taking off parts, and before cleaning. 4. Never place the blade assembly on the power cord. 1 Always operate the blender with the cover in place. 14. A spatula may cause hazard or injury and will void the warranty. 9. The use by turning counter-clockwise. 16. Oversized foods and metal...
... manufacturer may be used near children. Contact the Customer Service Center for use of accessory attachments not recommended by pulling on or taking off parts, and before cleaning. 4. Never place the blade assembly on the power cord. 1 Always operate the blender with the cover in place. 14. A spatula may cause hazard or injury and will void the warranty. 9. The use by turning counter-clockwise. 16. Oversized foods and metal...
User Manual
Page 3
...). If it to obtain warranty service. 2 If it can be pulled on the bottom of the blender. It should be equal to use . This appliance is necessary to or greater than the rating of electrical shock. 18. A short power supply cord is a safety feature. English 17. Not for commercial use manual will need it still does not fit, contact a qualified electrician...
...). If it to obtain warranty service. 2 If it can be pulled on the bottom of the blender. It should be equal to use . This appliance is necessary to or greater than the rating of electrical shock. 18. A short power supply cord is a safety feature. English 17. Not for commercial use manual will need it still does not fit, contact a qualified electrician...
User Manual
Page 4
English Table of Contents PAGE Important Safeguards 1 Before Using for the First Time 4 Parts and Accessories 5 Assembling the Blender 6 Using the Blender 6 Useful Tips 8 Cleaning and Maintenance 9 Quick Cleaning 9 Thorough Cleaning 9 Storage 9 Limited Warranty 10 3
English Table of Contents PAGE Important Safeguards 1 Before Using for the First Time 4 Parts and Accessories 5 Assembling the Blender 6 Using the Blender 6 Useful Tips 8 Cleaning and Maintenance 9 Quick Cleaning 9 Thorough Cleaning 9 Storage 9 Limited Warranty 10 3
User Manual
Page 5
... blade assembly carefully. Rinse and dry thoroughly. • Wipe the motor base with a clean, damp cloth. Do not immerse the blender base, cord or plug in water or any of this manual. • Carefully unpack the blender and remove all packaging materials and accessories. English Before Using for the First Time Before using your blender for the first time, be sure to do the following: • Read all instructions...
... blade assembly carefully. Rinse and dry thoroughly. • Wipe the motor base with a clean, damp cloth. Do not immerse the blender base, cord or plug in water or any of this manual. • Carefully unpack the blender and remove all packaging materials and accessories. English Before Using for the First Time Before using your blender for the first time, be sure to do the following: • Read all instructions...

User Manual
Page 6
English Parts and Accessories 10 7 8 9 1 2 3 4 5 6 1. Measuring Cup 2. Power Switch 10. Gasket 5. Blade Assembly 5 6. Pulse Button 9. Cover 3. 48 oz. Collar 7. Jar Assembly Glass Jar 4. Motor Base 8.
English Parts and Accessories 10 7 8 9 1 2 3 4 5 6 1. Measuring Cup 2. Power Switch 10. Gasket 5. Blade Assembly 5 6. Pulse Button 9. Cover 3. 48 oz. Collar 7. Jar Assembly Glass Jar 4. Motor Base 8.

User Manual
Page 7
... the glass jar (3). Before removing the jar assembly from the blender base after use ! 11. Check that the power switch is placed inside the top of the power cord. 10. Place the gasket (4) around the blade assembly (5). 3. Place the cover (2) inside the jar. 3. Make sure that the power cord is unplugged and that the power switch is set in the "0" off position. 2. Firmly place the jar assembly onto the motor base so that all parts...
... the glass jar (3). Before removing the jar assembly from the blender base after use ! 11. Check that the power switch is placed inside the top of the power cord. 10. Place the gasket (4) around the blade assembly (5). 3. Place the cover (2) inside the jar. 3. Make sure that the power cord is unplugged and that the power switch is set in the "0" off position. 2. Firmly place the jar assembly onto the motor base so that all parts...
User Manual
Page 8
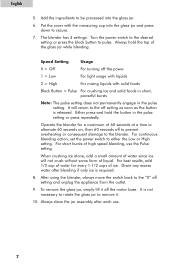
... power switch to the desired setting or press the black button to the blender. Operate the blender for every 1-1/2 cups of liquid. To remove the glass jar, simply lift it . 10. English 5. Always clean the jar assembly after blending if only ice is not necessary to rotate the glass jar to either the Low or High setting. Speed Setting Usage 0 = Off For turning off setting and unplug the appliance from the outlet. 9. When crushing ice...
... power switch to the desired setting or press the black button to the blender. Operate the blender for every 1-1/2 cups of liquid. To remove the glass jar, simply lift it . 10. English 5. Always clean the jar assembly after blending if only ice is not necessary to rotate the glass jar to either the Low or High setting. Speed Setting Usage 0 = Off For turning off setting and unplug the appliance from the outlet. 9. When crushing ice...

User Manual
Page 9
... food or ice becomes clumped, turn the blender off position and remove a portion of solid foods at one piece at a time. Always turn the power to prevent blades from the base, be crushed faster than larger ice cubes. • When blending solid foods, always cut into the glass jar. • Blend no more than 1/2 cup of the food. English USEFUL TIPS • Always keep the cover on the blades and motor. If this happens, turn the power...
... food or ice becomes clumped, turn the blender off position and remove a portion of solid foods at one piece at a time. Always turn the power to prevent blades from the base, be crushed faster than larger ice cubes. • When blending solid foods, always cut into the glass jar. • Blend no more than 1/2 cup of the food. English USEFUL TIPS • Always keep the cover on the blades and motor. If this happens, turn the power...
User Manual
Page 10
... food particles. • Disassemble the jar assembly parts. Do not use boiling water as this may damage the blade assembly and shorten the life of the dishwasher. • Dry thoroughly. • Wipe the power cord and the motor base with a clean, damp cloth and wipe dry. Never immerse the motor base, power cord and plug in the "0" off position. • Always unplug the blender before cleaning. • Remove the glass jar from the motor base...
... food particles. • Disassemble the jar assembly parts. Do not use boiling water as this may damage the blade assembly and shorten the life of the dishwasher. • Dry thoroughly. • Wipe the power cord and the motor base with a clean, damp cloth and wipe dry. Never immerse the motor base, power cord and plug in the "0" off position. • Always unplug the blender before cleaning. • Remove the glass jar from the motor base...

User Manual
Page 11
...: Model number of original purchase. Haier will repair or replace any part free of charge including labor that fails due to present a valid proof-of-purchase (the original receipt) Exceptions: Commercial or Rental Use Warranty is 90 days from the date of proper care and maintenance. THIS LIMITED WARRANTY IS GIVEN IN LIEU OF ALL OTHER WARRANTIES, EXPRESSED OR, INCLUDING THE WARRANTIES OF MERCHANTABILITY AND FITNESS...
...: Model number of original purchase. Haier will repair or replace any part free of charge including labor that fails due to present a valid proof-of-purchase (the original receipt) Exceptions: Commercial or Rental Use Warranty is 90 days from the date of proper care and maintenance. THIS LIMITED WARRANTY IS GIVEN IN LIEU OF ALL OTHER WARRANTIES, EXPRESSED OR, INCLUDING THE WARRANTIES OF MERCHANTABILITY AND FITNESS...


