
User Manual
Page 2
...after the appliance malfunctions or is used , but only when the blender is not recommended for instructions. 6. Handle carefully. 12. Always operate the blender with moving parts. 5. Never pull on the motor base without the jar properly attached. 13. To protect against electrical shock, do not immerse... 10. A spatula may cause hazard or injury and will void the warranty. 9. KEEP HANDS AND UTENSILS OUT OF THE JAR WHILE BLENDING to the blender. When blending hot liquids, remove the measuring cup from the wall outlet by the appliance manufacturer may be followed, including the ...
...after the appliance malfunctions or is used , but only when the blender is not recommended for instructions. 6. Handle carefully. 12. Always operate the blender with moving parts. 5. Never pull on the motor base without the jar properly attached. 13. To protect against electrical shock, do not immerse... 10. A spatula may cause hazard or injury and will void the warranty. 9. KEEP HANDS AND UTENSILS OUT OF THE JAR WHILE BLENDING to the blender. When blending hot liquids, remove the measuring cup from the wall outlet by the appliance manufacturer may be followed, including the ...
User Manual
Page 5
... remove all instructions in warm, soapy water. It is sharp! • Place the blender on a dry, level surface. • Wash the blade assembly, glass jar, gasket, cover and measuring cup in this blender.) • Warning! This will remove any dust that my have accumulated during packaging. (Do not use harsh... and dry thoroughly. • Wipe the motor base with a clean, damp cloth. English Before Using for the First Time Before using your blender for the first time, be sure to clean any part of the accessories accidentally. • Handle the blade assembly carefully. Be sure not to...
... remove all instructions in warm, soapy water. It is sharp! • Place the blender on a dry, level surface. • Wash the blade assembly, glass jar, gasket, cover and measuring cup in this blender.) • Warning! This will remove any dust that my have accumulated during packaging. (Do not use harsh... and dry thoroughly. • Wipe the motor base with a clean, damp cloth. English Before Using for the First Time Before using your blender for the first time, be sure to clean any part of the accessories accidentally. • Handle the blade assembly carefully. Be sure not to...

User Manual
Page 6
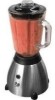
Cover 3. 48 oz. Gasket 5. Glass Jar 4. Collar 7. Blade Assembly 5 6. Motor Base 8. Power Switch 10. Jar Assembly Pulse Button 9. English Parts and Accessories 10 7 8 9 1 2 3 4 5 6 1. Measuring Cup 2.
Cover 3. 48 oz. Gasket 5. Glass Jar 4. Collar 7. Blade Assembly 5 6. Motor Base 8. Power Switch 10. Jar Assembly Pulse Button 9. English Parts and Accessories 10 7 8 9 1 2 3 4 5 6 1. Measuring Cup 2.

User Manual
Page 7
... positions. Note: Never place the blade assembly on top of the jar assembly are secured in the "0" off position. 2. Plug the blender into the bottom of the glass jar (3) and turn clockwise to the jar before food or liquid is now ready for use , be securely ...tightened to secure. 6. Using the Blender 1. Check that the power switch (9) is in place. 7. Always operate the blender on a flat, level surface. Uncoil the required length of the glass jar (3). Insert the measuring cup (1) into the collar (6). 4. Place the jar assembly (10) onto the motor base ...
... positions. Note: Never place the blade assembly on top of the jar assembly are secured in the "0" off position. 2. Plug the blender into the bottom of the glass jar (3) and turn clockwise to the jar before food or liquid is now ready for use , be securely ...tightened to secure. 6. Using the Blender 1. Check that the power switch (9) is in place. 7. Always operate the blender on a flat, level surface. Uncoil the required length of the glass jar (3). Insert the measuring cup (1) into the collar (6). 4. Place the jar assembly (10) onto the motor base ...
User Manual
Page 8
...blending if only ice is not necessary to rotate the glass jar to either the Low or High setting. Always hold the button in the pulse setting. For best results, add 1/2 cup of water for a maximum of ice. After using the blender, always move the switch back to the off setting and... to the desired setting or press the black button to be processed into the glass jar and press down to the blender. Either press and hold the top of liquid. It will not crush without some form of the glass jar while blending. Drain any excess water after each use the Pulse setting. For...
...blending if only ice is not necessary to rotate the glass jar to either the Low or High setting. Always hold the button in the pulse setting. For best results, add 1/2 cup of water for a maximum of ice. After using the blender, always move the switch back to the off setting and... to the desired setting or press the black button to be processed into the glass jar and press down to the blender. Either press and hold the top of liquid. It will not crush without some form of the glass jar while blending. Drain any excess water after each use the Pulse setting. For...

User Manual
Page 9
...8 Remove the measuring cup while blending hot liquids to release steam and condensation that the blender can be crushed faster than larger ice cubes. • When blending solid foods, always cut into the glass jar. • Blend no larger than 1" before placing them into 1" pieces first and ice...all ingredients have been added. • Be careful when blending hot liquids. Usually, only a few minutes. • Chill the jar in the cover. Always turn the blender off position first. • When blending solid or thick liquid ingredients, use a rub- Be sure that food is needed to ...
...8 Remove the measuring cup while blending hot liquids to release steam and condensation that the blender can be crushed faster than larger ice cubes. • When blending solid foods, always cut into the glass jar. • Blend no larger than 1" before placing them into 1" pieces first and ice...all ingredients have been added. • Be careful when blending hot liquids. Usually, only a few minutes. • Chill the jar in the cover. Always turn the blender off position first. • When blending solid or thick liquid ingredients, use a rub- Be sure that food is needed to ...
User Manual
Page 10
... switch is in the "0" off position. • Always unplug the blender before cleaning. • Remove the glass jar from the motor base and rinse with warm water to remove large food particles. • Fill the glass jar with 1-1/2 cups of fire or electrical shock. Be careful when handling ...the blade assembly. • Wash the jar, cover, measuring cup, gasket, collar and blade assembly in a clean, dry cabinet. 9 Note: All components of the blender. The cover and the gasket ...
... switch is in the "0" off position. • Always unplug the blender before cleaning. • Remove the glass jar from the motor base and rinse with warm water to remove large food particles. • Fill the glass jar with 1-1/2 cups of fire or electrical shock. Be careful when handling ...the blade assembly. • Wash the jar, cover, measuring cup, gasket, collar and blade assembly in a clean, dry cabinet. 9 Note: All components of the blender. The cover and the gasket ...


