User Manual
Page 2
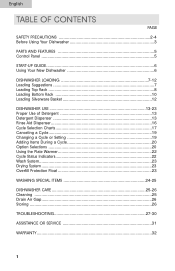
... Loading Suggestions 7 Loading Top Rack 8 Loading Bottom Rack 10 Loading Silverware Basket 12 DISHWASHER USE 13-23 Proper Use of Detergent 13 Detergent Dispenser 13 Rinse Aid Dispenser 16 Cycle Selection Charts 17 Canceling a Cycle 19 Changing a Cycle or Setting 19 Adding Items During a Cycle 20 Option Selections 20 Using the Plate Warmer 22 Cycle Status Indicators 22 Wash System 23 Drying System 23 Overfill Protection Float 23 WASHING SPECIAL ITEMS 24-25 DISHWASHER CARE 25-26 Cleaning ...25 Drain Air Gap 26 Storing ...26 TROUBLESHOOTING...
... Loading Suggestions 7 Loading Top Rack 8 Loading Bottom Rack 10 Loading Silverware Basket 12 DISHWASHER USE 13-23 Proper Use of Detergent 13 Detergent Dispenser 13 Rinse Aid Dispenser 16 Cycle Selection Charts 17 Canceling a Cycle 19 Changing a Cycle or Setting 19 Adding Items During a Cycle 20 Option Selections 20 Using the Plate Warmer 22 Cycle Status Indicators 22 Wash System 23 Drying System 23 Overfill Protection Float 23 WASHING SPECIAL ITEMS 24-25 DISHWASHER CARE 25-26 Cleaning ...25 Drain Air Gap 26 Storing ...26 TROUBLESHOOTING...
User Manual
Page 3
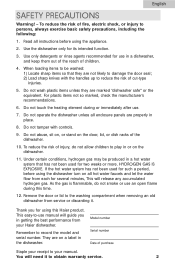
... all enclosure panels are not likely to damage the door seal; 2) Load sharp knives with controls. 9. As the gas is flammable, do not allow children to record the model and serial number. You will need it . Use only detergents or rinse agents recommended for several minutes, This will guide you for using the appliance. 2. Do not touch the heating element during this Haier product. If the hot water system has not...
... all enclosure panels are not likely to damage the door seal; 2) Load sharp knives with controls. 9. As the gas is flammable, do not allow children to record the model and serial number. You will need it . Use only detergents or rinse agents recommended for several minutes, This will guide you for using the appliance. 2. Do not touch the heating element during this Haier product. If the hot water system has not...
User Manual
Page 4
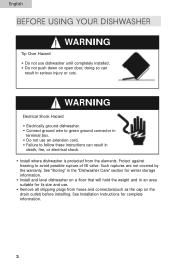
... serious injury or cuts. Protect against freezing to follow these instructions can result in an area suitable for its size and use an extension cord. • Failure to avoid possible rupture of fill valve. WARNING Electrical Shock Hazard • Electrically ground dishwasher. • Connect ground wire to green ground connector in terminal box. • Do not use . • Remove all shipping plugs from the elements.
... serious injury or cuts. Protect against freezing to follow these instructions can result in an area suitable for its size and use an extension cord. • Failure to avoid possible rupture of fill valve. WARNING Electrical Shock Hazard • Electrically ground dishwasher. • Connect ground wire to green ground connector in terminal box. • Do not use . • Remove all shipping plugs from the elements.

User Manual
Page 5
... be plugged into an appropriate outlet that is installed and grounded in accordance with the circuit conductors and connected to a grounded metal, permanent wiring system, or an equipment- SAVE THESE INSTRUCTIONS 4 WARNING: Improper connection of electric shock by a qualified electrician. The dishwasher is properly grounded. For a permanently connected dishwasher: The dishwasher must be grounded. English GROUNDING INSTRUCTIONS For a grounded, cord-connected dishwasher: The dishwasher must be connected...
... be plugged into an appropriate outlet that is installed and grounded in accordance with the circuit conductors and connected to a grounded metal, permanent wiring system, or an equipment- SAVE THESE INSTRUCTIONS 4 WARNING: Improper connection of electric shock by a qualified electrician. The dishwasher is properly grounded. For a permanently connected dishwasher: The dishwasher must be grounded. English GROUNDING INSTRUCTIONS For a grounded, cord-connected dishwasher: The dishwasher must be connected...
User Manual
Page 7
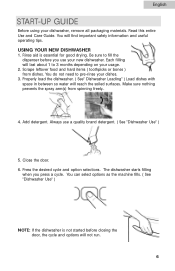
... the spray arm(s) from dishes. Press the desired cycle and option selections. The dishwasher starts filling when you use a quality brand detergent. ( See "Dishwasher Use" ) 5. Properly load the dishwasher. ( See" Dishwasher Loading" ) Load dishes with space in between so water will find important safety information and useful operating tips. Read this entire Use and Care Guide. Each filling will not run. 6 Close the door. 6. Always use your dishwasher, remove all packaging materials. Rinse aid is not started before you press a cycle. Add detergent...
... the spray arm(s) from dishes. Press the desired cycle and option selections. The dishwasher starts filling when you use a quality brand detergent. ( See "Dishwasher Use" ) 5. Properly load the dishwasher. ( See" Dishwasher Loading" ) Load dishes with space in between so water will find important safety information and useful operating tips. Read this entire Use and Care Guide. Each filling will not run. 6 Close the door. 6. Always use your dishwasher, remove all packaging materials. Rinse aid is not started before you press a cycle. Add detergent...
User Manual
Page 8
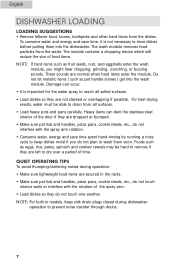
... such as pot handle screws ) get into the dishwasher. To conserve water and energy and save time spent hand-rinsing by running a rinse cycle to rinse dishes before putting them soon. The wash module removes food particles from the dishes. For best drying results, water must be hard to remove if they do not interfere with the rotation of the spray arm. • Load dishes so they are normal when hard items...
... such as pot handle screws ) get into the dishwasher. To conserve water and energy and save time spent hand-rinsing by running a rinse cycle to rinse dishes before putting them soon. The wash module removes food particles from the dishes. For best drying results, water must be hard to remove if they do not interfere with the rotation of the spray arm. • Load dishes so they are normal when hard items...
User Manual
Page 15
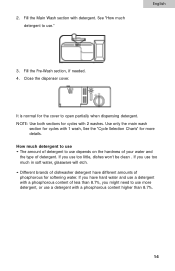
... needed. 4. It is normal for cycles with detergent. How much detergent to use • The amount of detergent to use a detergent with 2 washes. See "How much in soft water, glassware will etch. • Different brands of dishwasher detergent have hard water and use ." English 3. Fill the Main Wash section with 1 wash, See the "Cycle Selection Charts" for softening water. Close the dispenser cover. If you use too much detergent to open partially when dispensing detergent. 2. Use only...
... needed. 4. It is normal for cycles with detergent. How much detergent to use • The amount of detergent to use a detergent with 2 washes. See "How much in soft water, glassware will etch. • Different brands of dishwasher detergent have hard water and use ." English 3. Fill the Main Wash section with 1 wash, See the "Cycle Selection Charts" for softening water. Close the dispenser cover. If you use too much detergent to open partially when dispensing detergent. 2. Use only...
User Manual
Page 16
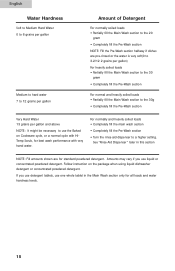
...-Wash section • Turn the rinse aid dispenser to a higher setting. English Water Hardness Soft to Medium Hard Water 0 to 6 grains per gallon Medium to hard water 7 to 12 grains per gallon Amount of Detergent For normally soiled loads • Partially fill the Main Wash section to the 20 gram • Completely fill the Pre-Wash section NOTE: Fill the Pre-Wash section halfway if dishes...
...-Wash section • Turn the rinse aid dispenser to a higher setting. English Water Hardness Soft to Medium Hard Water 0 to 6 grains per gallon Medium to hard water 7 to 12 grains per gallon Amount of Detergent For normally soiled loads • Partially fill the Main Wash section to the 20 gram • Completely fill the Pre-Wash section NOTE: Fill the Pre-Wash section halfway if dishes...
User Manual
Page 17
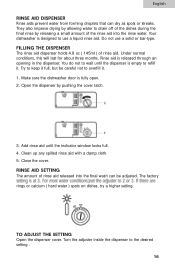
... final wash can dry as spots or streaks. Rinse aid is fully open. 2. Add rinse aid until the dispenser is designed to wait until the indicator window looks full. 4. Make sure the dishwasher door is released through an opening in the dispenser. FILLING THE DISPENSER The rinse aid dispenser holds 4.8 oz ( 145ml ) of rinse aid released into the rinse water. Clean up any spilled rinse aid with a damp cloth. 5. Turn the adjuster inside the dispenser to refill it . 1. RINSE AID SETTING...
... final wash can dry as spots or streaks. Rinse aid is fully open. 2. Add rinse aid until the dispenser is designed to wait until the indicator window looks full. 4. Make sure the dishwasher door is released through an opening in the dispenser. FILLING THE DISPENSER The rinse aid dispenser holds 4.8 oz ( 145ml ) of rinse aid released into the rinse water. Clean up any spilled rinse aid with a damp cloth. 5. Turn the adjuster inside the dispenser to refill it . 1. RINSE AID SETTING...
User Manual
Page 18
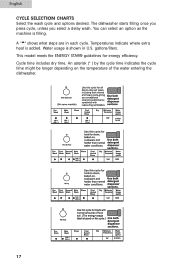
... cycle time indicates the cycle time might be longer depending on the temperature of the water entering the dishwasher. 17 You can select an option as the machine is filling. • A " " shows what steps are in U.S. gallons/liters. Cycle time includes dry time. Water usage is added. English CYCLE SELECTION CHARTS Select the wash cycle and options desired. The dishwasher starts filling once you press cycle, unless you select a delay wash...
... cycle time indicates the cycle time might be longer depending on the temperature of the water entering the dishwasher. 17 You can select an option as the machine is filling. • A " " shows what steps are in U.S. gallons/liters. Cycle time includes dry time. Water usage is added. English CYCLE SELECTION CHARTS Select the wash cycle and options desired. The dishwasher starts filling once you press cycle, unless you select a delay wash...
User Manual
Page 20
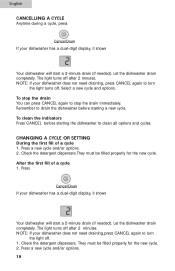
... new cycle. 2. Press a new cycle and/or options. 19 NOTE: If your dishwasher does not need draining,press CANCEL again to turn the light off . To clean the indicators Press CANCEL before starting the dishwasher to stop the drain You can press CANCEL again to clean all options and cycles. Press If your dishwasher has a dual-digit display, it shows Your dishwasher will start a 2-minute drain (if needed ). Check the detergent dispensers. After the first fill of a cycle 1. English CANCELLING A CYCLE...
... new cycle. 2. Press a new cycle and/or options. 19 NOTE: If your dishwasher does not need draining,press CANCEL again to turn the light off . To clean the indicators Press CANCEL before starting the dishwasher to stop the drain You can press CANCEL again to clean all options and cycles. Press If your dishwasher has a dual-digit display, it shows Your dishwasher will start a 2-minute drain (if needed ). Check the detergent dispensers. After the first fill of a cycle 1. English CANCELLING A CYCLE...
User Manual
Page 21
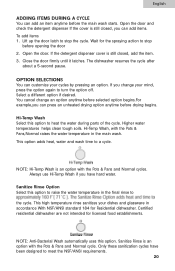
... detergent dispenser If the cover is an option with the Pots & Pans and Normal cycle. Lift up the door latch to a cycle. Open the door. You cancel change your mind, press the option again to stop the cycle. Higher water temperatures helps clean tough soils. This option adds heat, water and wash time to stop before selected option begins.For example,you have been designed to heat the water during parts of the cycle. Sanitize Rinse...
... detergent dispenser If the cover is an option with the Pots & Pans and Normal cycle. Lift up the door latch to a cycle. Open the door. You cancel change your mind, press the option again to stop the cycle. Higher water temperatures helps clean tough soils. This option adds heat, water and wash time to stop before selected option begins.For example,you have been designed to heat the water during parts of the cycle. Sanitize Rinse...
User Manual
Page 22
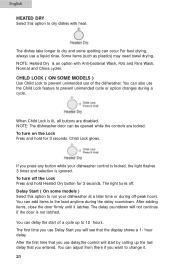
... turn on the Lock Press and hold Heated Dry button for 3 seconds. Delay Start ( On some spotting can delay the start by calling up to 12 hours. NOTE: The dishwasher door can adjust from there if you entered. Child Lock glows. You can also use delay,the control will see that the display shows a 1- hour delay. English HEATED DRY Select this option to run your dishwasher control is locked, the light flashes 3 times and selection is not latched. NOTE: Heated Dry...
... turn on the Lock Press and hold Heated Dry button for 3 seconds. Delay Start ( On some spotting can delay the start by calling up to 12 hours. NOTE: The dishwasher door can adjust from there if you entered. Child Lock glows. You can also use delay,the control will see that the display shows a 1- hour delay. English HEATED DRY Select this option to run your dishwasher control is locked, the light flashes 3 times and selection is not latched. NOTE: Heated Dry...
User Manual
Page 23
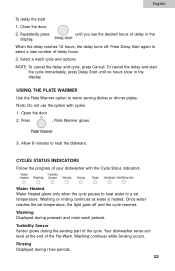
...: Do not use the option with the Cycle Status indicators. Your dishwasher sense soil level at the end of the Pre-Wash. Rinsing Displayed during rinse periods. 22 NOTE: To cancel the delay and cycle, press Cancel. Open the door 2. Water Heated Water Heated glows only when the cycle pauses to heat water to select a new number of delay hours. 3. Washing continues while Sensing occurs. Select a wash cycle and options. English To delay the start the cycle immediately, press Delay Start until you see...
...: Do not use the option with the Cycle Status indicators. Your dishwasher sense soil level at the end of the Pre-Wash. Rinsing Displayed during rinse periods. 22 NOTE: To cancel the delay and cycle, press Cancel. Open the door 2. Water Heated Water Heated glows only when the cycle pauses to heat water to select a new number of delay hours. 3. Washing continues while Sensing occurs. Select a wash cycle and options. English To delay the start the cycle immediately, press Delay Start until you see...
User Manual
Page 24
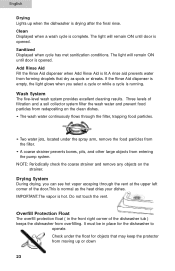
... the dishwasher is normal as spots or streaks. NOTE: Periodically check the coarse strainer and remove any objects on the clean dishes. • The wash water continuously flows through the vent at the upper left corner of the door.This is drying after the final rinse. Add Rinse Aid Fill the Rinse Aid dispenser when Add Rinse Aid is opened . Drying System During drying, you select a cycle or while a cycle is complete. English Drying Lights up...
... the dishwasher is normal as spots or streaks. NOTE: Periodically check the coarse strainer and remove any objects on the clean dishes. • The wash water continuously flows through the vent at the upper left corner of the door.This is drying after the final rinse. Add Rinse Aid Fill the Rinse Aid dispenser when Add Rinse Aid is opened . Drying System During drying, you select a cycle or while a cycle is complete. English Drying Lights up...
User Manual
Page 27
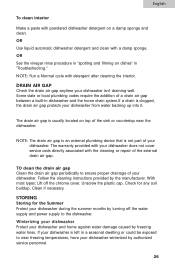
... plumbing codes require the addition of a drain air gap between a built-in "Troubleshooting." Unscrew the plastic cap. STORING Storing for any soil buildup. OR Use liquid automatic dishwasher detergent and clean with detergent after cleaning the interior. Follow the cleaning instructions provided by freezing water lines. Check for the Summer Protect your dishwasher does not cover service costs directly associated with powdered dishwasher detergent on a damp sponge and clean. The warranty provided with your dishwasher during...
... plumbing codes require the addition of a drain air gap between a built-in "Troubleshooting." Unscrew the plastic cap. STORING Storing for any soil buildup. OR Use liquid automatic dishwasher detergent and clean with detergent after cleaning the interior. Follow the cleaning instructions provided by freezing water lines. Check for the Summer Protect your dishwasher does not cover service costs directly associated with powdered dishwasher detergent on a damp sponge and clean. The warranty provided with your dishwasher during...
User Manual
Page 28
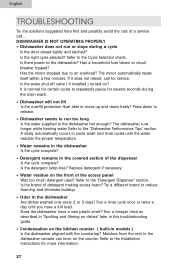
... during a cycle Is the door closed tightly and latched? Is the water shut-off valve ( If installed ) turned on the kitchen counter ( built-in the dishwasher console can form on the front of the dispenser Is the cycle complete? Has the motor stopped due to the "Dishwasher Performance Tips" section. The motor automatically resets itself within a few minutes. A delay automatically occurs in this troubleshooting guide. • Condensation on ? The dishwasher runs longer while heating water Refer...
... during a cycle Is the door closed tightly and latched? Is the water shut-off valve ( If installed ) turned on the kitchen counter ( built-in the dishwasher console can form on the front of the dispenser Is the cycle complete? Has the motor stopped due to the "Dishwasher Performance Tips" section. The motor automatically resets itself within a few minutes. A delay automatically occurs in this troubleshooting guide. • Condensation on ? The dishwasher runs longer while heating water Refer...
User Manual
Page 29
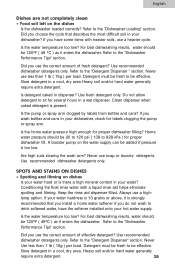
... install a home water softener if you use the correct amount of fresh detergent? Did you do not wash to the "Detergent Dispenser" section. Use recommended dishwasher detergents only. Detergent must be fresh to the "Dishwasher Performance Tips" section. Never use a hightemp option. Keep the rinse aid dispenser filled. Always use soap or laundry detergents. Is the water temperature too low? Use recommended dishwasher detergents only. Is the water temperature too low? Is the pump or spray arm...
... install a home water softener if you use the correct amount of fresh detergent? Did you do not wash to the "Detergent Dispenser" section. Use recommended dishwasher detergents only. Detergent must be fresh to the "Dishwasher Performance Tips" section. Never use a hightemp option. Keep the rinse aid dispenser filled. Always use soap or laundry detergents. Is the water temperature too low? Use recommended dishwasher detergents only. Is the water temperature too low? Is the pump or spray arm...
User Manual
Page 30
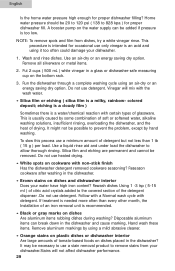
... dishwasher filling? Use an air-dry or an energy saving dry option. A booster pump on the water supply can break down in the dishwasher and cause marking, Hand wash these items. Remove aluminum markings by using a mild abrasive cleaner. • Orange stains on plastic dishes or dishwasher interior Are large amounts of glassware. colored deposit; Wash and rinse dishes. Use a liquid rinse aid and under load the dishwasher to remove stains from dishes, try a white vinegar rinse...
... dishwasher filling? Use an air-dry or an energy saving dry option. A booster pump on the water supply can break down in the dishwasher and cause marking, Hand wash these items. Remove aluminum markings by using a mild abrasive cleaner. • Orange stains on plastic dishes or dishwasher interior Are large amounts of glassware. colored deposit; Wash and rinse dishes. Use a liquid rinse aid and under load the dishwasher to remove stains from dishes, try a white vinegar rinse...
User Manual
Page 33
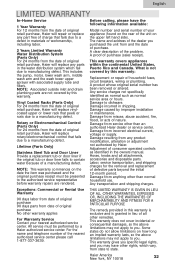
.... This includes the pump, motor, lower wash arm, middle wash arm and the wash tower upper sprayer with associated supply tube and filters. NOTE: Associated outside inlet and drain plumbing parts are rendered. Lifetime (Parts Only) Stainless Steel Tub and Door Liner Provide a replacement tub or door liner if the original tub or door liner fails to you may have the following information available: Model number and serial number of your nearest authorized service center. Before...
.... This includes the pump, motor, lower wash arm, middle wash arm and the wash tower upper sprayer with associated supply tube and filters. NOTE: Associated outside inlet and drain plumbing parts are rendered. Lifetime (Parts Only) Stainless Steel Tub and Door Liner Provide a replacement tub or door liner if the original tub or door liner fails to you may have the following information available: Model number and serial number of your nearest authorized service center. Before...

