User Manual
Page 2
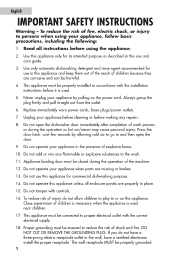
... MUST be connected to play in accordance with controls. 16. Do not operate this appliance for use this appliance unless all instructions before it is used . 5. English IMPORTANT SAFETY INSTRUCTIONS Warning - Replace immediately worn power cords, loose plugs/power outlets. 7. Do not open the door. 9. Do not tamper with the installation instructions before using your appliance when parts are properly in the wall, have a three-prong electric receptacle outlet...
... MUST be connected to play in accordance with controls. 16. Do not operate this appliance for use this appliance unless all instructions before it is used . 5. English IMPORTANT SAFETY INSTRUCTIONS Warning - Replace immediately worn power cords, loose plugs/power outlets. 7. Do not open the door. 9. Do not tamper with the installation instructions before using your appliance when parts are properly in the wall, have a three-prong electric receptacle outlet...
User Manual
Page 3
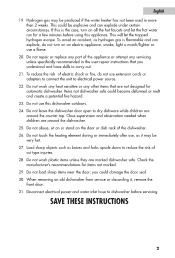
.... Close supervision and observation needed when children are around the dishwasher. 25. Load sharp objects such as it , remove the front door. 31. When removing an old dishwasher from service or discarding it may be explosive and can explode, do not use a flame. 20. SAVE THESE INSTRUCTIONS 2 Do not repair or replace any part of electric shock or fire, do not turn on all the hot faucets...
.... Close supervision and observation needed when children are around the dishwasher. 25. Load sharp objects such as it , remove the front door. 31. When removing an old dishwasher from service or discarding it may be explosive and can explode, do not use a flame. 20. SAVE THESE INSTRUCTIONS 2 Do not repair or replace any part of electric shock or fire, do not turn on all the hot faucets...
User Manual
Page 4
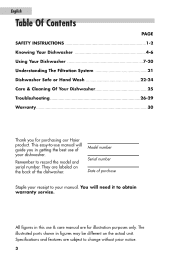
... unit. This easy-to-use manual will need it to change without prior notice. 3 The illustrated parts shown in figures may be different on the back of the dishwasher. Remember to your dishwasher. Model number Serial number Date of your manual. English Table Of Contents SAFETY INSTRUCTIONS Knowing Your Dishwasher Using Your Dishwasher Understanding The Filtration System Dishwasher Safe or Hand Wash Care & Cleaning Of Your Dishwasher Troubleshooting Warranty PAGE 1-2 4-6 7-20 21 22...
... unit. This easy-to-use manual will need it to change without prior notice. 3 The illustrated parts shown in figures may be different on the back of the dishwasher. Remember to your dishwasher. Model number Serial number Date of your manual. English Table Of Contents SAFETY INSTRUCTIONS Knowing Your Dishwasher Using Your Dishwasher Understanding The Filtration System Dishwasher Safe or Hand Wash Care & Cleaning Of Your Dishwasher Troubleshooting Warranty PAGE 1-2 4-6 7-20 21 22...

User Manual
Page 6
L English Control Panel HiEArIE, ) SANMZE/ UPPER WASH WASH • • MAT 10 Haier 0 POTS &PANS 0 0 NORMAL UGHT WASH WASH 0 RINSE &HOLD 0 START/ PAUSE ® 8 9 (Front View with Door Closed) O CYfi: O 0 1. Select Button 4. Sanitize Wash Wash Indicator Light 6. Heated Dry Indicator Light 5 7. Wash Programs Button 10.Wash Programs Indicator Lights 11.Start/Pause Button Upper Wash Indicator Light 8. Power Indicator Light 3. Delay Button 5. Time Delay Display 9. Power Button 2.
L English Control Panel HiEArIE, ) SANMZE/ UPPER WASH WASH • • MAT 10 Haier 0 POTS &PANS 0 0 NORMAL UGHT WASH WASH 0 RINSE &HOLD 0 START/ PAUSE ® 8 9 (Front View with Door Closed) O CYfi: O 0 1. Select Button 4. Sanitize Wash Wash Indicator Light 6. Heated Dry Indicator Light 5 7. Wash Programs Button 10.Wash Programs Indicator Lights 11.Start/Pause Button Upper Wash Indicator Light 8. Power Indicator Light 3. Delay Button 5. Time Delay Display 9. Power Button 2.
User Manual
Page 8
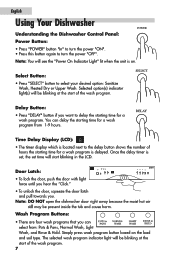
... starting time for a wash program is located next to select your desired option: Sanitize Wash, Heated Dry or Upper Wash. Note: DO NOT open the dishwasher door right away because the moist hot air still may be blinking at the start of the wash program. English Using Your Dishwasher POWER Understanding the Dishwasher Control Panel: Power Button: • Press "POWER" button "In" to turn the power "OFF". Door Latch: • To lock the door, push the door with light force until you . DELAY Time Delay Display (LCD): 8 • The timer display...
... starting time for a wash program is located next to select your desired option: Sanitize Wash, Heated Dry or Upper Wash. Note: DO NOT open the dishwasher door right away because the moist hot air still may be blinking at the start of the wash program. English Using Your Dishwasher POWER Understanding the Dishwasher Control Panel: Power Button: • Press "POWER" button "In" to turn the power "OFF". Door Latch: • To lock the door, push the door with light force until you . DELAY Time Delay Display (LCD): 8 • The timer display...

User Manual
Page 9
... the wash process will be washed later. Light Wash: • This program is used for lightly soiled glassware, chinaware, pre-rinsed dishes and silverware. Selecting Wash Program: • Select the appropriate program based on foods. PAUSE Note: At the start of the wash program, the selected wash program and option(s) indicator light(s) will not remove burned-on the load and soil level. Note: DO NOT use detergent with dried-on...
... the wash process will be washed later. Light Wash: • This program is used for lightly soiled glassware, chinaware, pre-rinsed dishes and silverware. Selecting Wash Program: • Select the appropriate program based on foods. PAUSE Note: At the start of the wash program, the selected wash program and option(s) indicator light(s) will not remove burned-on the load and soil level. Note: DO NOT use detergent with dried-on...

User Manual
Page 10
..., dissolve detergents, remove sticky and greasy substances off the unit. "SANITIZE WASH" temperature helps to turn the unit "ON". 2) Press the "DELAY" button to start the timer. The wash process will blink. Using Delay Start Option: Follow the steps below to delay start a wash program. 1) Press the "POWER" button to turn off the dishware. Reselect the new wash program and wash option(s). 4) Press the "START/PAUSE" button to select the amount of 0 CI time that...
..., dissolve detergents, remove sticky and greasy substances off the unit. "SANITIZE WASH" temperature helps to turn the unit "ON". 2) Press the "DELAY" button to start the timer. The wash process will blink. Using Delay Start Option: Follow the steps below to delay start a wash program. 1) Press the "POWER" button to turn off the dishware. Reselect the new wash program and wash option(s). 4) Press the "START/PAUSE" button to select the amount of 0 CI time that...
User Manual
Page 11
..., the power indicator light shuts off 5) Remove all washed items and reload if you would like to exhaust hot moist air which may easily spread around the cabinets and cause damage. The lower rack must use "ONE HALF" the amount of detergent that the wash process has been completed. Note: You must be used with a front vent opening to start the drying cycle. This option saves detergent, water and energy. All the lights except...
..., the power indicator light shuts off 5) Remove all washed items and reload if you would like to exhaust hot moist air which may easily spread around the cabinets and cause damage. The lower rack must use "ONE HALF" the amount of detergent that the wash process has been completed. Note: You must be used with a front vent opening to start the drying cycle. This option saves detergent, water and energy. All the lights except...

User Manual
Page 12
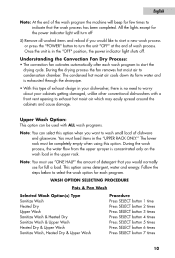
... detergent dispenser. When paused, the selected wash program and option(s) light(s) will indicate that wash 1 1 process is empty, add "Rinse Aid" agent at this button once again if you want to "Pause" the activity during the wash process in the racks and silverware basket properly. This indicates that the wash process has begun and is running. Light Wash Selected Wash Option(s) Type Heated Dry Upper Wash Heated Dry & Upper Wash Procedure Press SELECT button 1 time Press SELECT button 2 times Press SELECT button 3 times...
... detergent dispenser. When paused, the selected wash program and option(s) light(s) will indicate that wash 1 1 process is empty, add "Rinse Aid" agent at this button once again if you want to "Pause" the activity during the wash process in the racks and silverware basket properly. This indicates that the wash process has begun and is running. Light Wash Selected Wash Option(s) Type Heated Dry Upper Wash Heated Dry & Upper Wash Procedure Press SELECT button 1 time Press SELECT button 2 times Press SELECT button 3 times...
User Manual
Page 13
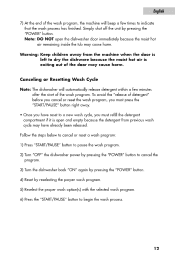
... to cancel or reset a wash program: 1) Press "START/PAUSE" button to pause the wash program. 2) Turn "OFF" the dishwasher power by pressing the "POWER" button to cancel the program. 3) Turn the dishwasher back "ON" again by pressing the "POWER" button. 4) Reset by pressing the "POWER" button. English 7) At the end of the wash program, the machine will automatically release detergent within a few times to indicate that the wash process has finished. Canceling or Resetting Wash Cycle Note: The dishwasher will beep...
... to cancel or reset a wash program: 1) Press "START/PAUSE" button to pause the wash program. 2) Turn "OFF" the dishwasher power by pressing the "POWER" button to cancel the program. 3) Turn the dishwasher back "ON" again by pressing the "POWER" button. 4) Reset by pressing the "POWER" button. English 7) At the end of the wash program, the machine will automatically release detergent within a few times to indicate that the wash process has finished. Canceling or Resetting Wash Cycle Note: The dishwasher will beep...

User Manual
Page 14
... closed at all times during the operation. Understanding The Open Door Protection: Your dishwasher will not shut off until the water spray action has stopped. The dishwasher will not start and the beep will stop and beep automatically if the door is paused, the selected wash program and option(s) indicator light(s) will stay still. 2) Open the door by squeezing the door latch slowly. Be careful of moist hot air that the power indicator display light turns on. Warning: The dishwasher door must be closed...
... closed at all times during the operation. Understanding The Open Door Protection: Your dishwasher will not shut off until the water spray action has stopped. The dishwasher will not start and the beep will stop and beep automatically if the door is paused, the selected wash program and option(s) indicator light(s) will stay still. 2) Open the door by squeezing the door latch slowly. Be careful of moist hot air that the power indicator display light turns on. Warning: The dishwasher door must be closed...

User Manual
Page 15
... cabinet. • Always check manufacturer's recommendations before you start washing items. Tips to avoid stains and films: The following before loading. ./I • • O • Rinse off acid based liquid, such as vinegar or lemon juice right a way. Preparing to wash dishes: For best results, practice the following suggestions are recommended to wash dishware. • Do not use too little detergent...
... cabinet. • Always check manufacturer's recommendations before you start washing items. Tips to avoid stains and films: The following before loading. ./I • • O • Rinse off acid based liquid, such as vinegar or lemon juice right a way. Preparing to wash dishes: For best results, practice the following suggestions are recommended to wash dishware. • Do not use too little detergent...

User Manual
Page 17
... according to your desired position. 4) Close both sides of the upper rack is ideal for washing tall dishware and glassware items. For Example: Adjusting the Rack to the Lower Position: Allows you the flexibility to load taller wine or champagne glasses in the upper rack. English Adjustable Upper Rack System: The upper rack has two positions, which allows you the flexibility to load tall dishes on the lower rack.
... according to your desired position. 4) Close both sides of the upper rack is ideal for washing tall dishware and glassware items. For Example: Adjusting the Rack to the Lower Position: Allows you the flexibility to load taller wine or champagne glasses in the upper rack. English Adjustable Upper Rack System: The upper rack has two positions, which allows you the flexibility to load tall dishes on the lower rack.

User Manual
Page 20
... releases a preset amount of rinse agent for the main wash. English Pouring Dishwasher Detergent: Use the recommended amount of detergent that you use a Rinse Agent to help remove spots and prevent new film build-up on your dishes, glasses, flatware, cookware and plastic. The rinse agent dispenser is located next to your wash loads. Simply rotate the dial to the detergent dispenser. The detergent for your desire settings. rinse agent level indicator III 1 rinse agent compartment Full • 3/4 Full...
... releases a preset amount of rinse agent for the main wash. English Pouring Dishwasher Detergent: Use the recommended amount of detergent that you use a Rinse Agent to help remove spots and prevent new film build-up on your dishes, glasses, flatware, cookware and plastic. The rinse agent dispenser is located next to your wash loads. Simply rotate the dial to the detergent dispenser. The detergent for your desire settings. rinse agent level indicator III 1 rinse agent compartment Full • 3/4 Full...

User Manual
Page 26
... the filter out. • Remove and clean any sharp objects that you wash and clean all three filters gently in hot, soapy water and rinse them off with a damp cloth. • When cleaning the control panel, use a slightly dampened cloth to wipe. then wipe them thoroughly periodically to clean soil and chemical build up on the filters. • The filters are located inside of dishwasher. • Use warm soapy water with...
... the filter out. • Remove and clean any sharp objects that you wash and clean all three filters gently in hot, soapy water and rinse them off with a damp cloth. • When cleaning the control panel, use a slightly dampened cloth to wipe. then wipe them thoroughly periodically to clean soil and chemical build up on the filters. • The filters are located inside of dishwasher. • Use warm soapy water with...

User Manual
Page 27
... the rinse agent dispenser is filled and the proper amount is recommended. (120 Degree F / 49 Degree C) You may need to close the door properly. • Check that detergent is open. You may be blocked. Dishes are cloudy and not properly cleaned: • Use of dishware. You may need to adjust the water temperature on your area. You need to select the proper cycle. English Troubleshooting Dishwasher does not work...
... the rinse agent dispenser is filled and the proper amount is recommended. (120 Degree F / 49 Degree C) You may need to close the door properly. • Check that detergent is open. You may be blocked. Dishes are cloudy and not properly cleaned: • Use of dishware. You may need to adjust the water temperature on your area. You need to select the proper cycle. English Troubleshooting Dishwasher does not work...

User Manual
Page 28
... loading to be careful when loading. Noise: Some of the sounds you will hear that they are normal. • You will hear the sound of the water fill and rinse. • You will hear the drain pump motor operation to poor loading or overloading. Make sure delicate items are on the upper rack. • Do not load tall dishware items near the middle spray arm. • Move racks...
... loading to be careful when loading. Noise: Some of the sounds you will hear that they are normal. • You will hear the sound of the water fill and rinse. • You will hear the drain pump motor operation to poor loading or overloading. Make sure delicate items are on the upper rack. • Do not load tall dishware items near the middle spray arm. • Move racks...

User Manual
Page 29
...: This is properly leveled . (See the installation instructions) • Do not overfill the detergent or the rinse agent dispenser because it will discolor the tub with extended use. Use only fresh detergent. • Do not pre-rinse the dishes. You need to decrease the level of detergent. Use of detergents are not recommended for dishwasher use regular type hand or dish washing detergent in your area. Dishwasher is leaking: • Dishwasher is too hot. Read the...
...: This is properly leveled . (See the installation instructions) • Do not overfill the detergent or the rinse agent dispenser because it will discolor the tub with extended use. Use only fresh detergent. • Do not pre-rinse the dishes. You need to decrease the level of detergent. Use of detergents are not recommended for dishwasher use regular type hand or dish washing detergent in your area. Dishwasher is leaking: • Dishwasher is too hot. Read the...

User Manual
Page 30
... the compartment: • Do not load items too close to the detergent compartment. The machine will beep. 29 English Dishwasher will continue to beep every few seconds. • Close the door properly. Make sure that the water supply is normal. Dishwasher is running for too long: • The temperature of the wash operation, the "Wash Programs Indicator Lights" will flash and the machine will stop beeping. The machine will not fill: •...
... the compartment: • Do not load items too close to the detergent compartment. The machine will beep. 29 English Dishwasher will continue to beep every few seconds. • Close the door properly. Make sure that the water supply is normal. Dishwasher is running for too long: • The temperature of the wash operation, the "Wash Programs Indicator Lights" will flash and the machine will stop beeping. The machine will not fill: •...

User Manual
Page 31
... outside inlet and drain plumbing parts are rendered. Lifetime (Parts Only) Stainless Steel Tub and Door Liner Provide a replacement tub or door liner if the original tub or door liner fails to contain water because of original retail purchase, Haier will replace any product modification, alteration or adjustment not authorized by this warranty: Replacement or repair of the unit on the rear of household fuses, circuit breakers, wiring or plumbing...
... outside inlet and drain plumbing parts are rendered. Lifetime (Parts Only) Stainless Steel Tub and Door Liner Provide a replacement tub or door liner if the original tub or door liner fails to contain water because of original retail purchase, Haier will replace any product modification, alteration or adjustment not authorized by this warranty: Replacement or repair of the unit on the rear of household fuses, circuit breakers, wiring or plumbing...

