User Manual
Page 2
... loading door must be connected to the wash. 11. Replace immediately worn power cords, loose plugs/power outlets. 7. Do not add or mix any repairs. 8. Close supervision of children is necessary when the appliance is used near children. 17. Proper grounding must be properly installed in place. 15. This appliance must be closed during the operation as described in or on the power cord. Use only automatic dishwashing detergent and rinse agent...
... loading door must be connected to the wash. 11. Replace immediately worn power cords, loose plugs/power outlets. 7. Do not add or mix any repairs. 8. Close supervision of children is necessary when the appliance is used near children. 17. Proper grounding must be properly installed in place. 15. This appliance must be closed during the operation as described in or on the power cord. Use only automatic dishwashing detergent and rinse agent...
User Manual
Page 3
... use , as it , remove the front door 31. Load sharp objects such as hydrogen gas is the case, turn on the door or dish rack of cut type injuries. 28. To avoid an accident, as knives and forks upside down to carry out. 21. Disconnect electrical power and water inlet hose to dry dishware while children are not designed for automatic dishwasher. When removing an old dishwasher from service...
... use , as it , remove the front door 31. Load sharp objects such as hydrogen gas is the case, turn on the door or dish rack of cut type injuries. 28. To avoid an accident, as knives and forks upside down to carry out. 21. Disconnect electrical power and water inlet hose to dry dishware while children are not designed for automatic dishwasher. When removing an old dishwasher from service...
User Manual
Page 4
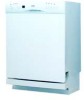
... warranty service. The illustrated parts shown in this use & care manual are for purchasing our Haier product. English Table of Contents SAFETY INSTRUCTIONS Knowing Your Dishwasher Using Your Dishwasher Understanding The Filtration System Dishwasher Safe or Hand Wash Care & Cleaning Of Your Dishwasher Troubleshooting Warranty PAGE 1-2 4-6 7-20 21 22-24 25 26-29 30 Thank you in getting the best use of purchase Staple your receipt to record the model and serial number. Specifications...
... warranty service. The illustrated parts shown in this use & care manual are for purchasing our Haier product. English Table of Contents SAFETY INSTRUCTIONS Knowing Your Dishwasher Using Your Dishwasher Understanding The Filtration System Dishwasher Safe or Hand Wash Care & Cleaning Of Your Dishwasher Troubleshooting Warranty PAGE 1-2 4-6 7-20 21 22-24 25 26-29 30 Thank you in getting the best use of purchase Staple your receipt to record the model and serial number. Specifications...
User Manual
Page 5
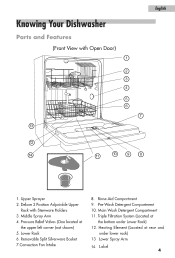
Pre-Wash Detergent Compartment 10. Lower Rack 6. Rinse Aid Compartment 9. Removable Split Silverware Basket 7.Convection Fan Intake 8. Upper Sprayer 2. Middle Spray Arm 4. Triple Filtration System (Located at rear and under Lower Rack) 12. Heating Element (Located at the bottom under lower rack) 13 Lower Spray Arm 14. Pressure Relief Valves (One located at the upper left corner (not shown) 5. Label 4 Deluxe 2 Position Adjustable Upper Rack with Open Door) 12 1. Main Wash Detergent Compartment 11. English Knowing Your Dishwasher Parts and Features (Front View with...
Pre-Wash Detergent Compartment 10. Lower Rack 6. Rinse Aid Compartment 9. Removable Split Silverware Basket 7.Convection Fan Intake 8. Upper Sprayer 2. Middle Spray Arm 4. Triple Filtration System (Located at rear and under Lower Rack) 12. Heating Element (Located at the bottom under lower rack) 13 Lower Spray Arm 14. Pressure Relief Valves (One located at the upper left corner (not shown) 5. Label 4 Deluxe 2 Position Adjustable Upper Rack with Open Door) 12 1. Main Wash Detergent Compartment 11. English Knowing Your Dishwasher Parts and Features (Front View with...
User Manual
Page 8
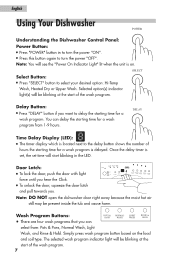
... wash program. DELAY Time Delay Display (LED): • The timer display which is delayed. Once the delay timer is on the load and soil type. Simply press wash program button based on . Note: DO NOT open the dishwasher door right away because the moist hot air still may be blinking at the start blinking in to turn the power "OFF". vs- v cm A • 000 00 - Door Latch: • To lock the door, push the door with light...
... wash program. DELAY Time Delay Display (LED): • The timer display which is delayed. Once the delay timer is on the load and soil type. Simply press wash program button based on . Note: DO NOT open the dishwasher door right away because the moist hot air still may be blinking at the start blinking in to turn the power "OFF". vs- v cm A • 000 00 - Door Latch: • To lock the door, push the door with light...
User Manual
Page 9
... start of the wash program, the selected wash program and option(s) indicator light(s) will not remove burned-on foods. Light Wash: •This program is used for lightly soiled glassware, chinaware, pre-rinsed dishes and silverware. Pressing this button once to start blinking. English Start/Pause Button: •After selecting your convenience, the dishwasher has Pots & Pans, Normal, Light and Rinse & Hold wash programs that will be washed later Note: DO NOT use detergent with dried...
... start of the wash program, the selected wash program and option(s) indicator light(s) will not remove burned-on foods. Light Wash: •This program is used for lightly soiled glassware, chinaware, pre-rinsed dishes and silverware. Pressing this button once to start blinking. English Start/Pause Button: •After selecting your convenience, the dishwasher has Pots & Pans, Normal, Light and Rinse & Hold wash programs that will be washed later Note: DO NOT use detergent with dried...
User Manual
Page 10
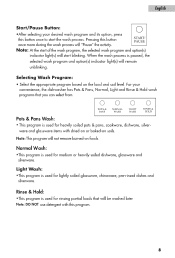
... incoming water temperature, proper water heating temperature can be affected. Heated Dry Option: • When this option is not available with the "RINSE & HOLD" program. To reselect new wash program and option(s), press "POWER" button again to delay start a wash program. Reselect the new wash program and wash option(s). 9 Hi-Temp Wash Option: HLTIDe HEATED UPPER WASH DRS WASH • • • 0 • This option is used with "POTS & PANS, NORMAL and LIGHT" wash programs...
... incoming water temperature, proper water heating temperature can be affected. Heated Dry Option: • When this option is not available with the "RINSE & HOLD" program. To reselect new wash program and option(s), press "POWER" button again to delay start a wash program. Reselect the new wash program and wash option(s). 9 Hi-Temp Wash Option: HLTIDe HEATED UPPER WASH DRS WASH • • • 0 • This option is used with "POTS & PANS, NORMAL and LIGHT" wash programs...
User Manual
Page 11
... start the drying cycle. The lower rack must use for the power indicator light will turn the unit "OFF" at the end of wash process. Follow the steps below to select the wash option for few times to condensation chamber. English 4) Press the "START/PAUSE" button to start a new wash process or press the "POWER" button to turn off 5) Remove all the selected: Wash Program, Wash Option(s) and Delay Time Display with selected "Hours" lights will blink. The condensed hot moist air...
... start the drying cycle. The lower rack must use for the power indicator light will turn the unit "OFF" at the end of wash process. Follow the steps below to select the wash option for few times to condensation chamber. English 4) Press the "START/PAUSE" button to start a new wash process or press the "POWER" button to turn off 5) Remove all the selected: Wash Program, Wash Option(s) and Delay Time Display with selected "Hours" lights will blink. The condensed hot moist air...
User Manual
Page 12
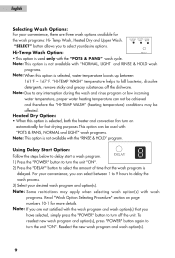
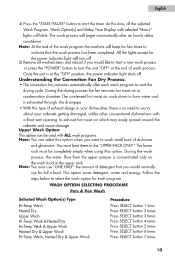
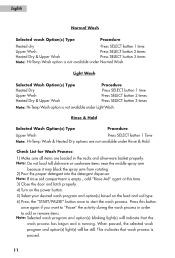
... rinse aid compartment is not available under Normal Wash. Press this time. 3) Close the door and latch properly. 4) Turn on the power button. 5) Select your desired wash program and option(s) based on the load and soil type. 6) Press the "START/PAUSE" button once to add or remove items. Note: Selected wash program and option(s) blinking light(s) will be still. Light Wash Selected Wash Option(s) Type Heated Dry Upper Wash Heated Dry & Upper Wash Procedure Press SELECT button 1 time Press SELECT button 2 times Press SELECT button 3 times...
... rinse aid compartment is not available under Normal Wash. Press this time. 3) Close the door and latch properly. 4) Turn on the power button. 5) Select your desired wash program and option(s) based on the load and soil type. 6) Press the "START/PAUSE" button once to add or remove items. Note: Selected wash program and option(s) blinking light(s) will be still. Light Wash Selected Wash Option(s) Type Heated Dry Upper Wash Heated Dry & Upper Wash Procedure Press SELECT button 1 time Press SELECT button 2 times Press SELECT button 3 times...
User Manual
Page 13
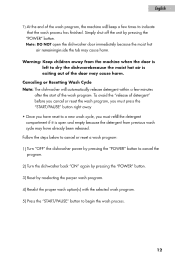
... to dry the dishwarebecause the moist hot air is open the dishwasher door immediately because the moist hot air remaininginside the tub may cause harm. Canceling or Resetting Wash Cycle Note: The dishwasher will beep a few minutes after the start of the wash program. Follow the steps below to cancel or reset a wash program: 1) Turn "OFF" the dishwasher power by pressing the "POWER" button to cancel the program. 2) Turn the dishwasher back "ON" again by pressing the "POWER" button. 3) Reset...
... to dry the dishwarebecause the moist hot air is open the dishwasher door immediately because the moist hot air remaininginside the tub may cause harm. Canceling or Resetting Wash Cycle Note: The dishwasher will beep a few minutes after the start of the wash program. Follow the steps below to cancel or reset a wash program: 1) Turn "OFF" the dishwasher power by pressing the "POWER" button to cancel the program. 2) Turn the dishwasher back "ON" again by pressing the "POWER" button. 3) Reset...
User Manual
Page 14
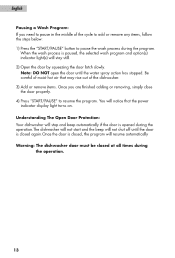
... hot air that the power indicator display light turns on. You will notice that may rise out of the dishwasher. 3) Add or remove items. Once you need to pause in the middle of the cycle to add or remove any items, follow the steps below: 1) Press the "START/PAUSE" button to resume the program. Understanding The Open Door Protection: Your dishwasher will stop and beep automatically if the door is opened...
... hot air that the power indicator display light turns on. You will notice that may rise out of the dishwasher. 3) Add or remove items. Once you need to pause in the middle of the cycle to add or remove any items, follow the steps below: 1) Press the "START/PAUSE" button to resume the program. Understanding The Open Door Protection: Your dishwasher will stop and beep automatically if the door is opened...

User Manual
Page 17
Steps to Remove the Rack 1) Open both sides of the upper rack is ideal for washingtall dishware and glassware items. For Example: Adjusting the Rack to the Lower Position: Allows you the flexibility to load tall dishes on the lower rack. For Example: Adjusting the Rack to Upper Position: Allows you the flexibility to load taller wine or champagne glasses in the upper rack. Simplyremove the rack and bring it...
Steps to Remove the Rack 1) Open both sides of the upper rack is ideal for washingtall dishware and glassware items. For Example: Adjusting the Rack to the Lower Position: Allows you the flexibility to load tall dishes on the lower rack. For Example: Adjusting the Rack to Upper Position: Allows you the flexibility to load taller wine or champagne glasses in the upper rack. Simplyremove the rack and bring it...
User Manual
Page 20
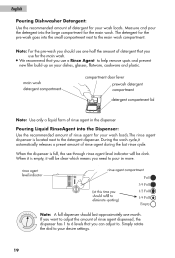
.... rinse agent level indicator rinse agent compartment I1 (at this time you want to adjust the amount of rinse agent dispensed, the dispenser has 1 to . If you should refill to eliminate spotting) Full • 3/4 Full • 1/2 Full0 1/4 FullCs 'm1O 3 Note: A full dispenser should use a Rinse Agent to help remove spots and prevent new film build-up on your dishes, glasses, flatware, cookware and plastic. Note: For the pre-wash you...
.... rinse agent level indicator rinse agent compartment I1 (at this time you want to adjust the amount of rinse agent dispensed, the dispenser has 1 to . If you should refill to eliminate spotting) Full • 3/4 Full • 1/2 Full0 1/4 FullCs 'm1O 3 Note: A full dispenser should use a Rinse Agent to help remove spots and prevent new film build-up on your dishes, glasses, flatware, cookware and plastic. Note: For the pre-wash you...

User Manual
Page 25
instructions before loading. Do not heat dry. plastic items on the top rack. If you are going stainless steel items in machine wash due to place instructions before loading. 24 Note: It will rust. Read manufacturer's washing instructions before loading. Read manufacturer's washing It is recommended to "DishwasherSafe" the hot water temperature Read manufacturer's condition. in contact with stainless Note: Do not mix stainless and steelitems. Do not load silverware...
instructions before loading. Do not heat dry. plastic items on the top rack. If you are going stainless steel items in machine wash due to place instructions before loading. 24 Note: It will rust. Read manufacturer's washing instructions before loading. Read manufacturer's washing It is recommended to "DishwasherSafe" the hot water temperature Read manufacturer's condition. in contact with stainless Note: Do not mix stainless and steelitems. Do not load silverware...
User Manual
Page 26
... the lower rack. • After a wash and dry cycle is finished, you finish cleaning the filters, place them thoroughly periodically to clean soil and chemical build up on the filters. • The filters are located inside of dishwasher. • Use warm soapy water with a soft brush or a piece of cloth to clean the interior of a tub. • Clean around the tub gasket with a damp cloth. • When cleaning the control panel, use...
... the lower rack. • After a wash and dry cycle is finished, you finish cleaning the filters, place them thoroughly periodically to clean soil and chemical build up on the filters. • The filters are located inside of dishwasher. • Use warm soapy water with a soft brush or a piece of cloth to clean the interior of a tub. • Clean around the tub gasket with a damp cloth. • When cleaning the control panel, use...
User Manual
Page 27
... poor detergent. You need to close the door properly. • Check that detergent is open.You may need to make sure that you have selected wrong cycle.) Inappropraite cycle selection. Dishes are cloudy and not properly cleaned: • Use of dishware. English Troubleshooting Dishwasher does not work: • Check if the circuit breaker needs to be reset or if the fuse needs to be low. You may need to adjust the water...
... poor detergent. You need to close the door properly. • Check that detergent is open.You may need to make sure that you have selected wrong cycle.) Inappropraite cycle selection. Dishes are cloudy and not properly cleaned: • Use of dishware. English Troubleshooting Dishwasher does not work: • Check if the circuit breaker needs to be reset or if the fuse needs to be low. You may need to adjust the water...

User Manual
Page 28
... each other Noise: Some of the sounds you will hear are normal. • You will hear the sound of the water fill and rinse. • You will hear the drain pump motor operation to pump water out. • You will hear the motor stopping at the end of the cycle. • If some utensils are not secure in the rack, you will hear that line chinaware...
... each other Noise: Some of the sounds you will hear are normal. • You will hear the sound of the water fill and rinse. • You will hear the drain pump motor operation to pump water out. • You will hear the motor stopping at the end of the cycle. • If some utensils are not secure in the rack, you will hear that line chinaware...

User Manual
Page 29
... hand or dish washing detergent in your area. You need to : • Use of too little detergent. • Low incoming water temperature and pressure. • Improper loading. • Use of old, moist and damp powder detergent. • Hard water in the detergent dispenser. You need to place the dishwasher on flatware/glassware: This is properly leveled . (See the installation instructions) • Do not overfill the detergent or the rinse agent dispenser because...
... hand or dish washing detergent in your area. You need to : • Use of too little detergent. • Low incoming water temperature and pressure. • Improper loading. • Use of old, moist and damp powder detergent. • Hard water in the detergent dispenser. You need to place the dishwasher on flatware/glassware: This is properly leveled . (See the installation instructions) • Do not overfill the detergent or the rinse agent dispenser because...
User Manual
Page 30
... "START/PAUSE" button to beep every few seconds. • Close the door properly. Beeping Sound and Flashing Light(s): • The dishwasher door is opened in the middle of incoming water is in the middle of operation. • Call the Haier Customer Satisfaction Center if this does not resolve the problem. The selected wash program light will beep. 29 Make sure that the water supply is below 120°F. English Dishwasher will stop beeping. The...
... "START/PAUSE" button to beep every few seconds. • Close the door properly. Beeping Sound and Flashing Light(s): • The dishwasher door is opened in the middle of incoming water is in the middle of operation. • Call the Haier Customer Satisfaction Center if this does not resolve the problem. The selected wash program light will beep. 29 Make sure that the water supply is below 120°F. English Dishwasher will stop beeping. The...
User Manual
Page 31
... exclusiveand is not covered by this warranty. Haier America New York, NY 10018 30 Lifetime (Parts Only) Stainless Steel Tub and Door Liner Provide a replacement tub or door liner if the original tub or door liner fails to contain waterbecause of purchase (sales receipt). All service must be performed by this warranty: Replacement or repair of household fuses, circuit breakers, wiring or plumbing. A clear description of...
... exclusiveand is not covered by this warranty. Haier America New York, NY 10018 30 Lifetime (Parts Only) Stainless Steel Tub and Door Liner Provide a replacement tub or door liner if the original tub or door liner fails to contain waterbecause of purchase (sales receipt). All service must be performed by this warranty: Replacement or repair of household fuses, circuit breakers, wiring or plumbing. A clear description of...


