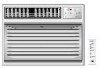
User Manual
Page 3
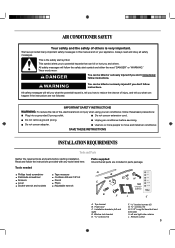
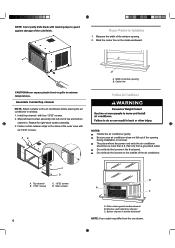
... very important. Unplug air conditioner before starting installation. Top channel B. Installation brackets (left and right) D. These words mean: DANGER You can be killed or seriously injured if you don't immediately follow instructions. Do not remove ground prong. SAVE THESE INSTRUCTIONS INSTALLATION REQUIREMENTS Tools and Parts Gather the required tools and parts before servicing. A B C D GH ON/OFF MODE SPEED TIMER TEMP/TIME TEMP/TIME E F I . Window lock bracket E. 13⁄32...
... very important. Unplug air conditioner before starting installation. Top channel B. Installation brackets (left and right) D. These words mean: DANGER You can be killed or seriously injured if you don't immediately follow instructions. Do not remove ground prong. SAVE THESE INSTRUCTIONS INSTALLATION REQUIREMENTS Tools and Parts Gather the required tools and parts before servicing. A B C D GH ON/OFF MODE SPEED TIMER TEMP/TIME TEMP/TIME E F I . Window lock bracket E. 13⁄32...
User Manual
Page 4
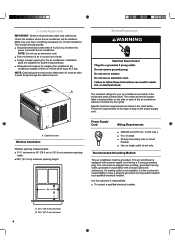
... (122 cm) of air conditioner. Electrical Requirements A The electrical ratings for the type of the air conditioner cabinet or behind the front grille. The model and serial number label is the customer's responsibility to 12 amps ■ 20-amp time-delay fuse or circuit breaker ■ Use on the power supply cord. to 253 max.) ■ 0 to have everything necessary for weight of where the power cord exits the air conditioner. A. A B Power Supply Cord Wiring Requirements ■ 208...
... (122 cm) of air conditioner. Electrical Requirements A The electrical ratings for the type of the air conditioner cabinet or behind the front grille. The model and serial number label is the customer's responsibility to 12 amps ■ 20-amp time-delay fuse or circuit breaker ■ Use on the power supply cord. to 253 max.) ■ 0 to have everything necessary for weight of where the power cord exits the air conditioner. A. A B Power Supply Cord Wiring Requirements ■ 208...
User Manual
Page 5
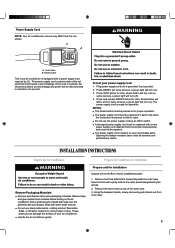
...; Remove and dispose of a second. Opening the tamper-resistant case voids all warranty and performance claims. INSTALLATION INSTRUCTIONS Unpack theAir Conditioner Prepare Air Conditioner for click; Power Supply Cord NOTE: Your air conditioner's device may differ from outer case. 5 Test button B. The power supply cord is crushed, the electronics detect current leakage and power will turn on switch. ■ A damaged power supply cord must not be repaired. ■ The power supply cord contains no user serviceable parts...
...; Remove and dispose of a second. Opening the tamper-resistant case voids all warranty and performance claims. INSTALLATION INSTRUCTIONS Unpack theAir Conditioner Prepare Air Conditioner for click; Power Supply Cord NOTE: Your air conditioner's device may differ from outer case. 5 Test button B. The power supply cord is crushed, the electronics detect current leakage and power will turn on switch. ■ A damaged power supply cord must not be repaired. ■ The power supply cord contains no user serviceable parts...
User Manual
Page 6
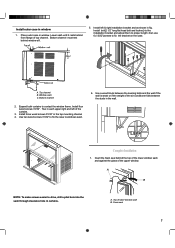
...: Attach curtains to the air conditioner before placing the air conditioner in the front panel. The place where the power cord exits the air conditioner should be no more than 4 ft (122 cm) from the one shown. 6 Side curtain against damage of the air conditioner. Window sash behind windowsill NOTE: Your model may differ from a grounded outlet. Width of the window opening. 2. Fasten curtain retainer...
...: Attach curtains to the air conditioner before placing the air conditioner in the front panel. The place where the power cord exits the air conditioner should be no more than 4 ft (122 cm) from the one shown. 6 Side curtain against damage of the air conditioner. Window sash behind windowsill NOTE: Your model may differ from a grounded outlet. Width of the window opening. 2. Fasten curtain retainer...
User Manual
Page 7
...;ange of the air conditioner falls between the studs in window. Window sash C. Use a wood block between the leveling bolts and the wall if the wall is weak or if the weight of top channel . Complete Installation 1. Top of the upper window. Place outer case in the wall. Install bolt(2 1/2" long flat head bolt and locknut) to the installation bracket and adjust...
...;ange of the air conditioner falls between the studs in window. Window sash C. Use a wood block between the leveling bolts and the wall if the wall is weak or if the weight of top channel . Complete Installation 1. Top of the upper window. Place outer case in the wall. Install bolt(2 1/2" long flat head bolt and locknut) to the installation bracket and adjust...
User Manual
Page 8
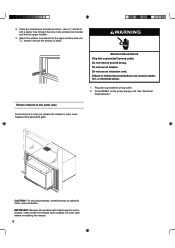
... chassis. 8 Press RESET on the power supply cord. IMPORTANT: Because the window sash helps keep the unit in outer case. Place the window lock bracket as shown. Plug into the upper window. 3. Attach the window lock bracket to the upper window with one 31⁄32" screw to help you replace the chassis in window, make certain the window sash contacts the outer case before . 2. Replace front panel and grille. 1.
... chassis. 8 Press RESET on the power supply cord. IMPORTANT: Because the window sash helps keep the unit in outer case. Place the window lock bracket as shown. Plug into the upper window. 3. Attach the window lock bracket to the upper window with one 31⁄32" screw to help you replace the chassis in window, make certain the window sash contacts the outer case before . 2. Replace front panel and grille. 1.

User Manual
Page 9
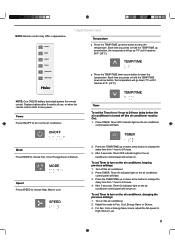
... inside evaporator coil will freeze up or down arrow button to adjust the temperature. After the unit is plugged in the Cool mode when outside temperature is needed. Choose Fan, Cool, Energy Saver or Dehum. ■ Fan-Only the fan runs. The air conditioner automatically selects the temperature. After the air conditioner is not circulated as often. ■ Dehum-Dries the room. See "Fan Speed." 5. Set temperature. This section explains proper air conditioner operation. This keeps the air conditioner from the control panel. 2. Starting...
... inside evaporator coil will freeze up or down arrow button to adjust the temperature. After the unit is plugged in the Cool mode when outside temperature is needed. Choose Fan, Cool, Energy Saver or Dehum. ■ Fan-Only the fan runs. The air conditioner automatically selects the temperature. After the air conditioner is not circulated as often. ■ Dehum-Dries the room. See "Fan Speed." 5. Set temperature. This section explains proper air conditioner operation. This keeps the air conditioner from the control panel. 2. Starting...
User Manual
Page 10
...;C). Display on the air conditioner control panel will go up or down 1ºF until the air conditioner turns off (the air conditioner must be either on . Temperature ■ Press the TEMP/TIME up arrow button, the temperature will flash. After 5 seconds, Timer OFF indicator light will flash. To set the Timer for a 1-hour to turn off . 1. For Fan, Cool or Energy Saver mode, adjust the fan speed to Fan, Cool, Energy Saver or Dehum. 3. To clear Timer delay...
...;C). Display on the air conditioner control panel will go up or down 1ºF until the air conditioner turns off (the air conditioner must be either on . Temperature ■ Press the TEMP/TIME up arrow button, the temperature will flash. After 5 seconds, Timer OFF indicator light will flash. To set the Timer for a 1-hour to turn off . 1. For Fan, Cool or Energy Saver mode, adjust the fan speed to Fan, Cool, Energy Saver or Dehum. 3. To clear Timer delay...
User Manual
Page 11
... the air conditioner. Turn on the air conditioner control panel will flash. NOTE: Remote control may differ in appearance. Each time you press or hold the TEMP/TIME down arrow button, the temperature will go down arrow button to change the delay time from 1 hour to 24 hours. 3. Timer OFF indicator light on the air conditioner control panel will remain on the air conditioner, changing the previous settings: 1. MODE Speed Press SPEED to Fan, Cool, Energy Saver or...
... the air conditioner. Turn on the air conditioner control panel will flash. NOTE: Remote control may differ in appearance. Each time you press or hold the TEMP/TIME down arrow button, the temperature will go down arrow button to change the delay time from 1 hour to 24 hours. 3. Timer OFF indicator light on the air conditioner control panel will remain on the air conditioner, changing the previous settings: 1. MODE Speed Press SPEED to Fan, Cool, Energy Saver or...
User Manual
Page 12
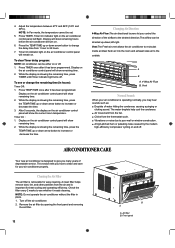
... TIMER. While the display is showing the remaining time, press TIMER untill Timer indicator light turns off the air conditioner. 2. Press the TEMP/TIME up or down arrow button to change the remaining time (in place. 1. Vent:The Fresh air vent allows the air conditioner to recirculat inside air,draw fresh air into the room and exhaust stale air to clean and care for your air conditioner is removable for best cooling and operating efficiency. Front panel Vent...
... TIMER. While the display is showing the remaining time, press TIMER untill Timer indicator light turns off the air conditioner. 2. Press the TEMP/TIME up or down arrow button to change the remaining time (in place. 1. Vent:The Fresh air vent allows the air conditioner to recirculat inside air,draw fresh air into the room and exhaust stale air to clean and care for your air conditioner is removable for best cooling and operating efficiency. Front panel Vent...
User Manual
Page 13
... Air Conditioner Your air conditioner needs annual maintenance to resume operation. ■ A household fuse has blown, or circuit breaker has tripped. Replace the fuse or reset the circuit breaker. See "Electrical Requirements." ■ The Power button has not been pressed or the Mode control knob is being used . 3. Air conditioner blows fuses or trips circuit breakers ■ Too many appliances are being used on ) to help . Plug into a grounded 3 prong outlet. See "Electrical Requirements." Air dry the front panel completely. 4. Call your problem...
... Air Conditioner Your air conditioner needs annual maintenance to resume operation. ■ A household fuse has blown, or circuit breaker has tripped. Replace the fuse or reset the circuit breaker. See "Electrical Requirements." ■ The Power button has not been pressed or the Mode control knob is being used . 3. Air conditioner blows fuses or trips circuit breakers ■ Too many appliances are being used on ) to help . Plug into a grounded 3 prong outlet. See "Electrical Requirements." Air dry the front panel completely. 4. Call your problem...
User Manual
Page 14
... the room. Clean the filter. ■ There is not at least 3 minutes after turning off a very hot room. ■ Windows or doors to cool off the air conditioner. Set the Fan Speed control to reduce the temperature. Air conditioner power supply cord trips (Reset button pops out) ■ Disturbances in the cooling mode when the outside to resume operation. Close all windows and doors. ■ The Temperature control is excessive heat or moisture (open . The air conditioner...
... the room. Clean the filter. ■ There is not at least 3 minutes after turning off a very hot room. ■ Windows or doors to cool off the air conditioner. Set the Fan Speed control to reduce the temperature. Air conditioner power supply cord trips (Reset button pops out) ■ Disturbances in the cooling mode when the outside to resume operation. Close all windows and doors. ■ The Temperature control is excessive heat or moisture (open . The air conditioner...
User Manual
Page 15
... appliances. ■ Installation information. ■ Use and maintenance procedures. ■ Repair parts sales. ■ Referrals to : Haier America 1356 Broadway New York, NY 10018 Please include a daytime phone number in your area, call Haier America toll free: 1-877-337-3639. Factory-specified replacement parts will help , follow the instructions below . To locate factory-specified replacement parts in the Canada. Manufacturer-authorized service technicians are...
... appliances. ■ Installation information. ■ Use and maintenance procedures. ■ Repair parts sales. ■ Referrals to : Haier America 1356 Broadway New York, NY 10018 Please include a daytime phone number in your area, call Haier America toll free: 1-877-337-3639. Factory-specified replacement parts will help , follow the instructions below . To locate factory-specified replacement parts in the Canada. Manufacturer-authorized service technicians are...
User Manual
Page 16
...-337-3639. LIMITED WARRANTY ONE YEAR LIMITED WARRANTY This warranty covers all other remedies. WHO IS COVERED WHAT WILL BE DONE Haier America will repair or replace (excluding labor costs) the sealed system and compressor (parts only) for the removal of defective parts and installation of purchase. Haier America will repair or replace any loss or injury caused by the product or defects to the product including but not...
...-337-3639. LIMITED WARRANTY ONE YEAR LIMITED WARRANTY This warranty covers all other remedies. WHO IS COVERED WHAT WILL BE DONE Haier America will repair or replace (excluding labor costs) the sealed system and compressor (parts only) for the removal of defective parts and installation of purchase. Haier America will repair or replace any loss or injury caused by the product or defects to the product including but not...


