
User Manual
Page 3
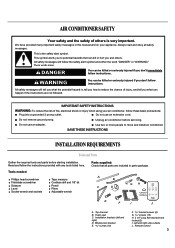
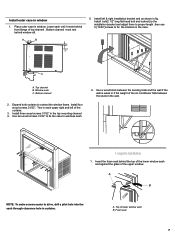
... listed here. Unplug air conditioner before starting installation. A B C D GH E F I . Top channel B. Window lock bracket E. 13⁄32" screws (10) F. 13⁄32" bracket screws (6) G. 31⁄32" screws (10) H. 2 1/2" Long flat head bolt and locknut(2) I J A. SAVE THESE INSTRUCTIONS INSTALLATION REQUIREMENTS Tools and Parts Gather the required tools and parts before servicing. Left and right side curtains J. Remote control 3 This is very important. Do not use...
... listed here. Unplug air conditioner before starting installation. A B C D GH E F I . Top channel B. Window lock bracket E. 13⁄32" screws (10) F. 13⁄32" bracket screws (6) G. 31⁄32" screws (10) H. 2 1/2" Long flat head bolt and locknut(2) I J A. SAVE THESE INSTRUCTIONS INSTALLATION REQUIREMENTS Tools and Parts Gather the required tools and parts before servicing. Left and right side curtains J. Remote control 3 This is very important. Do not use...
User Manual
Page 4
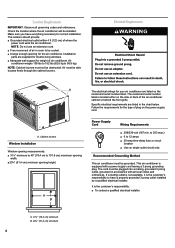
... circuit only. Installation parts are listed in accordance with a power supply cord having a 3 prong grounding plug. A. If a mating outlet is not available, it is located either on the model and serial number label. NOTE: Do not use an extension cord. ■ Free movement of air conditioner. The model and serial number label is the customer's responsibility to be plugged into a mating, grounded 3 prong outlet, grounded in the chart below. Cabinet louvers Window Installation Window opening...
... circuit only. Installation parts are listed in accordance with a power supply cord having a 3 prong grounding plug. A. If a mating outlet is not available, it is located either on the model and serial number label. NOTE: Do not use an extension cord. ■ Free movement of air conditioner. The model and serial number label is the customer's responsibility to be plugged into a mating, grounded 3 prong outlet, grounded in the chart below. Cabinet louvers Window Installation Window opening...
User Manual
Page 5
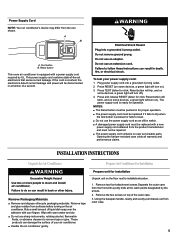
... switch. ■ A damaged power supply cord must be replaced with a new power supply cord obtained from the product manufacturer and must not be pushed in a fraction of the outer case. 3. NOTES: ■ The Reset button must be disconnected in for click; Opening the tamper-resistant case voids all warranty and performance claims. INSTALLATION INSTRUCTIONS Unpack the Air Conditioner Prepare Air Conditioner for installation Unpack unit on ). Wipe with your power supply cord...
... switch. ■ A damaged power supply cord must be replaced with a new power supply cord obtained from the product manufacturer and must not be pushed in a fraction of the outer case. 3. NOTES: ■ The Reset button must be disconnected in for click; Opening the tamper-resistant case voids all warranty and performance claims. INSTALLATION INSTRUCTIONS Unpack the Air Conditioner Prepare Air Conditioner for installation Unpack unit on ). Wipe with your power supply cord...
User Manual
Page 6
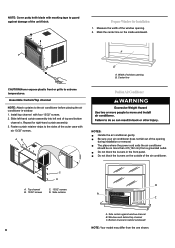
... window opening during installation or removal. AB Position Air Conditioner NOTES: Handle the air conditioner gently. Window sash behind windowsill NOTE: Your model may differ from a grounded outlet. Install top channel with four 13/32" screws. 2. C D B A. Side curtain against damage of the air conditioner. Mark the center line on the outside of the unit finish. Repeat for Installation 1. The place where the power cord exits the air conditioner...
... window opening during installation or removal. AB Position Air Conditioner NOTES: Handle the air conditioner gently. Window sash behind windowsill NOTE: Your model may differ from a grounded outlet. Install top channel with four 13/32" screws. 2. C D B A. Side curtain against damage of the air conditioner. Mark the center line on the outside of the unit finish. Repeat for Installation 1. The place where the power cord exits the air conditioner...
User Manual
Page 7
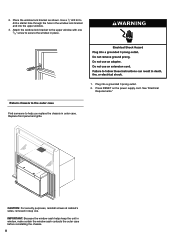
.... A. Lower sash until it rests behind window sill. Bottom channel 2. Foam seal 7 Install bolt(2 1/2" long flat head bolt and locknut) to the installation bracket and adjust them to proper length ,then use 6 (13/32")screws to drive, drill a pilot hole into the sash through clearance hole in curtains. Top of the air conditioner falls between the studs in...
.... A. Lower sash until it rests behind window sill. Bottom channel 2. Foam seal 7 Install bolt(2 1/2" long flat head bolt and locknut) to the installation bracket and adjust them to proper length ,then use 6 (13/32")screws to drive, drill a pilot hole into the sash through clearance hole in curtains. Top of the air conditioner falls between the studs in...
User Manual
Page 8
... to the outer case Find someone to secure the window in outer case. CAUTION: For security purposes, reinstall screws at cabinet's sides, removed in step one 31⁄32" screw to help you replace the chassis in place. Place the window lock bracket as shown. Press RESET on the power supply cord. Plug into the upper window. 3. See "Electrical Requirements." Replace front panel and grille. 1.
... to the outer case Find someone to secure the window in outer case. CAUTION: For security purposes, reinstall screws at cabinet's sides, removed in step one 31⁄32" screw to help you replace the chassis in place. Place the window lock bracket as shown. Press RESET on the power supply cord. Plug into the upper window. 3. See "Electrical Requirements." Replace front panel and grille. 1.
User Manual
Page 9
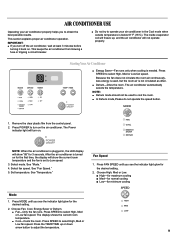
... from blowing a fuse or tripping a circuit breaker. ■ Do not try to obtain the best possible results. NOTE: When the air conditioner is plugged in the Cool mode when outside temperature is turned on . Choose Fan, Cool, Energy Saver or Dehum. ■ Fan-Only the fan runs. The air conditioner automatically selects the temperature. NOTE: ■ Dehum mode should not be used , but the room air is needed. See "Temperature." Press MODE until you turn on . Starting YourAir Conditioner ■ Energy Saver-Fan...
... from blowing a fuse or tripping a circuit breaker. ■ Do not try to obtain the best possible results. NOTE: When the air conditioner is plugged in the Cool mode when outside temperature is turned on . Choose Fan, Cool, Energy Saver or Dehum. ■ Fan-Only the fan runs. The air conditioner automatically selects the temperature. NOTE: ■ Dehum mode should not be used , but the room air is needed. See "Temperature." Press MODE until you turn on . Starting YourAir Conditioner ■ Energy Saver-Fan...
User Manual
Page 10
..., the display on the air conditioner, changing the previous settings: 1. Temperature ■ Press the TEMP/TIME up 1ºF until it reaches 86°F (30°C). NOTE: After 5 seconds, the display will show the current room temperature. ■ Press the TEMP/TIME down arrow button to turn off. 2. Display will show the current room temperature. Timer On indicator light will flash. For Fan, Cool or Energy Saver mode, adjust the fan speed to Fan, Cool, Energy Saver or...
..., the display on the air conditioner, changing the previous settings: 1. Temperature ■ Press the TEMP/TIME up 1ºF until it reaches 86°F (30°C). NOTE: After 5 seconds, the display will show the current room temperature. ■ Press the TEMP/TIME down arrow button to turn off. 2. Display will show the current room temperature. Timer On indicator light will flash. For Fan, Cool or Energy Saver mode, adjust the fan speed to Fan, Cool, Energy Saver or...
User Manual
Page 11
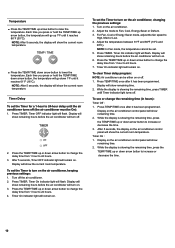
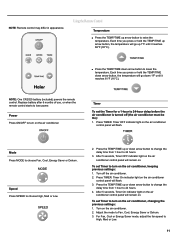
Timer OFF indicator light on the air conditioner control panel will flash. Timer On indicator light on the air conditioner control panel will flash. 3. For Fan, Cool or Energy Saver mode, adjust the fan speed to raise the temperature. Using the Remote Control Temperature ■ Press the TEMP/TIME up arrow button to High, Med or Low. 11 Power Press ON/OFF to choose Fan, Cool, Energy Saver or Dehum. Mode Press MODE to turn on the air conditioner, keeping previous settings: 1. Press TIMER. Press the...
Timer OFF indicator light on the air conditioner control panel will flash. Timer On indicator light on the air conditioner control panel will flash. 3. For Fan, Cool or Energy Saver mode, adjust the fan speed to raise the temperature. Using the Remote Control Temperature ■ Press the TEMP/TIME up arrow button to High, Med or Low. 11 Power Press ON/OFF to choose Fan, Cool, Energy Saver or Dehum. Mode Press MODE to turn on the air conditioner, keeping previous settings: 1. Press TIMER. Press the...
User Manual
Page 12
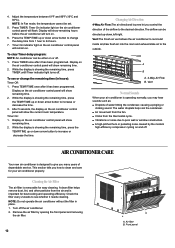
... Fan mode, the temperature cannot be directed up or down ,left-right. Timer On indicator light on the air conditioner control panel will show remaining time. 2. Press TEMP/TIME once after it needs cleaning. While the display is important for best cooling and operating efficiency. Timer On : 1. Display on the air conditioner control panel will show remaining time. 2. Vent:The Fresh air vent allows the air conditioner to recirculat inside air,draw fresh air into the room and exhaust stale air...
... Fan mode, the temperature cannot be directed up or down ,left-right. Timer On indicator light on the air conditioner control panel will show remaining time. 2. Press TEMP/TIME once after it needs cleaning. While the display is important for best cooling and operating efficiency. Timer On : 1. Display on the air conditioner control panel will show remaining time. 2. Vent:The Fresh air vent allows the air conditioner to recirculat inside air,draw fresh air into the room and exhaust stale air...
User Manual
Page 13
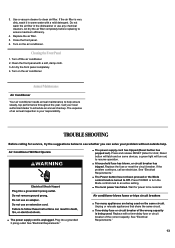
... "Electrical Requirements." 13 Close the front panel. 6. 3. Cleaning the Front Panel 1. Turn off the air conditioner. 2. Turn on the air conditioner. Reset button will latch and on some devices, a green light will turn the Mode control knob to resume operation. ■ A household fuse has blown, or circuit breaker has tripped. Press POWER or turn on the same circuit. Call your responsibility. If the problem continues, call an electrician. Replace with a soft, damp cloth. 3. Air dry the air fi...
... "Electrical Requirements." 13 Close the front panel. 6. 3. Cleaning the Front Panel 1. Turn off the air conditioner. 2. Turn on the air conditioner. Reset button will latch and on some devices, a green light will turn the Mode control knob to resume operation. ■ A household fuse has blown, or circuit breaker has tripped. Press POWER or turn on the same circuit. Call your responsibility. If the problem continues, call an electrician. Replace with a soft, damp cloth. 3. Air dry the air fi...
User Manual
Page 14
... a hole into your room air conditioner. Refer to resume operation. Set the Fan Speed control to exhaust heat or moisture from the product manufacturer and must not be accustomed to from cabinet into the bottom of your house ■ The air conditioner is not properly leveled. Clean the filter. ■ There is excessive heat or moisture (open . Do not use in use an extension cord with a new power supply cord obtained...
... a hole into your room air conditioner. Refer to resume operation. Set the Fan Speed control to exhaust heat or moisture from the product manufacturer and must not be accustomed to from cabinet into the bottom of your house ■ The air conditioner is not properly leveled. Clean the filter. ■ There is excessive heat or moisture (open . Do not use in use an extension cord with a new power supply cord obtained...
User Manual
Page 15
... call Haier America toll free: 1-877-337-3639. Manufacturer-authorized service technicians are trained to repair parts distributors, and service companies. To locate factory-specified replacement parts in the Canada. Please record the model and serial number information below . Model Number Serial Number Purchase Date Store Name Store Address Store Phone Keep this information on our appliances. ■ Installation information. ■ Use and maintenance procedures. ■ Repair parts sales...
... call Haier America toll free: 1-877-337-3639. Manufacturer-authorized service technicians are trained to repair parts distributors, and service companies. To locate factory-specified replacement parts in the Canada. Please record the model and serial number information below . Model Number Serial Number Purchase Date Store Name Store Address Store Phone Keep this information on our appliances. ■ Installation information. ■ Use and maintenance procedures. ■ Repair parts sales...
User Manual
Page 16
... AND FITNESS FOR A PARTICULAR PURPOSE. This warranty covers units within the continental United States, Canada and Puerto Rico. 16 Damages in providing service, repair or replacement. 11. Damages from improper installation. 2. Refurbished product purchased as proof of the date of 12 months. In commercial or rental use, the additional limited compressor warranty is 90 days. Decorative trims or replaceable light bulbs. 8. Some states do not...
... AND FITNESS FOR A PARTICULAR PURPOSE. This warranty covers units within the continental United States, Canada and Puerto Rico. 16 Damages in providing service, repair or replacement. 11. Damages from improper installation. 2. Refurbished product purchased as proof of the date of 12 months. In commercial or rental use, the additional limited compressor warranty is 90 days. Decorative trims or replaceable light bulbs. 8. Some states do not...


