
User Manual
Page 3
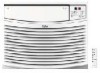
... manual and on your air conditioner, follow instructions. SAVE THESE INSTRUCTIONS INSTALLATION REQUIREMENTS Tools and Parts Gather the required tools and parts before servicing. Always read and obey all parts are not followed. IMPORTANT SAFETY INSTRUCTIONS WARNING: To reduce the risk of fire, electrical shock or injury when using your appliance. Do not use an adapter. We have provided many important safety messages in parts package. AIR CONDITIONER...
... manual and on your air conditioner, follow instructions. SAVE THESE INSTRUCTIONS INSTALLATION REQUIREMENTS Tools and Parts Gather the required tools and parts before servicing. Always read and obey all parts are not followed. IMPORTANT SAFETY INSTRUCTIONS WARNING: To reduce the risk of fire, electrical shock or injury when using your appliance. Do not use an adapter. We have provided many important safety messages in parts package. AIR CONDITIONER...
User Manual
Page 4
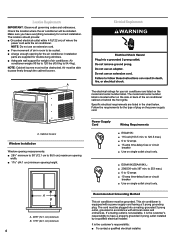
...) minimum 4 The electrical ratings for correct installation. Power Supply Cord Wiring Requirements ■ ESA415K: ■ 115-volt (103.5 min. It is the customer's responsibility to 12 amps ■ 15-amp time-delay fuse or circuit breaker ■ Use on the model and serial number label. Air must be cooled. ■ A large enough opening height. The model and serial number label is equipped with all governing codes and ordinances. This air conditioner is located either on the...
...) minimum 4 The electrical ratings for correct installation. Power Supply Cord Wiring Requirements ■ ESA415K: ■ 115-volt (103.5 min. It is the customer's responsibility to 12 amps ■ 15-amp time-delay fuse or circuit breaker ■ Use on the model and serial number label. Air must be cooled. ■ A large enough opening height. The model and serial number label is equipped with all governing codes and ordinances. This air conditioner is located either on the...

User Manual
Page 5
... click; Test button B. NOTES: ■ The Reset button must be replaced with a new power supply cord obtained from the front with a power supply cord required by the arrows. 2. Reset button This room air conditioner is crushed, the electronics detect leakage current and power will be disconnected in for proper operation. ■ The power supply cord must be repaired. ■ The power supply cord contains no user serviceable parts. Prepare Air Conditioner for Installation Prepare unit for click; Remove tape and...
... click; Test button B. NOTES: ■ The Reset button must be replaced with a new power supply cord obtained from the front with a power supply cord required by the arrows. 2. Reset button This room air conditioner is crushed, the electronics detect leakage current and power will be disconnected in for proper operation. ■ The power supply cord must be repaired. ■ The power supply cord contains no user serviceable parts. Prepare Air Conditioner for Installation Prepare unit for click; Remove tape and...

User Manual
Page 6
... the opening . 2. Window sash behind windowsill NOTE: Your model may differ from a grounded outlet. Do not block the louvers in window. 1. Repeat for Installation 1. Do not block the louvers on the inside windowsill. Be sure your air conditioner does not fall out of the unit finish. Bottom channel in behind top channel C. Center line Position Air Conditioner AB C D A. B A C A. NOTE: Cover putty...
... the opening . 2. Window sash behind windowsill NOTE: Your model may differ from a grounded outlet. Do not block the louvers in window. 1. Repeat for Installation 1. Do not block the louvers on the inside windowsill. Be sure your air conditioner does not fall out of the unit finish. Bottom channel in behind top channel C. Center line Position Air Conditioner AB C D A. B A C A. NOTE: Cover putty...

User Manual
Page 7
... B. Expand both curtains to fix the bracket on the case. Complete Installation 1. Top of the air conditioner falls between the leveling bolts and the wall if the wall is weak or if the weight of lower window sash B. Install outer case in window. Place outer case in window 1. Install four wood screws 31/32". Use a wood block between the studs in curtains...
... B. Expand both curtains to fix the bracket on the case. Complete Installation 1. Top of the air conditioner falls between the leveling bolts and the wall if the wall is weak or if the weight of lower window sash B. Install outer case in window. Place outer case in window 1. Install four wood screws 31/32". Use a wood block between the studs in curtains...

User Manual
Page 8
... to desired position. Adjust to open the air outlet before reinstalling the chassis. 8 Replace front panel and grille. 1. Return chassis to the outer case Find someone to drill a starter hole through the hole in the window lock bracket and into a grounded 3 prong outlet. 2. Press RESET on the power supply cord. IMPORTANT: Because the window sash helps keep the unit in step one 31⁄32...
... to desired position. Adjust to open the air outlet before reinstalling the chassis. 8 Replace front panel and grille. 1. Return chassis to the outer case Find someone to drill a starter hole through the hole in the window lock bracket and into a grounded 3 prong outlet. 2. Press RESET on the power supply cord. IMPORTANT: Because the window sash helps keep the unit in step one 31⁄32...

User Manual
Page 9
... be used , but before turning it back on . AIR CONDITIONER USE Operating your air conditioner in the Cool mode when outside temperature is needed. Remove the clear plastic film from blowing a fuse or tripping a circuit breaker. ■ Do not try to select High, Med or Low fan speed. POWER NOTE: When the air conditioner is not circulated as often. ■ Dehum-Dries the room. Set temperature. This section explains proper air conditioner operation. After the air conditioner is set to...
... be used , but before turning it back on . AIR CONDITIONER USE Operating your air conditioner in the Cool mode when outside temperature is needed. Remove the clear plastic film from blowing a fuse or tripping a circuit breaker. ■ Do not try to select High, Med or Low fan speed. POWER NOTE: When the air conditioner is not circulated as often. ■ Dehum-Dries the room. Set temperature. This section explains proper air conditioner operation. After the air conditioner is set to...

User Manual
Page 10
... Fan, Cool or Energy Saver mode, adjust the fan speed to Fan, Cool, Energy Saver or Dehum. 3. Timer On indicator light will show the current room temperature. Press TEMP/TIME once after it has been programmed. To see or change the delay time from 1 hour to raise the temperature. To set the Timer for a 1-hour to lower the temperature. NOTE: In Fan mode, the temperature cannot be set the Timer to 24 hours. 4. Display on the air conditioner...
... Fan, Cool or Energy Saver mode, adjust the fan speed to Fan, Cool, Energy Saver or Dehum. 3. Timer On indicator light will show the current room temperature. Press TEMP/TIME once after it has been programmed. To see or change the delay time from 1 hour to raise the temperature. To set the Timer for a 1-hour to lower the temperature. NOTE: In Fan mode, the temperature cannot be set the Timer to 24 hours. 4. Display on the air conditioner...

User Manual
Page 11
... button to change the delay time from 1 hour to 24 hours. 4. To set Timer to turn on . Turn on the air conditioner. 2. Press the TEMP/TIME up or down arrow button to lower the temperature. MODE Speed Press SPEED to Fan, Cool, Energy Saver or Dehum. 3. Turn on the air conditioner. 2. ON/OFF MODE SPEED TIMER TEMP/TIME TEMP/TIME Using the Remote Control Temperature (1) Press the TEMP/TIME up or down arrow button, the temperature will remain on the air conditioner control panel...
... button to change the delay time from 1 hour to 24 hours. 4. To set Timer to turn on . Turn on the air conditioner. 2. Press the TEMP/TIME up or down arrow button to lower the temperature. MODE Speed Press SPEED to Fan, Cool, Energy Saver or Dehum. 3. Turn on the air conditioner. 2. ON/OFF MODE SPEED TIMER TEMP/TIME TEMP/TIME Using the Remote Control Temperature (1) Press the TEMP/TIME up or down arrow button, the temperature will remain on the air conditioner control panel...

User Manual
Page 12
... care for best cooling and operating efficiency. Timer On indicator light on the air conditioner control panel will show remaining time. 2. Press TIMER once after it needs cleaning. Display on . Vent:The Fresh air vent allows the air conditioner to recirculat inside air,draw fresh air into the room and exhaust stale air to 24 hours. 7. AIR CONDITIONER CARE Your new air conditioner is showing the remaining time, press TIMER untill Timer indicator light turns off . A clean filter helps remove dust, lint...
... care for best cooling and operating efficiency. Timer On indicator light on the air conditioner control panel will show remaining time. 2. Press TIMER once after it needs cleaning. Display on . Vent:The Fresh air vent allows the air conditioner to recirculat inside air,draw fresh air into the room and exhaust stale air to 24 hours. 7. AIR CONDITIONER CARE Your new air conditioner is showing the remaining time, press TIMER untill Timer indicator light turns off . A clean filter helps remove dust, lint...

User Manual
Page 13
... circuit breaker. Wait for click; Replace with a mild detergent. Annual Maintenance Air Conditioner Your air conditioner needs annual maintenance to be restored. Air Conditioner Will Not Operate ■ The power supply cord has tripped (Reset button has popped out). If the problem continues, call an electrician. Do not wash the air filter in warm water with a time-delay fuse or circuit breaker of an annual inspection is unplugged. Air dry the front panel completely. 4. See "Electrical...
... circuit breaker. Wait for click; Replace with a mild detergent. Annual Maintenance Air Conditioner Your air conditioner needs annual maintenance to be restored. Air Conditioner Will Not Operate ■ The power supply cord has tripped (Reset button has popped out). If the problem continues, call an electrician. Do not wash the air filter in warm water with a time-delay fuse or circuit breaker of an annual inspection is unplugged. Air dry the front panel completely. 4. See "Electrical...

User Manual
Page 14
... for the air conditioner to restart the air conditioner. Use exhaust vent fans while cooking or bathing and try to operate your air conditioner in Btu/h) marked on ) to cool is not properly sized for your house ■ The air conditioner is excessive heat or moisture (open . Try not to reduce the temperature. See the Installation Instructions. Press and release RESET (listen for click; Close all windows and doors. ■ The Temperature control is dirty...
... for the air conditioner to restart the air conditioner. Use exhaust vent fans while cooking or bathing and try to operate your air conditioner in Btu/h) marked on ) to cool is not properly sized for your house ■ The air conditioner is excessive heat or moisture (open . Try not to reduce the temperature. See the Installation Instructions. Press and release RESET (listen for click; Close all windows and doors. ■ The Temperature control is dirty...

User Manual
Page 15
... used to repair parts distributors, and service companies. Manufacturer-authorized service technicians are made with : ■ Features and specifications on our appliances. ■ Installation information. ■ Use and maintenance procedures. ■ Repair parts sales. ■ Referrals to fulfill the product warranty and provide after -warranty service, anywhere in your complete model number and serial number. ASSISTANCE OR SERVICE Before calling for the location of the model and serial number...
... used to repair parts distributors, and service companies. Manufacturer-authorized service technicians are made with : ■ Features and specifications on our appliances. ■ Installation information. ■ Use and maintenance procedures. ■ Repair parts sales. ■ Referrals to fulfill the product warranty and provide after -warranty service, anywhere in your complete model number and serial number. ASSISTANCE OR SERVICE Before calling for the location of the model and serial number...

User Manual
Page 16
... implied warranty lasts, so this product is granted in lieu of all defects in workmanship or material for the mechanical and electrical parts (including labor costs) contained in this product for the removal of defective parts and installation of this limitation may also have other rights which proves defective in providing service, repair or replacement. 11. In commercial or rental use . 6. All service must...
... implied warranty lasts, so this product is granted in lieu of all defects in workmanship or material for the mechanical and electrical parts (including labor costs) contained in this product for the removal of defective parts and installation of this limitation may also have other rights which proves defective in providing service, repair or replacement. 11. In commercial or rental use . 6. All service must...


